
Edge Threat Radar (Cloudflare)
Connect your Cloudflare account so the Edge Threat Radar can correlate adversary traffic with your posture. Read-only by default; one Edit scope for the optional approval-gated blocklist.
The Cloudflare integration powers the Edge Threat Radar. WASViking® reads WAF, Firewall, and Bot signals from your Cloudflare account via the GraphQL API and correlates them with your open findings, amplifying the Risk Score when adversary traffic matches a real exposure.
What this integration does
- Pulls Cloudflare WAF, Firewall, and Bot events at a 5-minute cadence.
- Correlates events to open Findings and amplifies the Risk Score.
- Enriches IPs with AbuseIPDB and ThreatFox.
- Powers the Edge Threat Radar dashboard, the AI assistant scoped to edge events, and multi-channel alerts.
- Optionally maintains a WASViking-managed dynamic IP blocklist in your Cloudflare account, with one important guardrail: no IP is blocked automatically. Each block is gated on explicit customer approval, per event.
Access posture
- Read-only by default. No traffic is intercepted, no rules are pushed, no DNS is changed.
- One exception: the optional dynamic blocklist needs an
Editscope onAccount Filter Lists. It is used only to write IPs the customer has explicitly approved. - Revocable at any time from the Cloudflare side (delete the API token).
Pre-requisites
| Requirement | Detail |
|---|---|
| Cloudflare account | Active. |
| Plan | Pro or higher (required for the API surfaces WASViking reads). |
| Domains | Already proxied through Cloudflare. |
| Cloudflare permissions | Administrative access to the account. |
| WASViking plan | Edge Threat Radar module enabled (Pro plan and above). |
Step 1: Enable the required Cloudflare features
These three features must be on at the zone level. If any is off, the events WASViking reads will be empty.
1.1 WAF
Cloudflare Dashboard → select your domain → Security → WAF.
- WAF must be Enabled.
- Under Managed Rules, enable:
- Cloudflare Managed Rules
- OWASP Core Rule Set
1.2 Firewall Rules
Security → WAF → Firewall Rules.
- Confirm there is at least one active rule. If none exist, create a minimal log-only rule. Empty rule sets produce empty event streams.
1.3 Bot Protection
Security → Bot traffic → Settings.
Enable the best option available on your plan:
| Option | Available on |
|---|---|
| Bot Fight Mode (minimum) | Free, Pro |
| Super Bot Fight Mode (recommended) | Pro, Business |
| Bot Management (best signal) | Enterprise |
Step 2: Create the API token
WASViking reads data via the Cloudflare API (GraphQL). Create a dedicated Custom Token, read-only except for the optional blocklist.
2.1 Create the token
- Cloudflare → My Profile → API Tokens → Create Token.
- Select Create Custom Token.
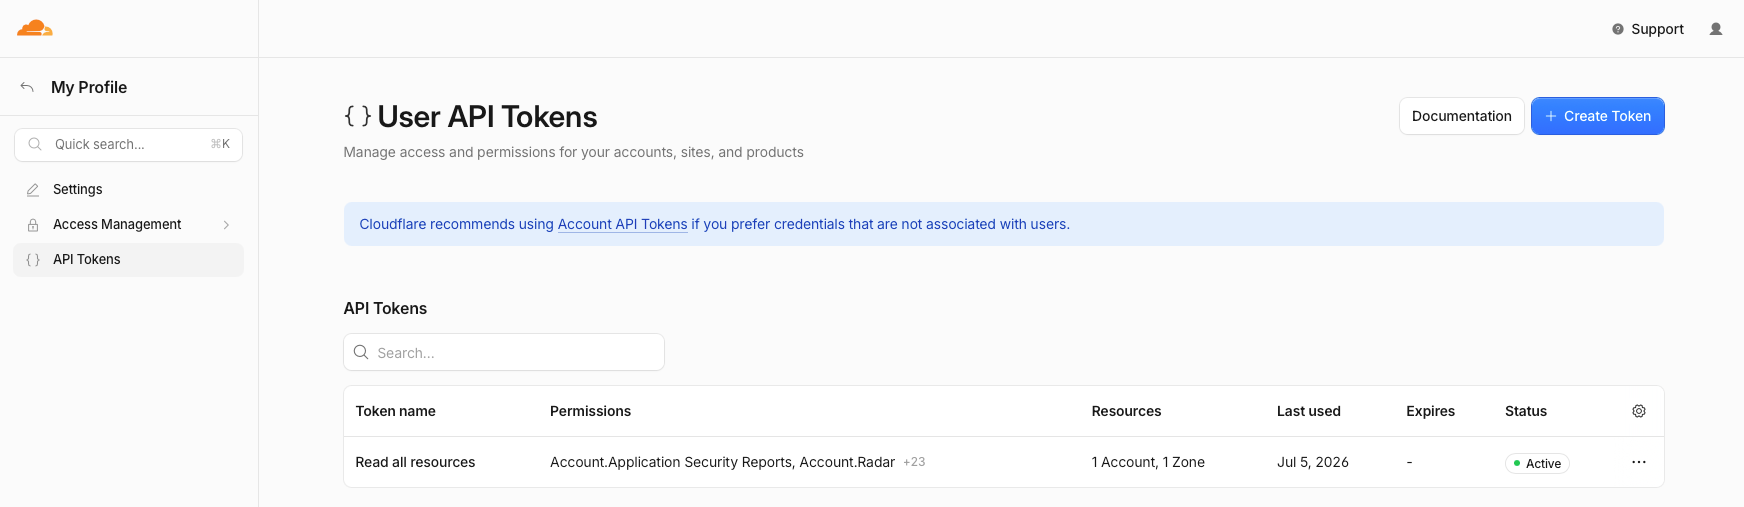
2.2 Account permissions
| Permission | Access |
|---|---|
| Account Analytics | Read |
| Account Firewall Access Rules | Read |
| Account WAF | Read |
| DDoS Protection | Read |
| Logs | Read |
| Radar | Read |
| Application Security Reports | Read |
| Cloudforce One | Read |
| DDoS Botnet Feed | Read |
| Intel | Read |
| DNS Firewall | Read |
| URL Scanner | Read |
| Account Filter Lists | Edit (only if you want the customer-approved dynamic blocklist; otherwise skip) |
The
Editon Account Filter Lists is the only non-read scope. WASViking uses it solely to execute customer-approved IP blocks. Each block is preceded by an email notification with the event details and an explicit approve step. No IP is added without that.
2.3 Zone permissions
| Permission | Access |
|---|---|
| Zone | Read |
| Analytics | Read |
| Logs | Read |
| Firewall Services | Read |
| Zone WAF | Read |
| Bot Management | Read |
| HTTP DDoS Managed Ruleset | Read |
| SSL and Certificates | Read |
| DNS | Read |
| API Gateway | Read |
| Page Shield | Read |
| Fraud Detection | Read |
| Managed Headers | Read |
DNS (Read) lets WASViking read the zone's DNS records as an extra subdomain discovery source. It surfaces hosts hidden behind a wildcard certificate, which public certificate logs cannot enumerate, and feeds Certificate Monitoring. It stays strictly read-only: no DNS record is ever created or changed. If this scope is missing, discovery simply falls back to the public sources and the rest of the integration is unaffected.
Do not grant any
Editscope you do not need. Least privilege wins.
2.4 Scope the token
Under Resources:
- Include → Specific Account → your account.
- Include → Specific Zones → only the domains you want monitored.
2.5 Create and save the token
- Click Continue to summary → Create Token.
- Copy the token immediately. Cloudflare does not show it again.
Step 3: Create the Cloudflare lists
Create these lists in Cloudflare before you configure the portal. The portal's Load Lists button (Step 4) can only show lists that already exist in your Cloudflare account, so this step comes first.
Both are Account Filter Lists, created under Cloudflare → Security → Settings → IP Lists.
| List | Purpose | Needed |
|---|---|---|
wasviking_whitelist |
Your own infrastructure IPs and CIDR blocks. WASViking treats these as trusted, so they are never raised as adversary traffic. This is how you suppress false positives from known-good sources. | Recommended |
wasviking_edge_blocklist |
The list the Edge Threat Radar writes to when you approve a risky IP for blocking in the portal. Create it even though it starts empty; the Radar populates it over time. | Required |
3.1 Infrastructure allowlist (recommended)
Cloudflare → Security → Settings → IP Lists → Create List.
| Field | Value |
|---|---|
| Name | wasviking_whitelist |
| Kind | IP |
| Description | Trusted infrastructure IPs excluded from Edge Threat Radar detections |
Add every IP or CIDR block that belongs to your own infrastructure: office ranges, VPN egress, monitoring, CI runners, partner systems. Click Create. You can keep adding entries at any time; WASViking re-reads the list on each poll, so a known-good source flagged as a false positive can be cleared simply by adding it here.
3.2 Dynamic blocklist (required)
Create this list even though it starts empty. The Edge Threat Radar writes to it whenever you approve a risky IP for blocking from the portal, so it must exist for that flow to work.
Cloudflare → Security → Settings → IP Lists → Create List.
| Field | Value |
|---|---|
| Name | wasviking_edge_blocklist |
| Kind | IP |
| Description | Dynamic IP blocklist managed by WASViking Edge Threat Radar |
Click Create. The list appears with kind = ip and 0 records.
It stays empty until you approve your first block in the portal. The
security rule that actually enforces this list is created later, in
Step 5.
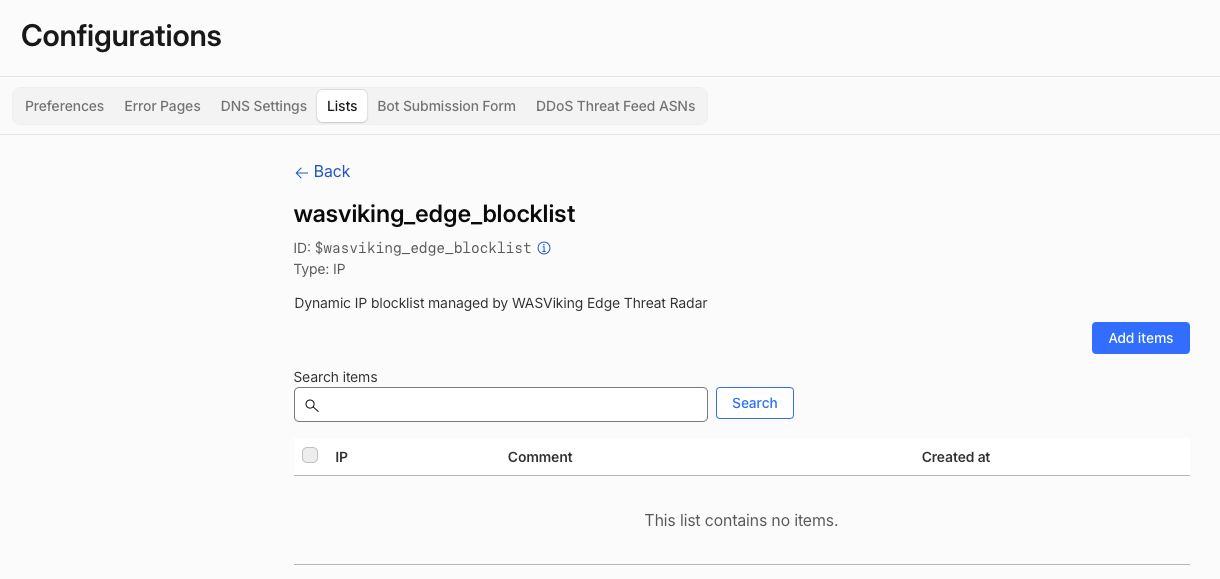 The new list under Manage account → Configurations → Lists.
Step 4: Configure on the WASViking side
In the portal, go to Settings → System Settings → Edge Threat Radar. The Cloudflare Edge Settings card lists the zones already connected to this organization, each with its Zone ID, lookback window, status, and last run.
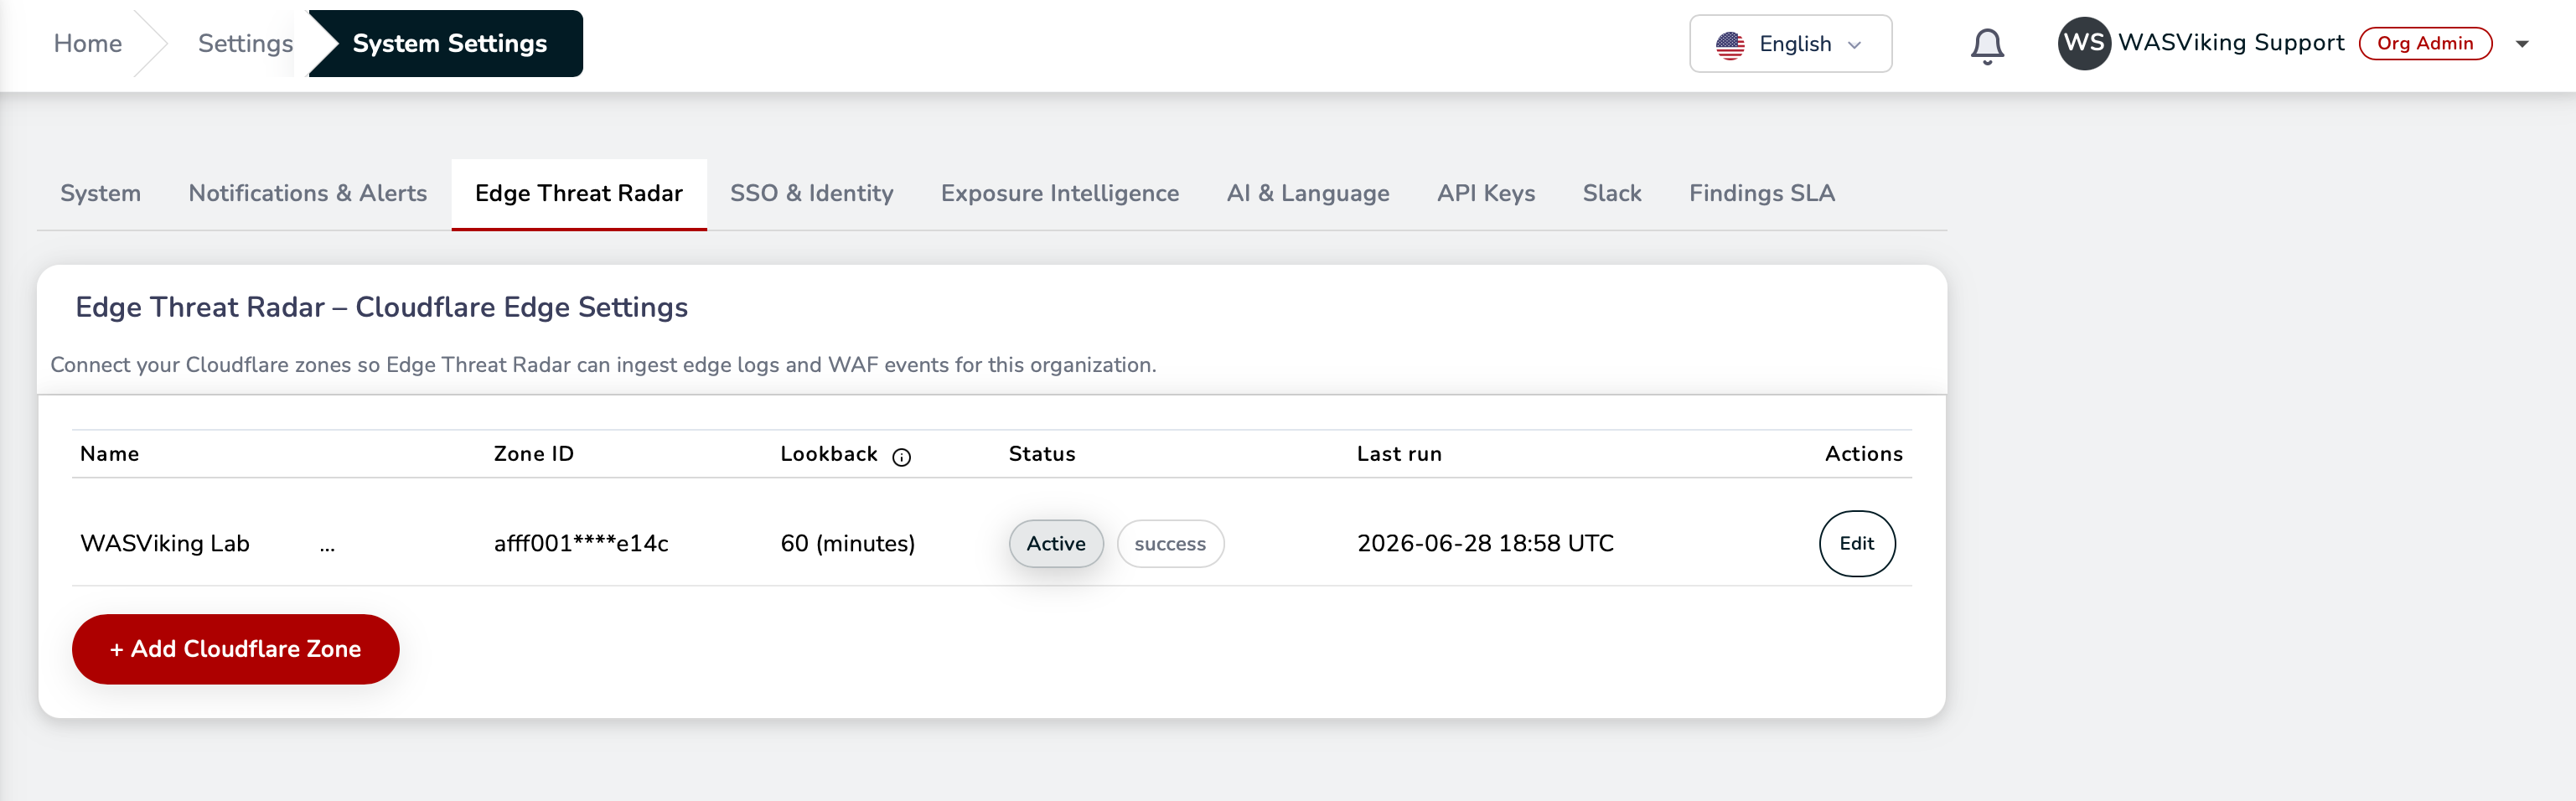 Settings → System Settings → Edge Threat Radar.
4.1 Add a zone
Click + Add Cloudflare Zone. The Cloudflare Edge Configuration dialog opens.
Fill in Zone ID, Account ID, and the API Token first, and check they are correct. The Custom List and Infrastructure IP List dropdowns are populated by Load Lists, which reads your Cloudflare account using exactly those three values. If any of them is wrong or missing, the dropdowns come up empty, you cannot select the lists, and the integration will not monitor as expected.
Fill it in:
| Field | Value |
|---|---|
| Name | A label for this zone (for example, the domain it covers). |
| Zone ID | Cloudflare Dashboard → select the zone → Overview → Zone ID. |
| Account ID | Cloudflare Dashboard → Overview → Account ID. |
| API Token | Paste the token from Step 2.5. It is stored encrypted and never shown again after saving. |
| Custom List | Click Load Lists, then select wasviking_edge_blocklist (created in Step 3.2). This is where the Radar writes IPs you approve for blocking. |
| Infrastructure IP List | Click Load Lists, then select wasviking_whitelist (created in Step 3.1). This is what tells the Edge to treat those IPs as trusted and not raise them as threats. |
| Default lookback (minutes) | How far back each poll reads. 60 is a good default. |
| Enable this configuration for Edge Intel ingestion | Turn on to start ingestion for this zone. |
If the values are correct but Load Lists still returns nothing, the API Token is missing the
Account Filter Listsscope (Step 2.2).
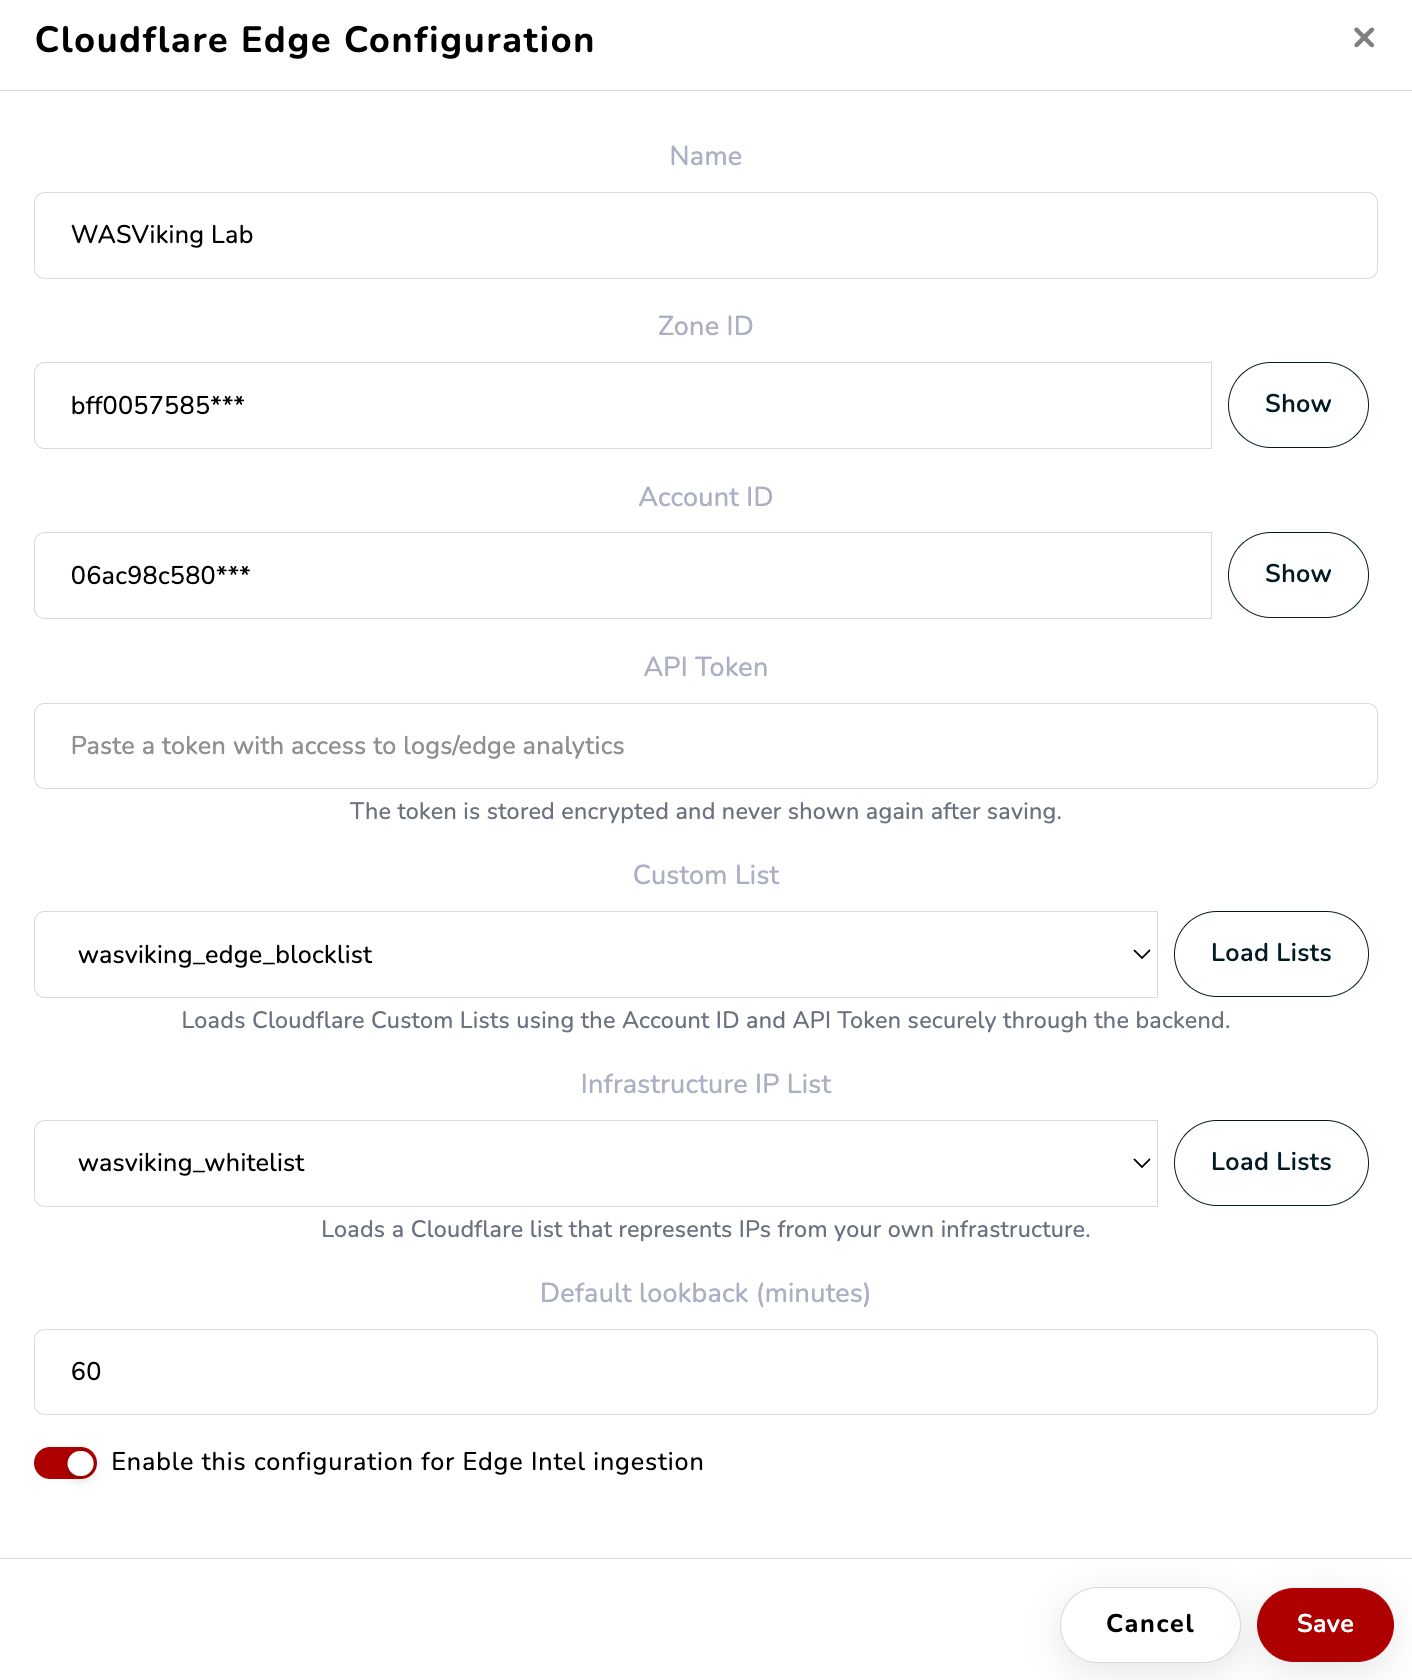 The Cloudflare Edge Configuration dialog opened from + Add Cloudflare Zone.
4.2 Save and confirm
Click Save. The zone returns to the list. Once the first poll succeeds, its row shows Active with a success badge and a Last run timestamp, and the Edge Threat Radar dashboard begins to populate within a few minutes. To change any field later, use Edit on the zone row.
What WASViking collects
Per Cloudflare event:
- Source IP.
- Country and ASN.
- Attack type.
- WAF rule triggered.
- URL attacked.
- Bot score.
- Action applied by Cloudflare (challenge, block, log).
- Timestamp.
Each event is enriched with AbuseIPDB and ThreatFox reputation, correlated to open Findings, and surfaced on the Edge Threat Radar dashboard.
Step 5: Enforce blocks with a security rule
This rule is what makes Cloudflare act on wasviking_edge_blocklist.
Without it, IPs you approve in the portal are added to the list but are
never actually blocked at the edge.
This step comes after Step 3.2 on purpose. The rule's condition picks the list from a selector, so
wasviking_edge_blocklistmust already exist; if it was not created first, it will not appear there.
5.1 Create the security rule
Cloudflare → Security → Security Rules → Create rule → Custom rules.
Configure:
| Field | Value |
|---|---|
| Rule name | wasviking_edge_blocklist |
| Condition | IP Source Address is in list wasviking_edge_blocklist |
| Action | Block |
| Response type | Default Cloudflare WAF block page |
| Response code | 403 |
Add an exclusion for the WASViking scanner egress IPs so security tests
are never caught by this rule. With the not ... is in rows added, the
expression looks like:
(ip.src in $wasviking_edge_blocklist
  and not ip.src in {SCANNER_IP_1}
  and not ip.src in {SCANNER_IP_2}
  and not ip.src in {SCANNER_IP_3})
Replace the placeholders with the current WASViking scanner egress IPs.
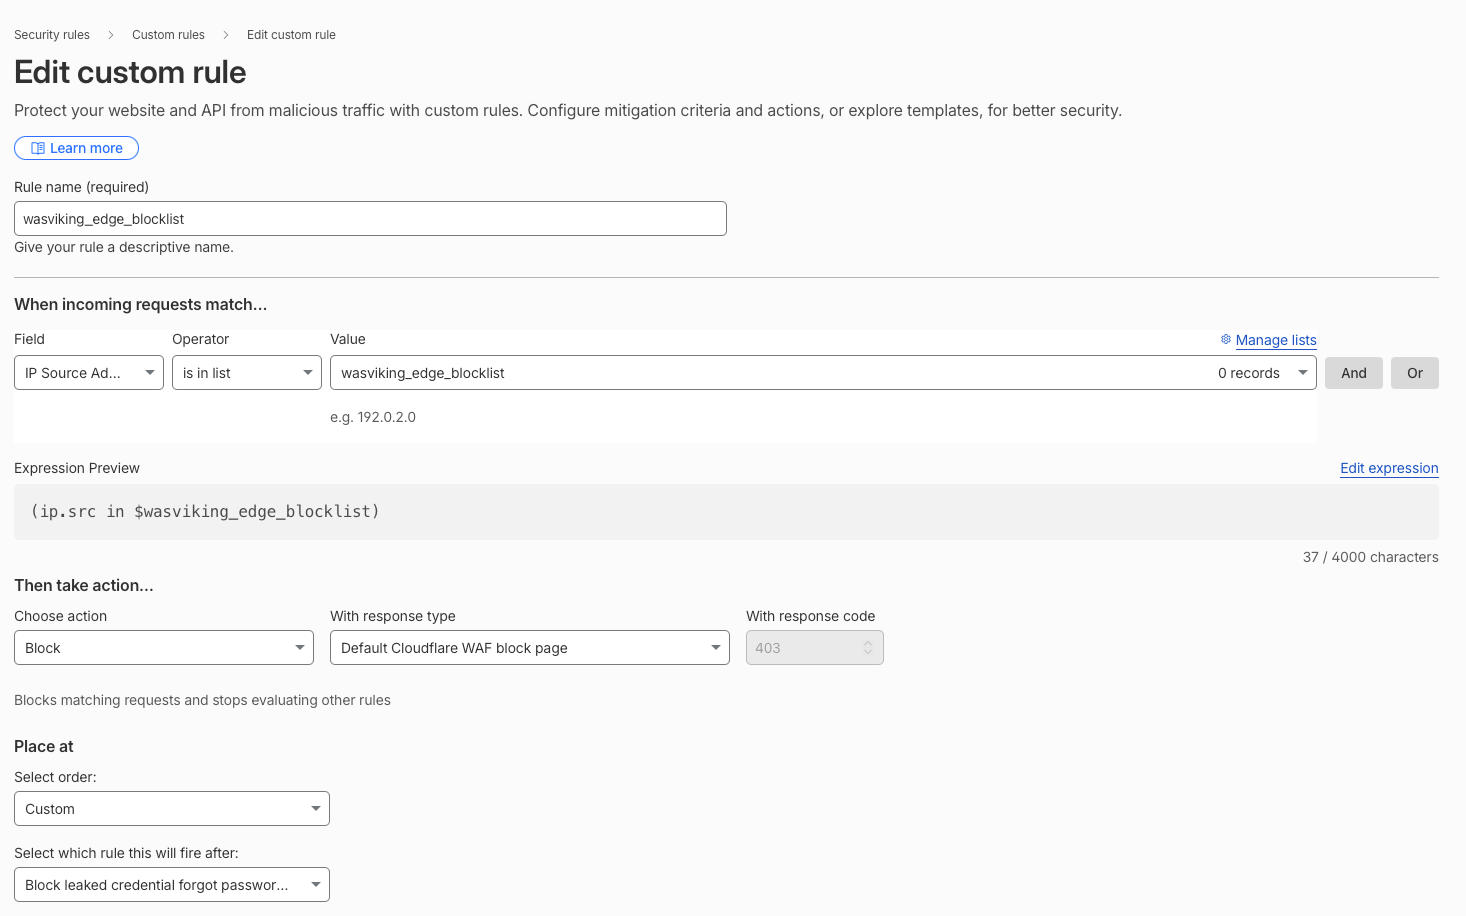 Condition: IP Source Address is in list wasviking_edge_blocklist.
Click Deploy.
5.2 Keep trusted IPs from being blocked
Your own infrastructure is already protected if you set the zone's
Infrastructure IP List to wasviking_whitelist (Step 3.1 and 4.1):
WASViking treats those addresses as trusted and never adds them to the
blocklist.
The security rule above also keeps a small set of WASViking scanner
egress IPs out of the block via the not ip.src in {...} clause. Keep
that clause in place so security tests are never blocked by your own
rule.
5.3 Approval flow (how blocks actually happen)
Edge event detected
        │
        ▼
WASViking risk amplification
        │
        ▼
Notification email to the operator (event details + approve link)
        │
        ▼
Operator approves in the portal
        │
        ▼
WASViking writes the IP to wasviking_edge_blocklist
        │
        ▼
Cloudflare custom rule blocks the IP at the edge
No IP reaches the blocklist without the operator step. The approve / reject decision is captured in the audit log on both sides.
Your first results
Once the zone is saved and enabled, the first poll runs within a few minutes and the Edge Threat Radar dashboard (Dashboard → Edge Intelligence) starts to fill in: a global attack map, classification breakdown, and a ranked list of top attackers with country, risk score, request volume, and last-seen time. From here you can open any IP for full intelligence and approve a block when warranted.
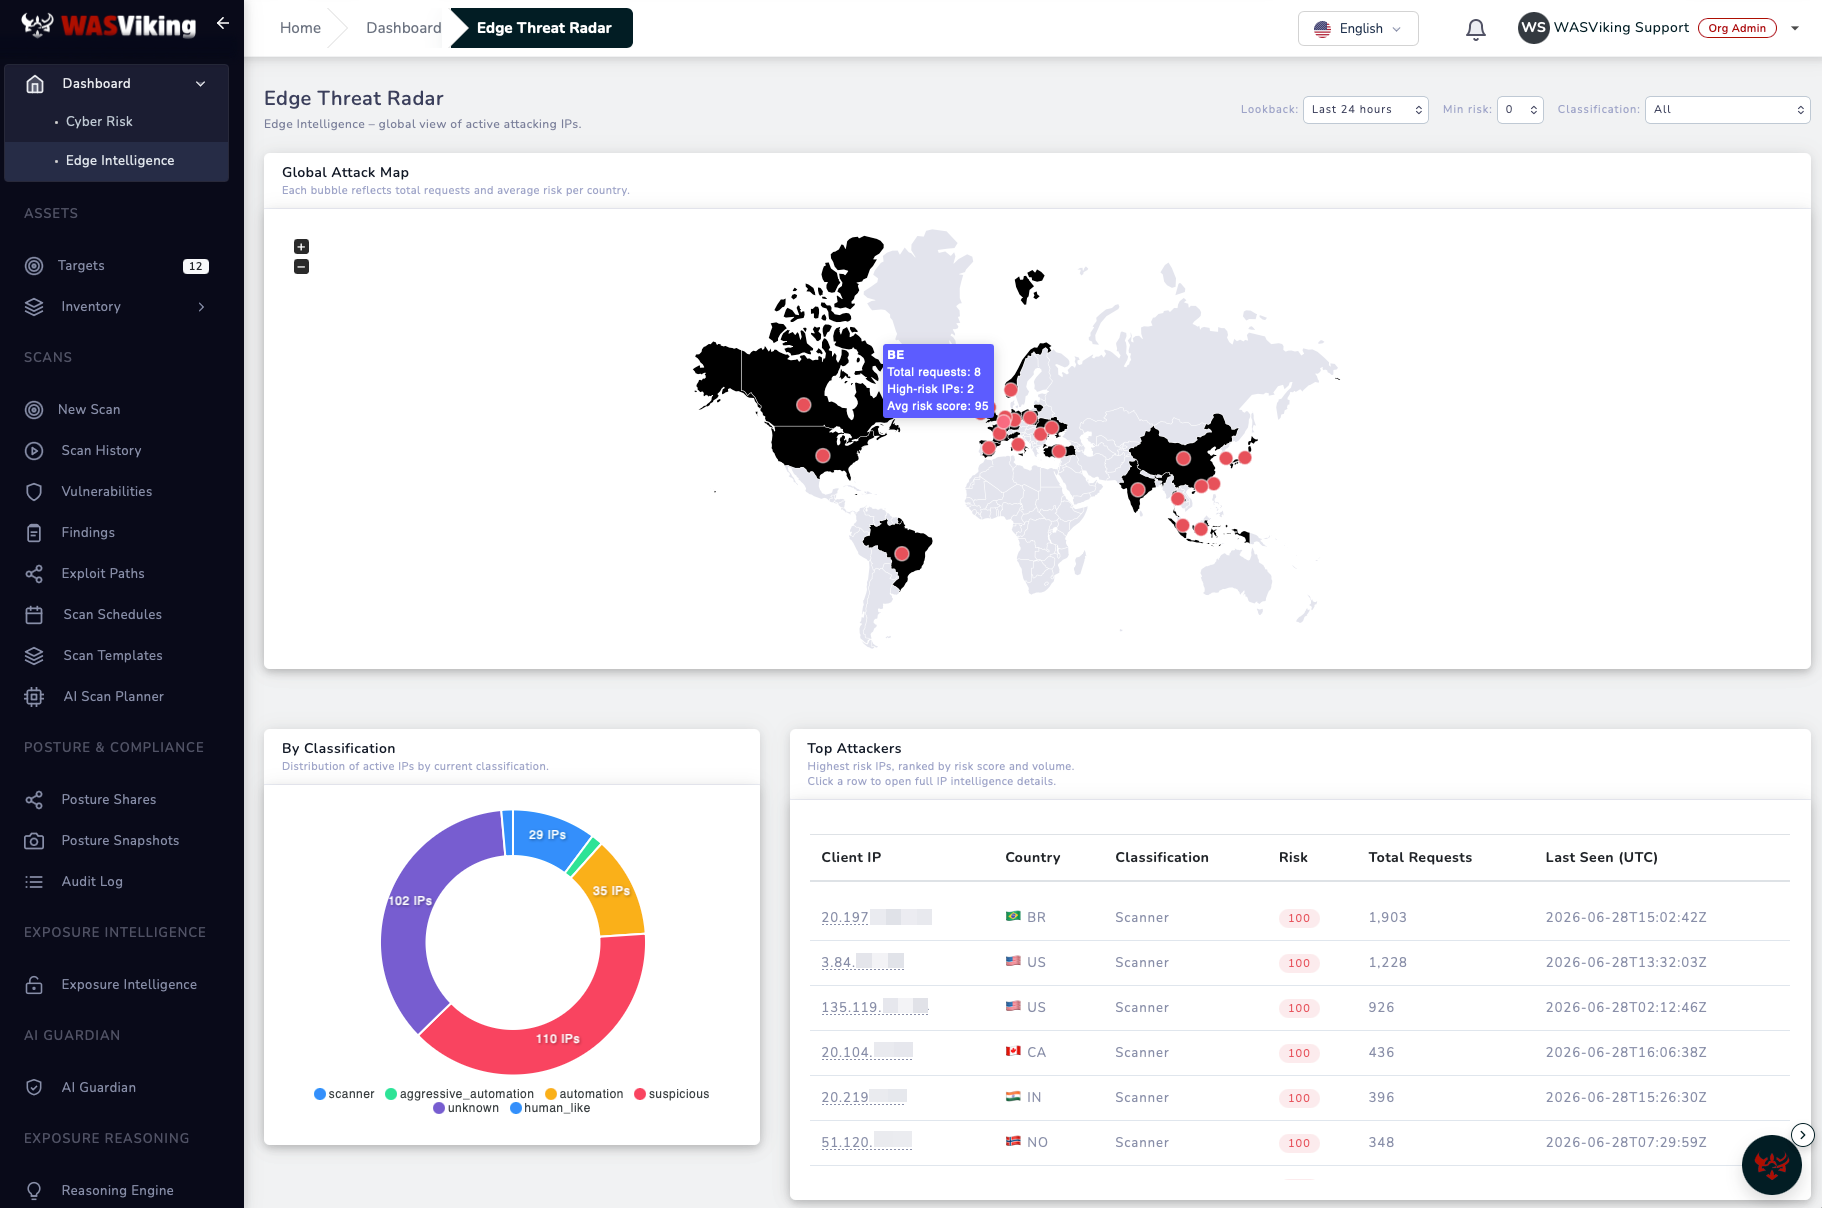 Dashboard → Edge Intelligence, populated a few minutes after setup.
Operating notes
- Cadence. WASViking polls every 5 minutes per zone.
- Backfill. On first connection, WASViking pulls the last 24 hours of events as initial baseline.
- Quota. The Edge module meters per monitored domain. See the Usage tab.
- Multi-zone. One token can carry multiple zones. Add or remove zone IDs in WASViking without re-issuing the token.
Common problems
| Problem | Likely cause |
|---|---|
| Load Lists returns nothing | Account ID wrong, or the token is missing the Account Filter Lists scope. |
| Zone row never turns Active / status stays in error | Wrong token, token scope missing the right zones, or a Zone ID typo. Use Edit to correct and save again. |
| Zone not found on first poll | Zone ID typo, or the zone is on a free plan that lacks the API surface. |
| Empty Edge Threat Radar dashboard | WAF / Firewall Rules / Bot Protection not enabled at the zone level, or the ingestion toggle left off. |
403 adding to the blocklist |
Account Filter Lists scope set to Read instead of Edit. |
| Blocks not applying | Custom rule not deployed, or wasviking_edge_blocklist not referenced. |
| Legitimate scans blocked by the rule | Scanner egress IPs missing from the rule exclusion (Step 5.1), or trusted IPs missing from wasviking_whitelist (Step 5.2). |
Revoking the integration
- Soft revoke: in the WASViking portal, open Settings → System Settings → Edge Threat Radar, Edit the zone, and turn off Enable this configuration for Edge Intel ingestion. Reads stop; the configuration is kept so you can re-enable it later.
- Hard revoke: delete the API token in Cloudflare. WASViking shows an error on the next poll and stops trying. No data is retained beyond the configured event retention window.
Compliance posture
- Aligned with the principle of least privilege.
- All-read scopes by default; one optional Edit gated by explicit customer approval per event.
- Compatible with ISO 27001, LGPD, GDPR, NIST, OWASP Top 10 requirements for monitoring and audit.
Where this fits in the platform
- The capability lives at Edge Threat Radar.
- Risk amplification logic is documented under Findings and Risk Score.
- Alert routing is documented under Slack and Teams and Webhooks.