
Edge Threat Radar (Google Cloud Armor)
Connect Google Cloud Armor so the Edge Threat Radar can correlate adversary traffic with your posture. Read-only by default; one optional role for the approval-gated IP blocking.
The Google Cloud Armor integration powers the Edge Threat Radar for workloads that sit behind a Google Cloud external Application Load Balancer instead of (or alongside) Cloudflare. WASViking® reads the load balancer request logs — where every Cloud Armor decision is recorded — via the Cloud Logging API and correlates them with your open findings, amplifying the Risk Score when adversary traffic matches a real exposure.
If your edge is Cloudflare, follow the Cloudflare guide instead. You can run both at the same time: each connected zone or policy counts against the same Edge Threat Radar target allowance on your plan.
What this integration does
- Pulls Cloud Armor allow/deny decisions and WAF rule hits at a 5-minute cadence, straight from your load balancer request logs.
- Correlates events to open Findings and amplifies the Risk Score.
- Enriches IPs with AbuseIPDB and ThreatFox.
- Powers the same Edge Threat Radar dashboard, AI assistant scope, and multi-channel alerts as the Cloudflare integration — data from both providers lands in one place.
- Optionally maintains WASViking-managed deny rules in your Cloud Armor security policy, with the same guardrail as Cloudflare: no IP is blocked automatically. Each block is gated on explicit customer approval, per event.
- Reads your public Cloud DNS zones (read-only) as an extra subdomain discovery source, surfacing hosts hidden behind wildcard certificates for Certificate Monitoring — the same capability the Cloudflare integration gets from its DNS (Read) zone scope.
Access posture
- Read-only by default. The service account only needs permission to read logs and DNS zones. No traffic is intercepted, no rules are pushed, no infrastructure is changed.
- One exception: the optional approval-gated blocking needs the Compute Security Admin role so WASViking can write deny rules to the policy. It is used only to execute blocks the customer has explicitly approved.
- The Cloud DNS subdomain discovery uses only the read-only DNS Reader role: zones and records are listed, never created or changed, and private zones are never read.
- Revocable at any time from the Google Cloud side (delete the service account key, or the service account itself).
Pre-requisites
| Requirement | Detail |
|---|---|
| Google Cloud project | Active, with billing enabled. |
| Load balancer | A global external Application Load Balancer in front of the application. |
| Cloud Armor | A security policy attached to the load balancer's backend service. |
| Cloud DNS (if used) | Public zones hosted in the same project are read as an extra subdomain discovery source. Having the zones elsewhere is fine — discovery then relies on the public sources only. |
| Google Cloud permissions | Enough access to create a service account and grant project IAM roles (Project IAM Admin or Owner). |
| Service account keys allowed | The project must permit service account key creation. Many enterprise orgs block it by default — see Step 2.3 for the one-time exception an Org Policy Administrator grants. |
| WASViking plan | Edge Threat Radar module enabled (Pro plan and above). |
Google Cloud setup with gcloud
Everything on the Google Cloud side is done from the command line, so
you can run it against an existing project — the one that already
hosts your load balancer and Cloud Armor policy. Open
Cloud Shell (no local install
needed) or a terminal with the gcloud CLI authenticated.
Set your variables once and reuse them through the rest of this guide:
# The project that hosts the load balancer and the security policy.
# This is the project ID (e.g. my-company-prod), not the display name.
export PROJECT_ID="your-project-id"

# The existing objects you want to monitor.
export SECURITY_POLICY="your-cloud-armor-policy"
export BACKEND_SERVICE="your-backend-service"

gcloud config set project "$PROJECT_ID"
Step 1: Turn on the signals at the source
Cloud Armor has no events API. Every allow/deny decision it makes is written into the load balancer request logs, and those logs are what WASViking reads. Three settings have to be right for the logs to carry useful data.
1.1 Confirm the policy is attached to the backend service
gcloud compute backend-services describe "$BACKEND_SERVICE" \
    --global \
    --format="yaml(name,securityPolicy)"
The securityPolicy line must point at your policy. If it is empty,
attach it:
gcloud compute backend-services update "$BACKEND_SERVICE" \
    --global \
    --security-policy="$SECURITY_POLICY"
Use the exact
$SECURITY_POLICYname later in the portal (Step 3). A typo here is the most common reason an integration connects but stays empty.
1.2 Enable request logging on the backend service
If logging is off, Cloud Armor still protects you, but nothing is written for WASViking to read.
gcloud compute backend-services update "$BACKEND_SERVICE" \
    --global \
    --enable-logging \
    --logging-sample-rate=1.0
Confirm it took:
gcloud compute backend-services describe "$BACKEND_SERVICE" \
    --global \
    --format="yaml(logConfig)"
# logConfig:
#   enable: true
#   sampleRate: 1.0
A sample rate below
1.0logs only that fraction of requests. The integration still works, but the Radar only sees the sampled slice. For security visibility keep it at1.0.
1.3 Switch the policy to verbose logging
By default Cloud Armor logs the decision but not the detail. Verbose logging adds the attacker's country and the specific WAF rules that fired — the context the Radar uses for geographic attribution and rule-level detail. This flag is CLI-only; the console has no toggle for it.
gcloud compute security-policies update "$SECURITY_POLICY" \
    --log-level=VERBOSE
If you leave it on
NORMAL, ingestion still works — the country and triggered-rule columns just come up thinner. Google recommends verbose mainly while tuning or troubleshooting, since it writes more request detail into your logs; for edge threat visibility it is worth leaving on.
1.4 Confirm Cloud Armor decisions are being logged
Send a request through the load balancer (or wait for real traffic), then read the load balancer logs. Confirming this now tells you the Google side is correct before you configure the portal:
gcloud logging read \
  'resource.type="http_load_balancer"
   AND jsonPayload.enforcedSecurityPolicy.name="'"$SECURITY_POLICY"'"' \
  --project="$PROJECT_ID" \
  --freshness=30m \
  --limit=20 \
  --format="table(
    timestamp,
    httpRequest.remoteIp,
    httpRequest.requestMethod,
    httpRequest.requestUrl,
    httpRequest.status,
    jsonPayload.statusDetails,
    jsonPayload.enforcedSecurityPolicy.priority,
    jsonPayload.enforcedSecurityPolicy.outcome
  )"
You should see one row per request. A normal request looks like
OUTCOME: ACCEPT; a blocked one like OUTCOME: DENY with
STATUS: 403 and STATUS_DETAILS: denied_by_security_policy. If you
want to force a DENY to confirm blocking is logged, hit a path your
WAF rules reject, for example:
curl -i -A "sqlmap/1.8" "http://YOUR_LB_IP/"
If this query returns nothing, stop here — the problem is on the Google side (logging disabled, sample rate
0, policy not attached, or a policy-name typo), not in WASViking. Fix it before Step 3.
Step 2: Create the service account and key
WASViking authenticates to the Cloud Logging API with a dedicated service account, following the same pull model as the Cloudflare integration. Keep it separate from everything else so it can be revoked on its own.
2.1 Create the service account and grant the roles
gcloud iam service-accounts create wasviking-edge-radar \
    --display-name="WASViking Edge Threat Radar" \
    --description="Read-only access to Cloud Armor load balancer logs and Cloud DNS zones"

export SERVICE_ACCOUNT_EMAIL="wasviking-edge-radar@${PROJECT_ID}.iam.gserviceaccount.com"

# Required: read the load balancer request logs.
gcloud projects add-iam-policy-binding "$PROJECT_ID" \
    --member="serviceAccount:${SERVICE_ACCOUNT_EMAIL}" \
    --role="roles/logging.viewer"

# Required: read the public Cloud DNS zones for subdomain discovery.
gcloud services enable dns.googleapis.com --project="$PROJECT_ID"

gcloud projects add-iam-policy-binding "$PROJECT_ID" \
    --member="serviceAccount:${SERVICE_ACCOUNT_EMAIL}" \
    --role="roles/dns.reader"
DNS Reader mirrors the DNS (Read) zone scope of the Cloudflare integration: it lets WASViking read the zones' records as an extra subdomain discovery source. It surfaces hosts hidden behind a wildcard certificate, which public certificate logs cannot enumerate, and feeds Certificate Monitoring. It stays strictly read-only: no DNS record is ever created or changed, and private zones are never read — only public zones feed discovery. If this project hosts no public Cloud DNS zones (your DNS lives elsewhere), the grant is harmless and discovery simply keeps working from the public sources.
Add the optional role only if you want the approval-gated IP blocking. It lets WASViking write customer-approved deny rules into the policy; without it the integration is strictly read-only and the block button in the portal simply reports that it is unavailable.
# Optional: only for one-click, approval-gated blocking.
gcloud projects add-iam-policy-binding "$PROJECT_ID" \
    --member="serviceAccount:${SERVICE_ACCOUNT_EMAIL}" \
    --role="roles/compute.securityAdmin"
Least privilege wins. If you are not sure yet, grant the two required read-only roles now and add
roles/compute.securityAdminlater when you decide to enable blocking.
2.2 Create the JSON key
gcloud iam service-accounts keys create wasviking-edge-radar-key.json \
    --iam-account="$SERVICE_ACCOUNT_EMAIL"
The file wasviking-edge-radar-key.json is what you paste into the
portal in Step 3. Keep it only until the configuration is saved, then
delete the local copy (rm wasviking-edge-radar-key.json). In Cloud
Shell, use the file's ⋮ → Download menu to bring it to your machine
first.
2.3 If key creation is blocked
Many organizations enforce the org policy
constraints/iam.disableServiceAccountKeyCreation (Google enables it by
default for organizations created on or after May 3, 2024). When it is
active, the key command fails with:
FAILED_PRECONDITION: Key creation is not allowed on this service account.
If that happens, an Organization Policy Administrator must allow key creation for this project. This is an org-level change — a Project Owner cannot do it:
gcloud services enable orgpolicy.googleapis.com --project="$PROJECT_ID"

cat > allow-sa-keys.yaml <<EOF
name: projects/${PROJECT_ID}/policies/iam.disableServiceAccountKeyCreation
spec:
  rules:
  - enforce: false
EOF

gcloud org-policies set-policy allow-sa-keys.yaml
Then re-run Step 2.2. If a failed attempt left an empty
wasviking-edge-radar-key.json behind, delete it first so you do not
paste an empty file into the portal.
If your organization forbids service account keys entirely and will not grant a per-project exception, contact WASViking support — a keyless setup can be arranged.
2.4 Check the key is valid
Confirm the file is a complete JSON key before pasting it — a truncated or empty file is the most common cause of a failed connection:
python3 -c "import json,sys; d=json.load(open('wasviking-edge-radar-key.json')); sys.exit('Invalid key file') if not (d.get('private_key') and d.get('type')=='service_account') else print('OK', d['client_email'])"
Step 3: Configure on the WASViking side
In the portal, go to Settings → System Settings → Edge Threat Radar. Below the Cloudflare card you will find the Google Cloud Armor Settings card, listing the policies already connected to this organization, each with its project, lookback window, status, and last run.
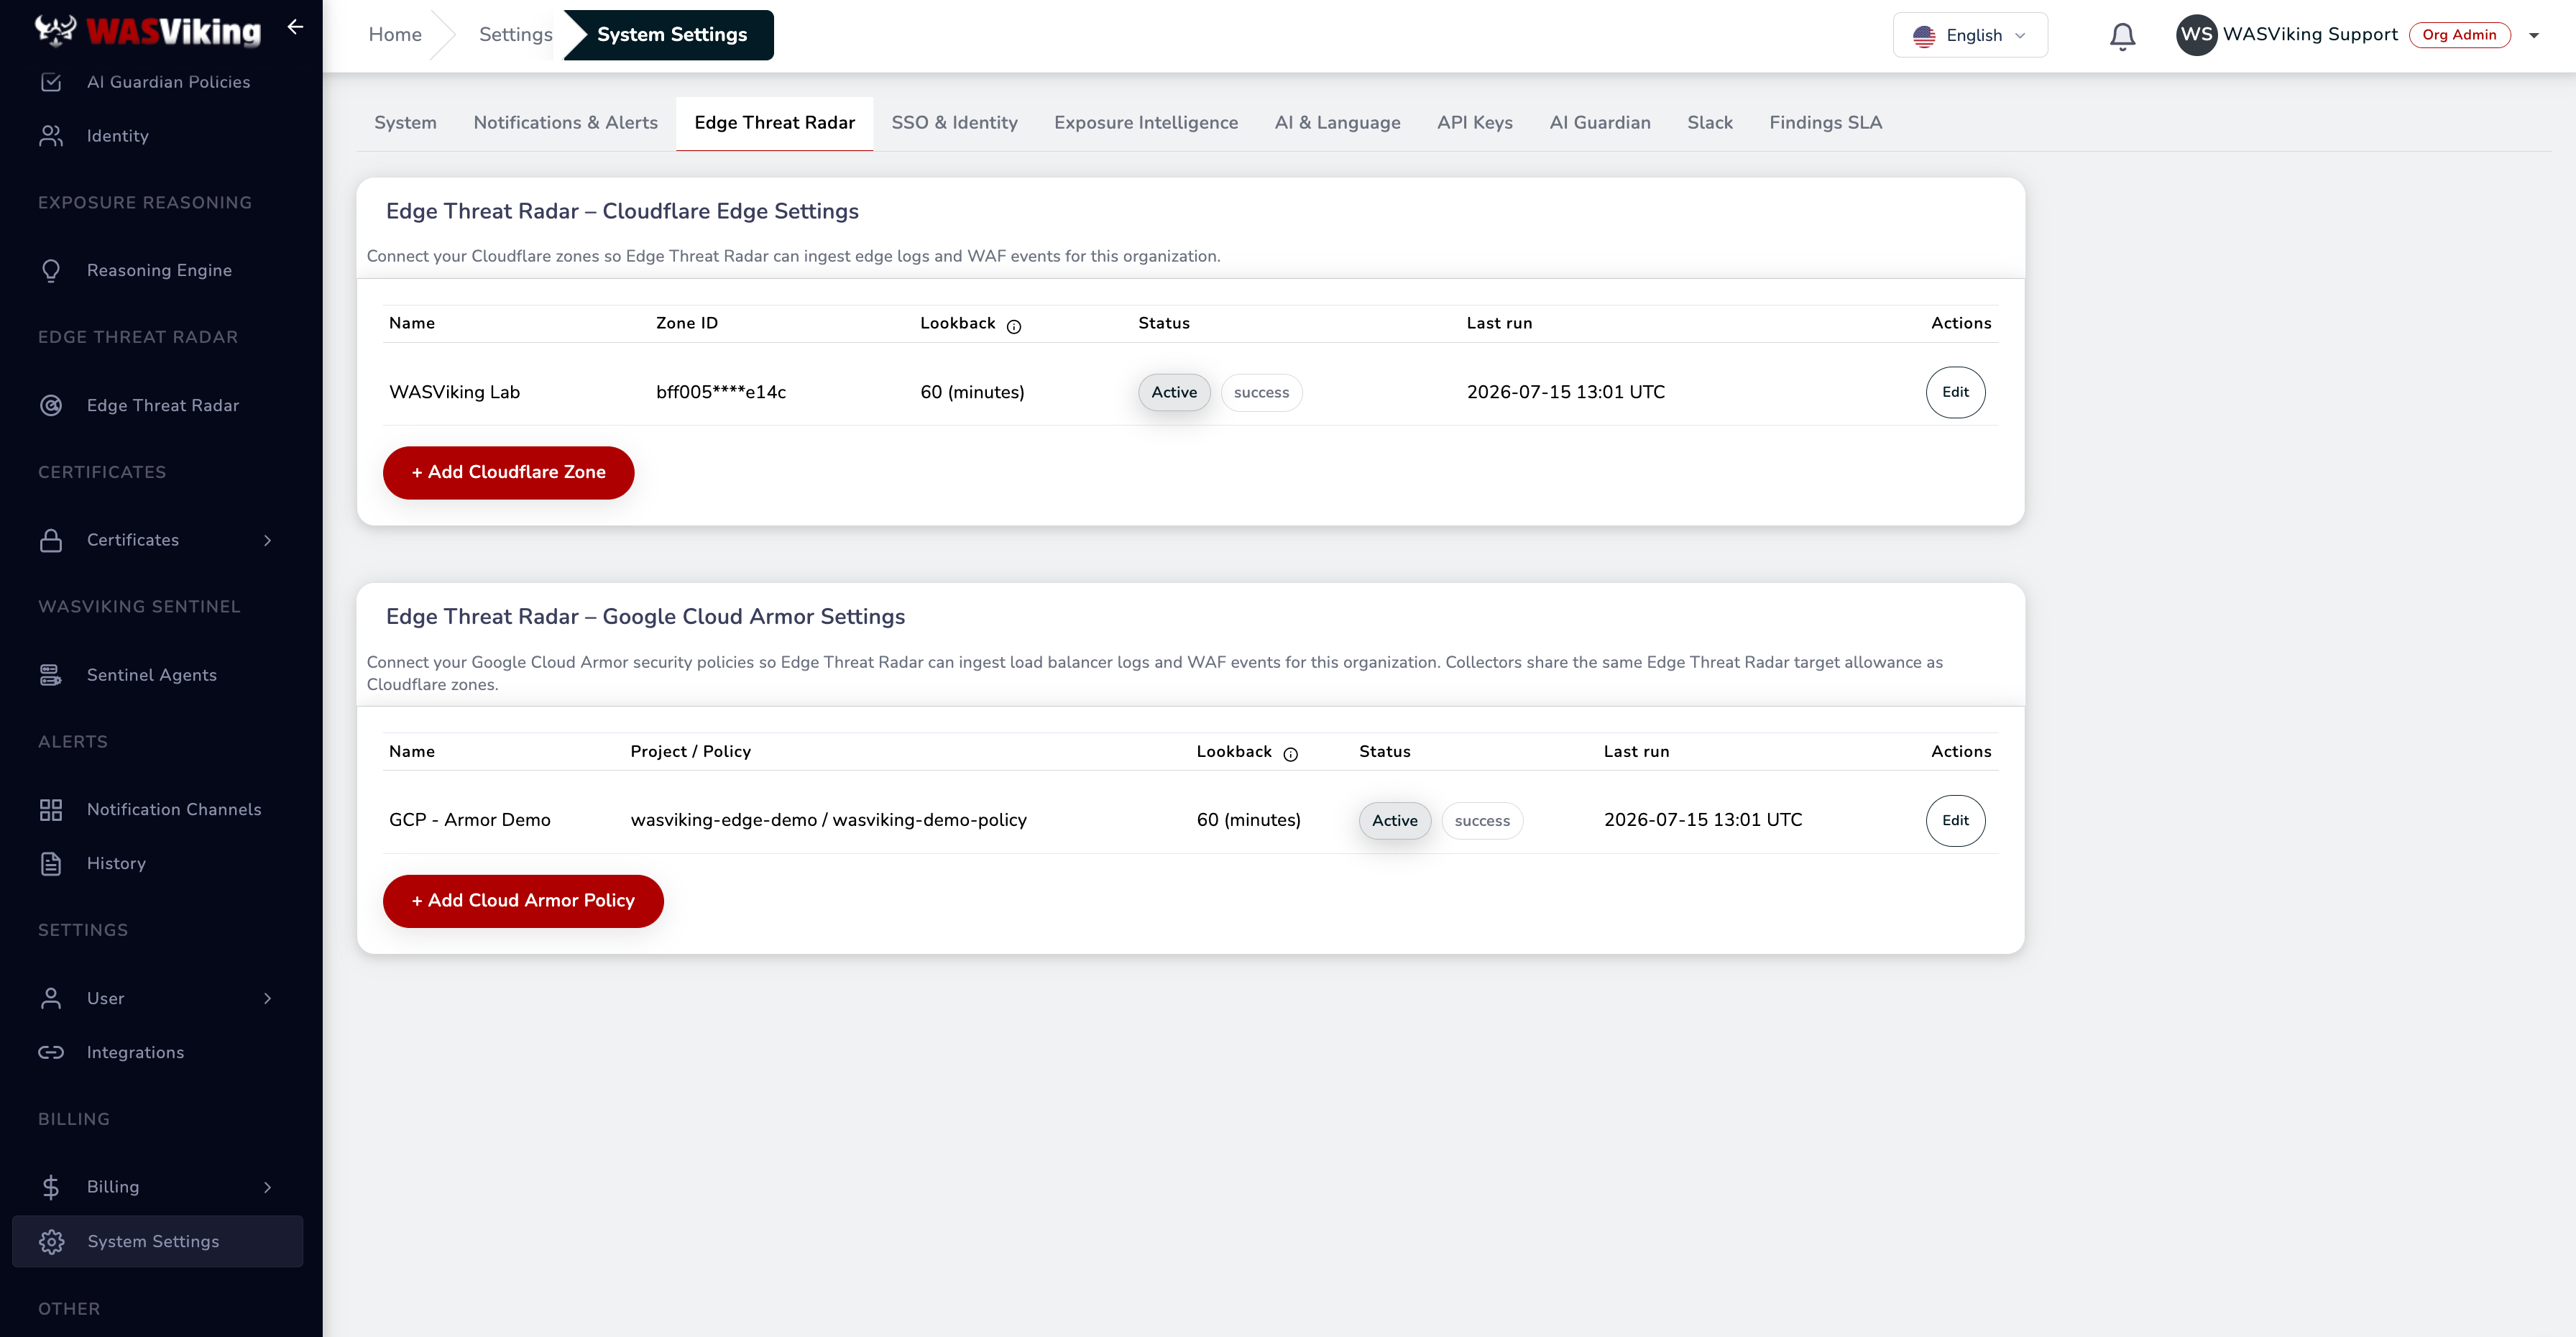 Settings → System Settings → Edge Threat Radar → Google Cloud Armor Settings.
3.1 Add a policy
Click + Add Cloud Armor Policy. The Google Cloud Armor Configuration dialog opens. Fill it in:
| Field | Value |
|---|---|
| Name | A label for this collector (for example, the application it covers). |
| GCP Project ID | Your $PROJECT_ID. It is the ID (like my-company-prod), not the display name or the project number. |
| Security Policy name | Your $SECURITY_POLICY, exactly as confirmed in Step 1.1. |
| Service Account key (JSON) | Open wasviking-edge-radar-key.json from Step 2.2 and paste the entire JSON content. It is stored encrypted and never shown again after saving. |
| Trusted infrastructure IPs/CIDRs | One IP or CIDR per line: office ranges, VPN egress, monitoring, CI runners. WASViking treats these as your own infrastructure — they are never raised as adversary traffic and never blocked. |
| Default lookback (minutes) | How far back each poll reads. 60 is a good default. |
| Enable this configuration for Edge Intel ingestion | Turn on to start ingestion for this policy. |
Unlike Cloudflare, there are no lists to load here — Cloud Armor has no list concept. The trusted addresses live in this dialog, and the blocklist lives inside the policy itself as WASViking-managed rules (more on that below).
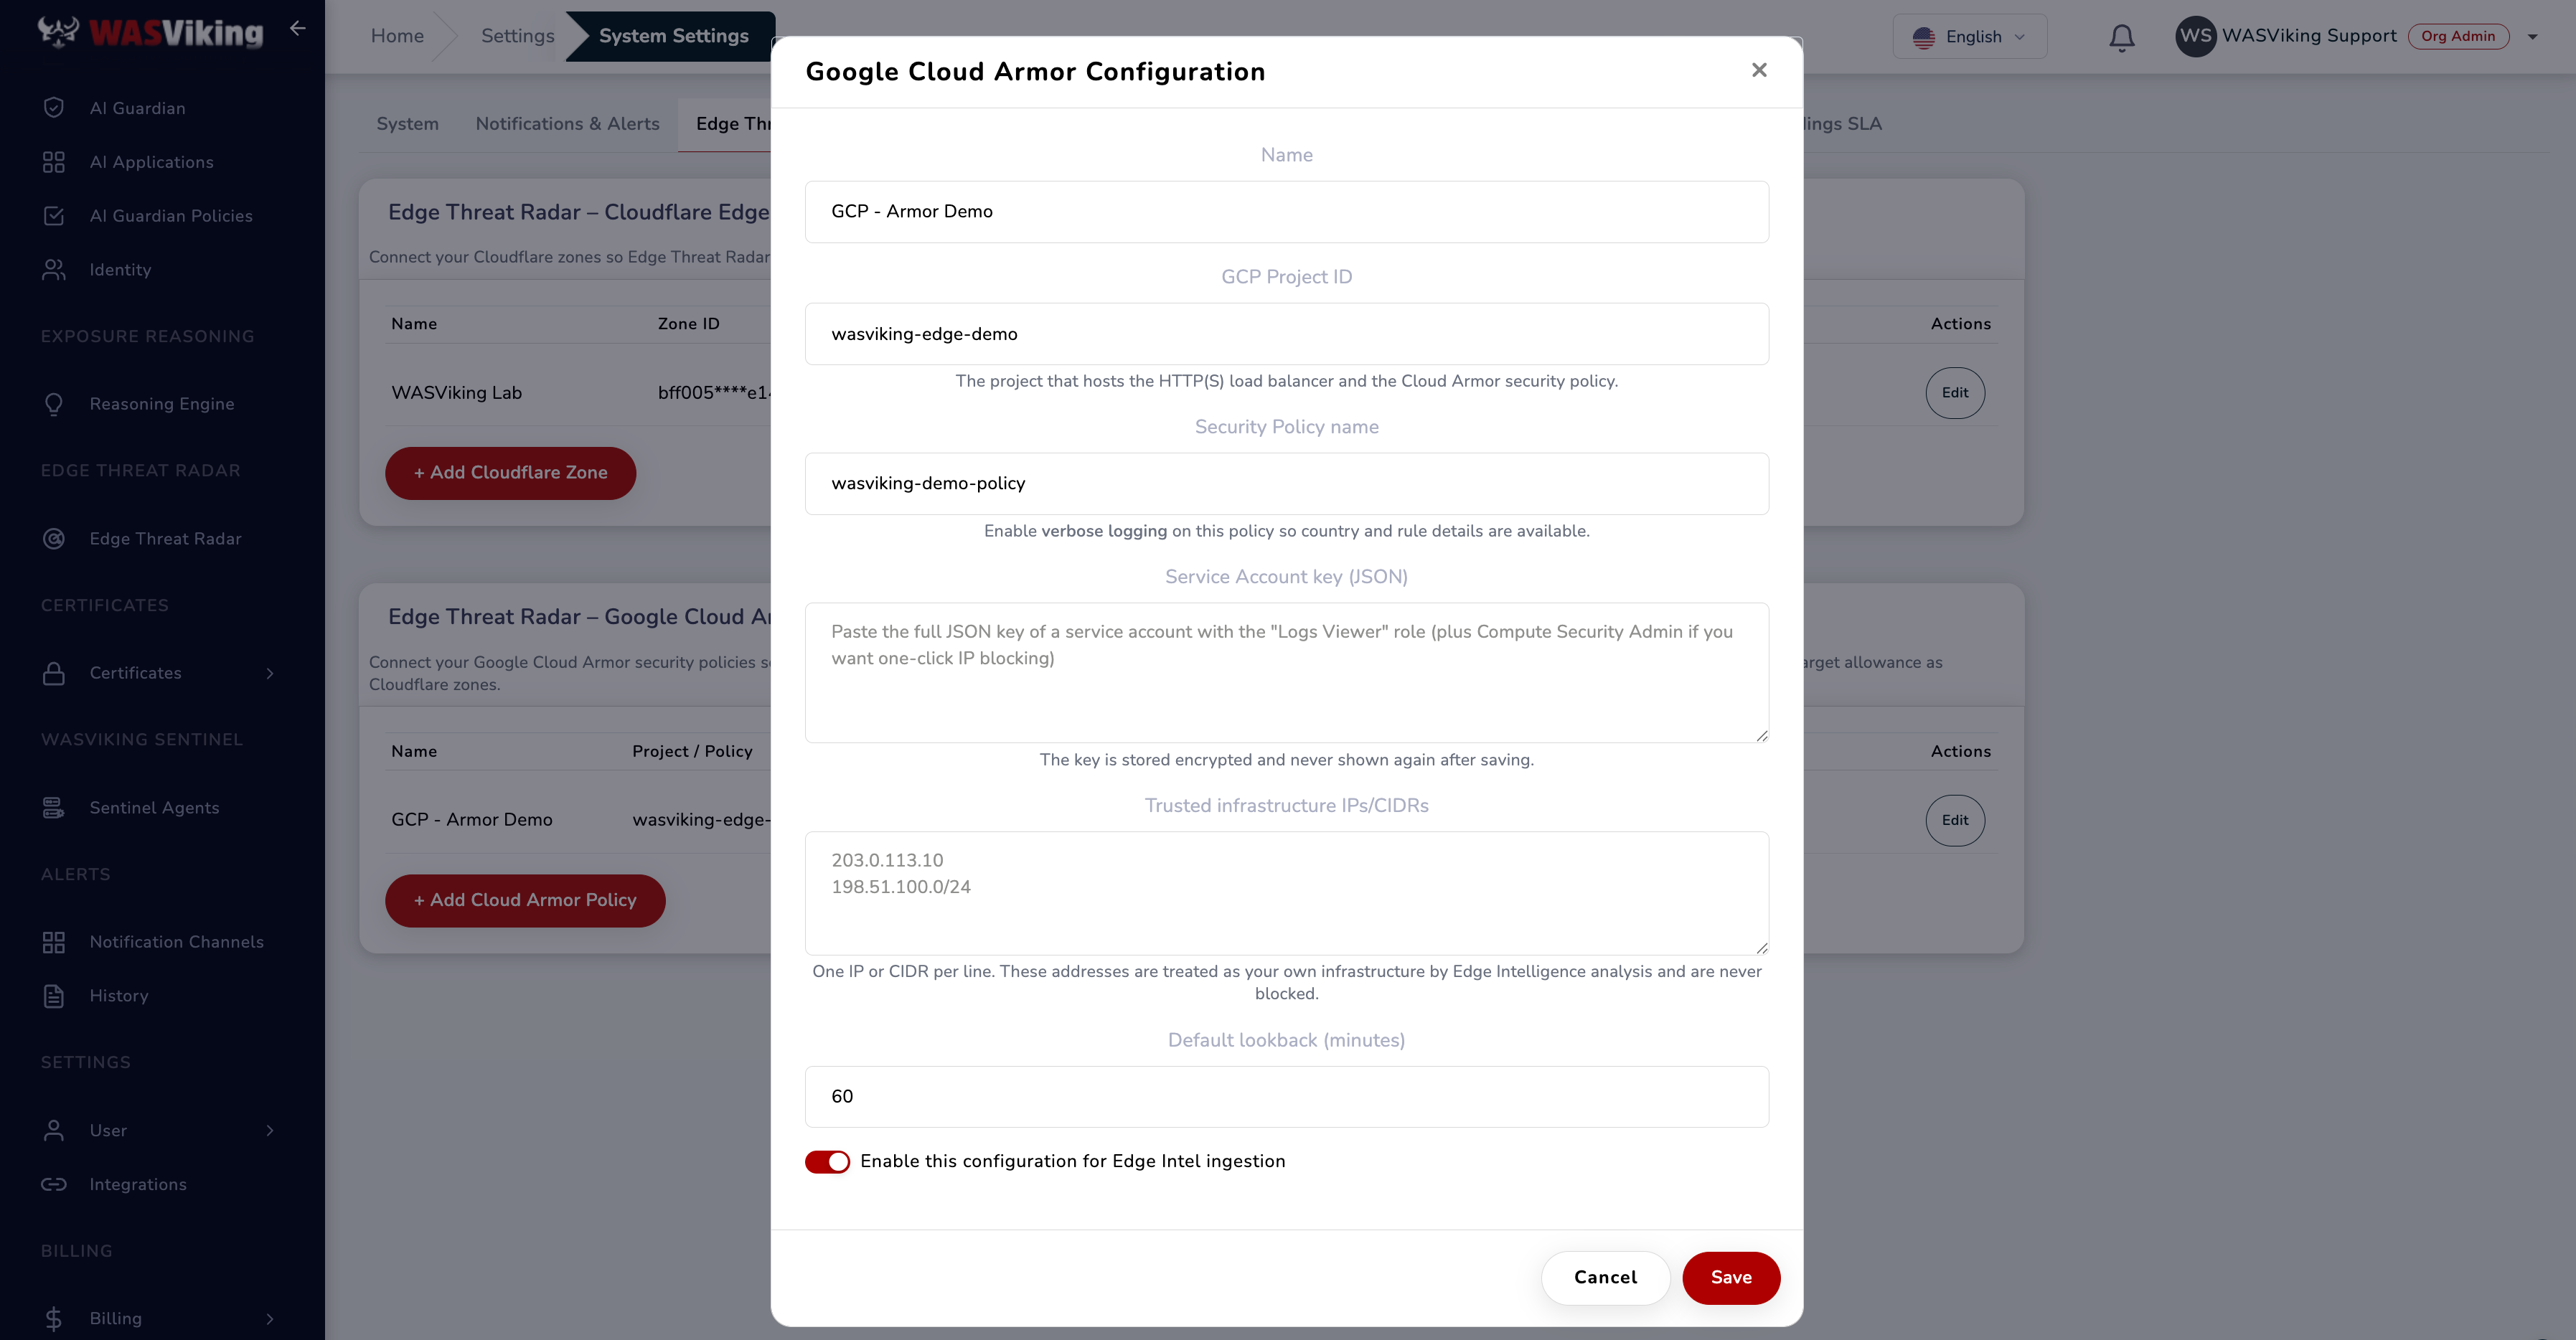 The Google Cloud Armor Configuration dialog opened from + Add Cloud Armor Policy.
3.2 Save and confirm
Click Save. The policy returns to the list. Once the first poll succeeds, its row shows Active with a success badge and a Last run timestamp, and the Edge Threat Radar dashboard begins to populate within a few minutes. To change any field later, use Edit on the row — leaving the key field blank on edit keeps the stored key.
What WASViking collects
Per load balancer log entry:
- Source IP.
- Country (with verbose logging on).
- URL and method attacked.
- HTTP status returned.
- The Cloud Armor decision (allow, deny, throttle, redirect).
- The rule priority and the preconfigured WAF rule expressions that fired (with verbose logging on).
- User agent.
- Timestamp.
Each event is enriched with AbuseIPDB and ThreatFox reputation, correlated to open Findings, and surfaced on the same Edge Threat Radar dashboard as your Cloudflare traffic.
Cloud Armor has no bot score equivalent to Cloudflare's Bot Management. WASViking's own behavioral scoring (request rate, path spread, sensitive-path probing, tooling signatures) fills that role, so classification still works — it just leans on behavior instead of an upstream score.
How blocking works on Cloud Armor
Enabling the block action (one-time)
Blocking is off until you grant it. With only the two read-only
roles from Step 2.1 the integration cannot change anything: the block
button in the portal will report that the action is unavailable, and
any attempt returns an HTTP 403 from Google. To turn it on, grant the
blocking role to the same service account — no new key and no
portal change are needed:
gcloud projects add-iam-policy-binding "$PROJECT_ID" \
    --member="serviceAccount:${SERVICE_ACCOUNT_EMAIL}" \
    --role="roles/compute.securityAdmin"
IAM changes can take up to a minute to propagate. After that, the Block this IP at the edge button on a Cloud Armor IP goes live and writes to your policy. To confirm the policy is reachable, describe it:
gcloud compute security-policies describe "$SECURITY_POLICY" --format="value(name)".Keep least privilege in mind: this role lets WASViking add and remove deny rules on the policy. It never touches rules you authored (see below). If you later want to make the integration read-only again, remove the binding with
gcloud projects remove-iam-policy-bindingusing the same--member/--role.
What a block does
There is no separate blocklist to create. When you approve a block in the portal, WASViking writes a deny rule directly into your security policy:
- Every managed rule is tagged
wasviking-managedand placed at a high priority (starting at100000), so it never overrides the rules you authored. WASViking only ever reads or changes its own tagged rules — your rules are never touched. - The action is
deny(403). - There is a capacity limit on how many addresses can be blocked this way. If it is ever reached, you get a clear message in the portal instead of a silent failure.
The approval flow is identical to Cloudflare:
Edge event detected
        │
        ▼
WASViking risk amplification
        │
        ▼
Notification email to the operator (event details + approve link)
        │
        ▼
Operator approves in the portal
        │
        ▼
WASViking adds a deny rule to the security policy
        │
        ▼
Cloud Armor blocks the IP at the edge
No rule reaches the policy without the operator step. The approve / reject decision is captured in the audit log on both sides.
If WASViking also runs DAST scans against the application behind this load balancer, add your own allow rule for the WASViking scanner egress IPs at a priority lower than 100000 (lower number = higher precedence). That guarantees an approved block can never catch your own security tests.
Your first results
Once the policy is saved and enabled, the first poll runs within a few minutes and the Edge Threat Radar dashboard (Dashboard → Edge Intelligence) starts to fill in: a global attack map, classification breakdown, and a ranked list of top attackers with country, risk score, request volume, and last-seen time. Traffic from Cloud Armor and Cloudflare shows up side by side. From here you can open any IP for full intelligence and approve a block when warranted.
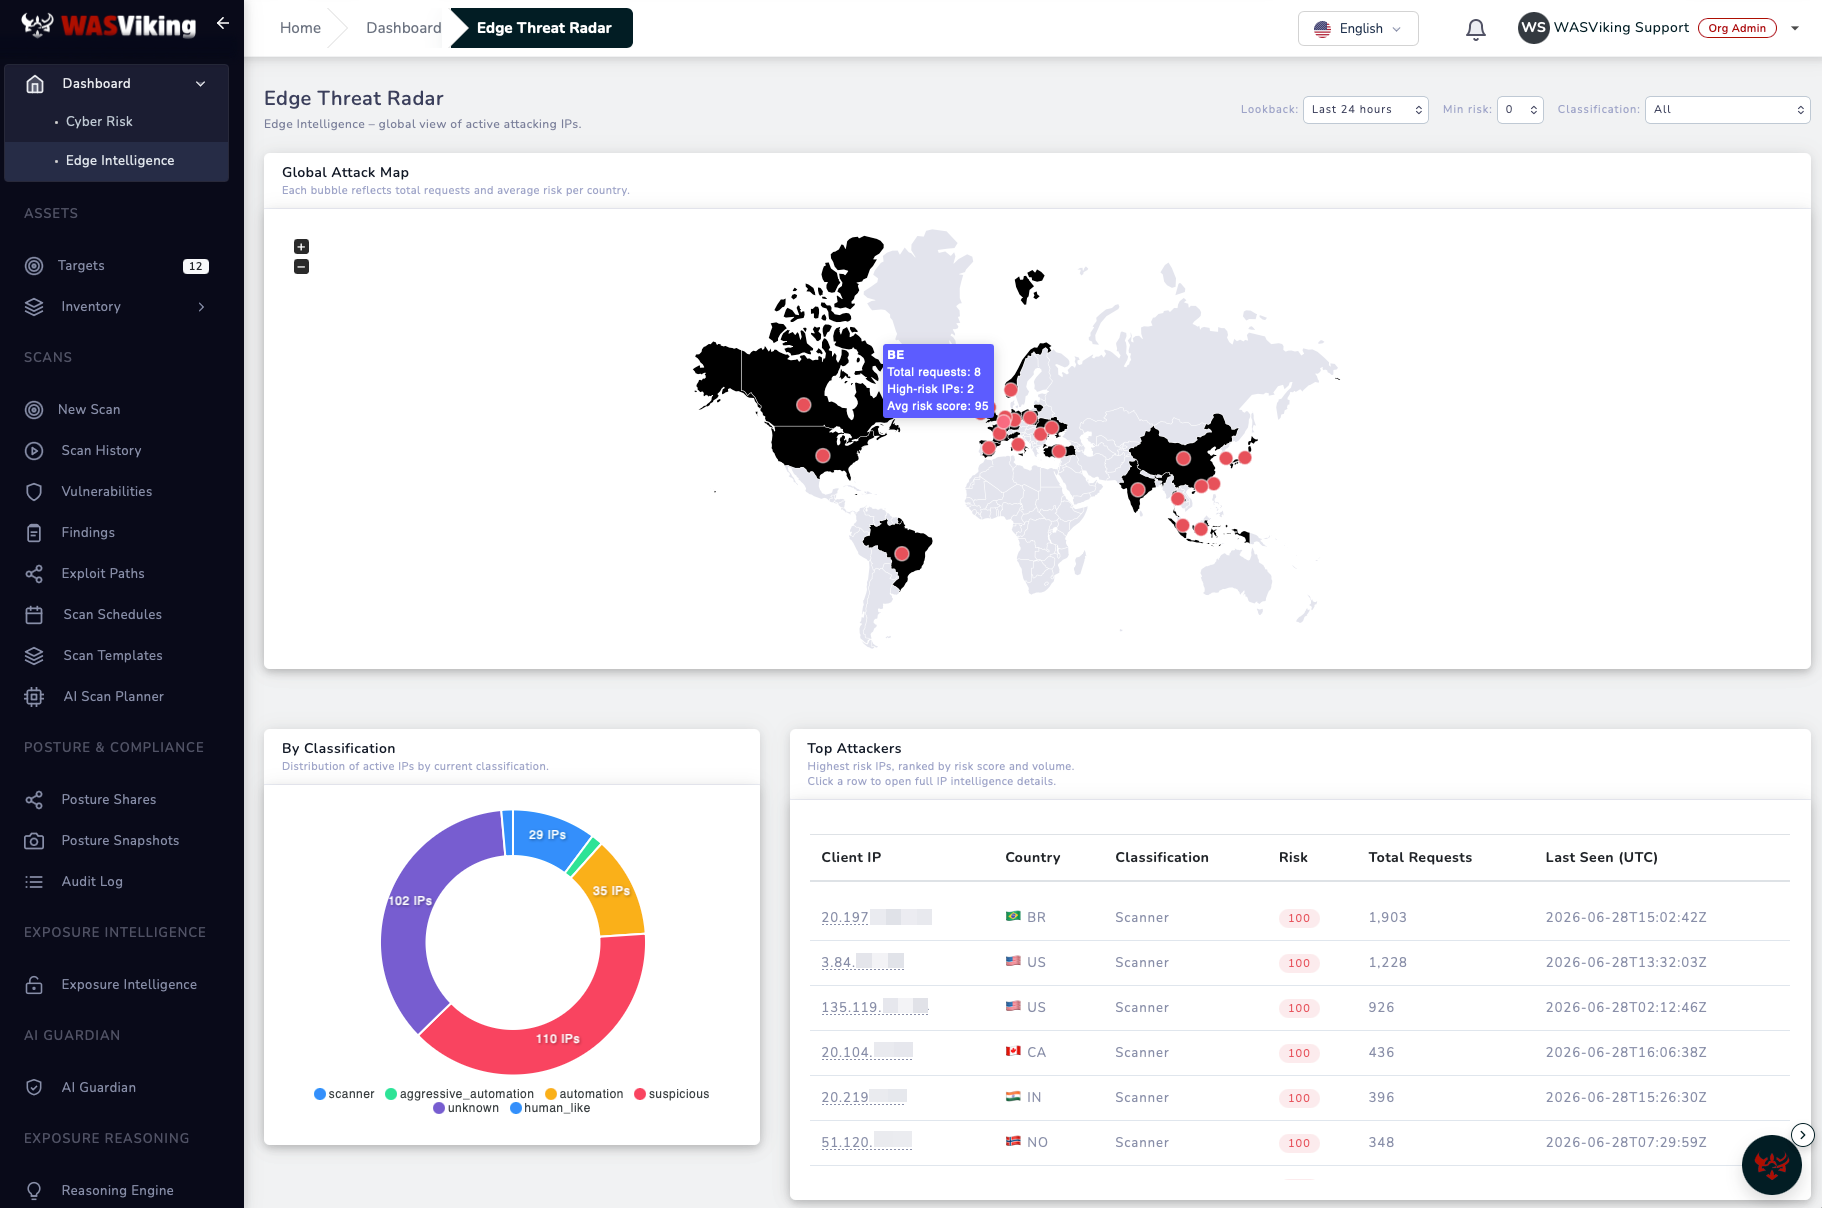 Dashboard → Edge Intelligence, populated a few minutes after setup.
Operating notes
- Cadence. WASViking polls every 5 minutes per policy, same as Cloudflare zones.
- Shared allowance. Every connected collector — Cloudflare zone or Cloud Armor policy — consumes one Edge Threat Radar target from your plan. See the Usage tab.
- Lookback. Each poll reads the window you configured (default 60 minutes); events already seen are de-duplicated, so overlapping windows are safe.
- Multiple policies. Add one configuration per security policy. The same service account key can be reused across policies in the same project.
Common problems
| Problem | Likely cause |
|---|---|
| Row never turns Active / status stays in error | The pasted key is not the full JSON file (a blocked key creation can leave a 0-byte file — see Step 2.3/2.4), the key was deleted in Google Cloud, or the Project ID is wrong (remember: the ID, not the display name). Use Edit to correct and save again. |
| Empty Edge Threat Radar dashboard | Request logging off on the backend service (Step 1.2), sample rate set to 0, policy name typo (Step 1.1), or the service account missing roles/logging.viewer. Confirm with the log-read query in Step 1.4 first. |
| Country column empty | Verbose logging not enabled — it is CLI-only (Step 1.3). |
| Triggered rule IDs missing | Same cause: verbose logging off. |
FAILED_PRECONDITION: Key creation is not allowed |
The iam.disableServiceAccountKeyCreation org policy is enforced (default for orgs created on or after May 3, 2024). An Org Policy Administrator grants a per-project exception — see Step 2.3. |
| Block action fails | Service account missing roles/compute.securityAdmin (Step 2.1). |
| Cloud DNS subdomains not appearing | Service account missing roles/dns.reader, the Cloud DNS API (dns.googleapis.com) not enabled on the project (Step 2.1), the zone lives in a different project, or the zone is private (private zones are never read). Discovery keeps working from the public sources meanwhile. |
| "Block capacity reached" | The WASViking-managed deny rules are full. Review and prune the wasviking-managed rules in your policy. |
| Legitimate scans blocked | Scanner egress IPs missing an allow rule below priority 100000, or your own ranges missing from Trusted infrastructure IPs/CIDRs (Step 3.1). |
Revoking the integration
- Soft revoke: in the WASViking portal, open Settings → System Settings → Edge Threat Radar, Edit the policy, and turn off Enable this configuration for Edge Intel ingestion. Reads stop; the configuration is kept so you can re-enable it later.
- Hard revoke: delete the key (or the whole service account) in Google Cloud. WASViking shows an error on the next poll and stops trying. No data is retained beyond the configured event retention window.
```bash # List the key IDs, then delete the one in use: gcloud iam service-accounts keys list \ --iam-account="$SERVICE_ACCOUNT_EMAIL" gcloud iam service-accounts keys delete KEY_ID \ --iam-account="$SERVICE_ACCOUNT_EMAIL"
# Or remove the service account entirely: gcloud iam service-accounts delete "$SERVICE_ACCOUNT_EMAIL" ```
Compliance posture
- Aligned with the principle of least privilege.
- Read-only role by default; one optional admin role gated by explicit customer approval per event.
- Compatible with ISO 27001, LGPD, GDPR, NIST, OWASP Top 10 requirements for monitoring and audit.
Where this fits in the platform
- The capability lives at Edge Threat Radar.
- The Cloudflare flavor of this integration is documented at Edge Threat Radar (Cloudflare).
- Risk amplification logic is documented under Findings and Risk Score.
- Alert routing is documented under Slack and Teams and Webhooks.