
CI/CD DAST with GitHub Actions
Run automated DAST scans inside your GitHub Actions pipeline with the WASViking Sentinel. Scans the app on localhost over an ephemeral mTLS tunnel, runs authenticated scans with a token minted in the pipeline, prioritizes the endpoints you list, fails the build on real findings, and publishes results to the GitHub Security tab.
This integration runs a WASViking® DAST scan inside your
GitHub Actions runner, against the application you start on localhost,
and fails the pipeline when it finds real vulnerabilities. The app is
never exposed to the public internet: the Sentinel agent opens an
ephemeral mTLS tunnel and the DAST engine sends its probes back through
it.
The setup has two halves, and the order matters: you configure the
WASViking portal first (a Sentinel agent token and an API Key scoped
to ci:scan), then wire those into GitHub Actions.
What this integration does
- Runs a DAST scan on every push and pull request, against the build you stand up in the runner.
- Fails the build by severity with
--fail-on, so vulnerable releases are blocked before merge. - Compares against the base branch with
--baseline, so a PR only fails on what it introduces, not pre-existing debt. - Runs authenticated scans with a short-lived token your pipeline
mints at runtime (
--auth-bearer/--auth-header), so protected areas behind a login are actually reached, with no static credentials in a config. - Prioritizes the endpoints you list with
--path, scanning your own API routes first, before the auto-discovered surface. Essential for authenticated APIs and SPAs that have no crawlable HTML links. - Emits SARIF 2.1.0, consumed natively by GitHub Code Scanning, plus a full JSON report.
- Provisions and tears down the agent per run, with no persistent credentials left on the runner.
- Meters against your CI/CD scan quota and records every run in the portal.
How it works
- The runner downloads and installs the Sentinel agent using the Sentinel token.
- The agent provisions an ephemeral mTLS bundle (valid 60 minutes, not reusable) from the WASViking API.
- The agent opens a gRPC over mTLS tunnel to the WASViking tunnel server.
- The agent requests a scan against your
localhosttarget. The API validates that the target is a private address, checks quota and concurrency, and starts the DAST engine. - The engine runs its checks (OWASP Top 10, SQLi, XSS, security headers, and more) by sending probes back through the tunnel; the agent executes them locally against your app.
- The agent writes
wasviking-scan.sarifandwasviking-scan.json, and the workflow uploads the SARIF to GitHub Code Scanning.
Access posture
- The agent only scans private targets:
localhost, RFC1918, and link-local. Public addresses are rejected by the API target validator. - The mTLS bundle is ephemeral (60 minutes) and single-use.
- No production traffic is intercepted. Only the test instance you start in the runner is scanned.
- Revoke access at any time by revoking the API Key in the portal.
Pre-requisites
| Requirement | Detail |
|---|---|
| WASViking plan | CI/CD Pipeline Scans enabled (Pro or higher). |
| Portal role | Admin or Manager, to issue API Keys and Sentinel tokens. |
| GitHub repository | Permission to create Actions secrets/variables and files under .github/. |
| Workflow permissions | contents: read and security-events: write (for the SARIF upload). |
| Target app | Able to start in the runner and answer on localhost:<port>. |
| Runner | GitHub-hosted (ubuntu-latest recommended) or self-hosted Linux x86_64. |
| Network egress | HTTPS to api.wasviking.com, sentinel.wasviking.com, and github.com on 443. No inbound is needed. |
Not on GitHub Actions? The same gate runs on any CI system where the
wasviking-sentinelbinary can execute. Start from wasviking-sentinel in CI/CD.
Step 1: Create a Sentinel agent token (portal)
The runner needs a token to download and register the agent.
In the portal, go to Sentinel → Sentinel Agents and click Add Sentinel Agent.
| Field | Value |
|---|---|
| Agent display name | A label shown in the portal, unique in your org (for example, Production CI/CD Bootstrap). This is not the machine hostname; you can rename it later. |
Click Create. The portal shows a RAW bootstrap token once.
Copy it and store it safely. You will paste it into GitHub in Step 3 as
WASV_SENTINEL_API_KEY. If you lose it, create another agent and use
the new token.
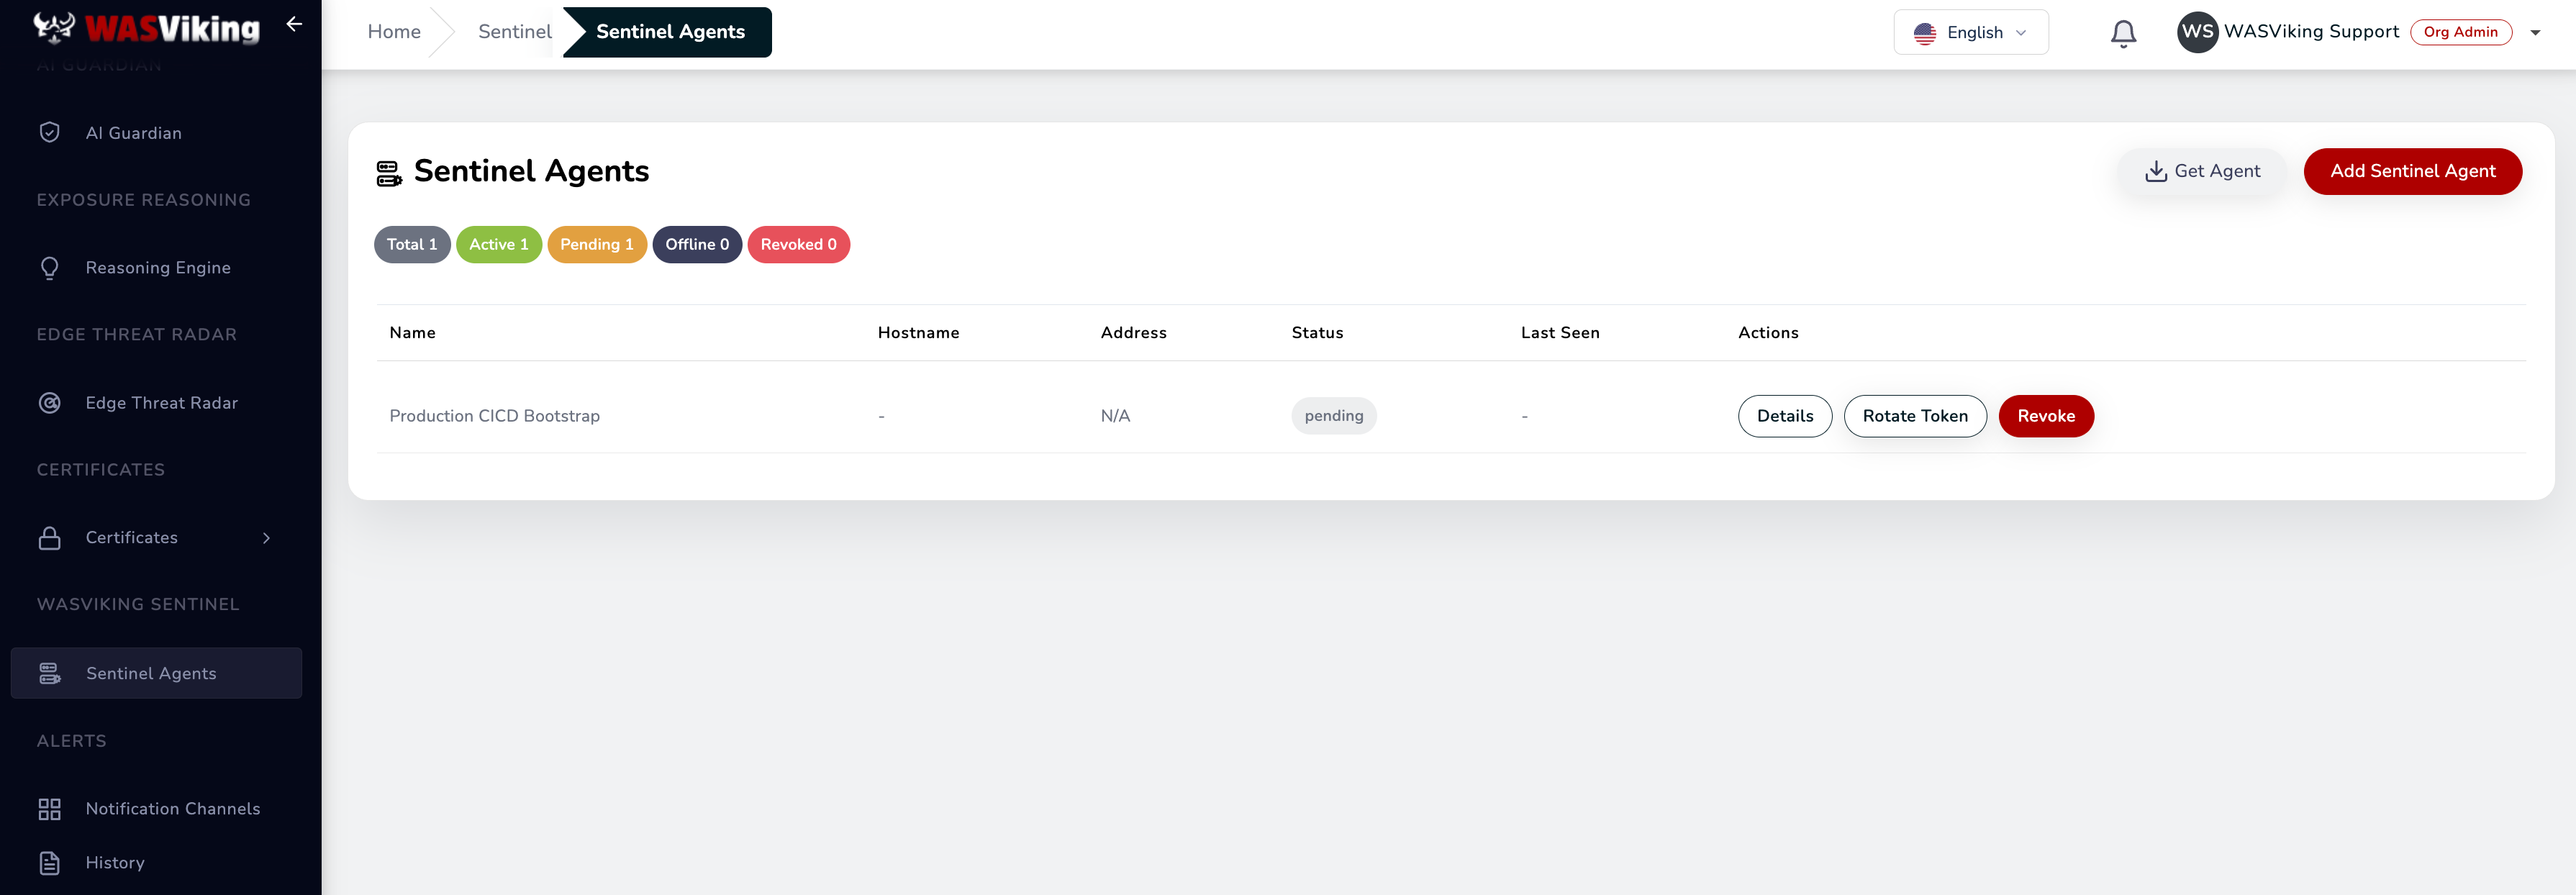 Sentinel → Sentinel Agents → Add Sentinel Agent.
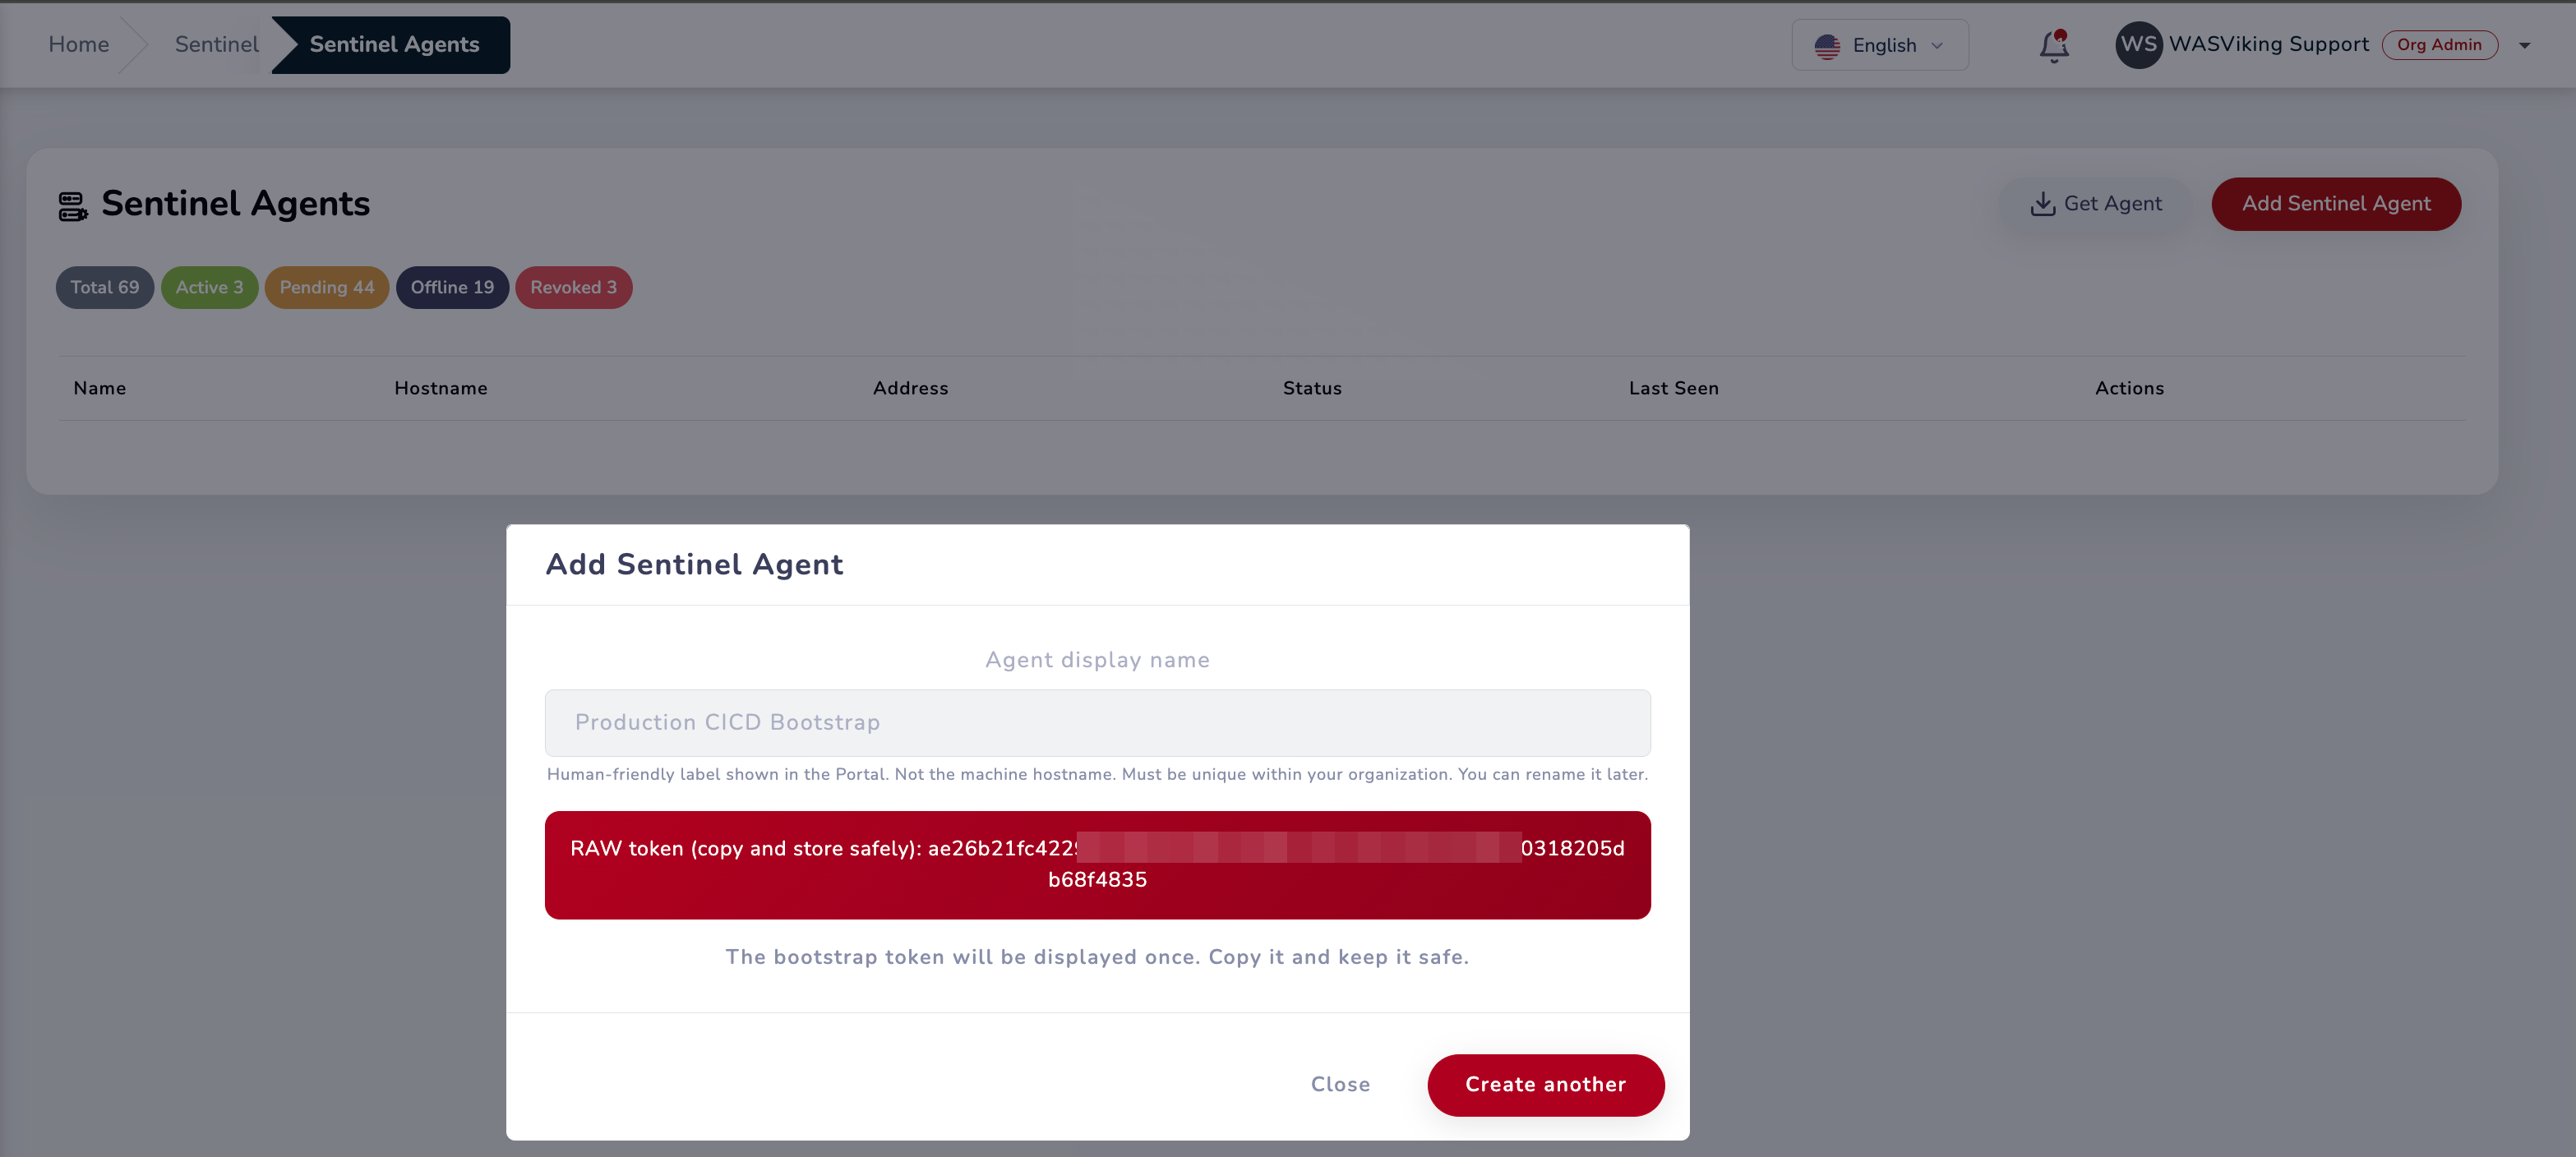 The bootstrap token is shown only once. Copy it before closing.
Step 2: Create an API Key scoped to ci:scan (portal)
This is the credential the scan itself runs under, separate from the agent token.
Go to Settings → System Settings → API Keys and click + New Key.
| Field | Value |
|---|---|
| Label | Something identifiable, for example GitHub Actions CI/CD pipeline. Use one key per repository so you can revoke it without affecting other pipelines. |
| Scopes | Select ci:scan only (Trigger scans from a CI/CD pipeline). Least privilege: do not add scopes the pipeline does not need. |
| Expiration | 90 days is a sensible default; rotate on that cadence. |
Save and copy the key once. You will paste it into GitHub in Step 3
as WASV_DAST_API_KEY.
You can review or adjust a key's scopes later with Edit on the key row. Editing scopes keeps the same key value, so the pipeline keeps working without re-issuing the secret.
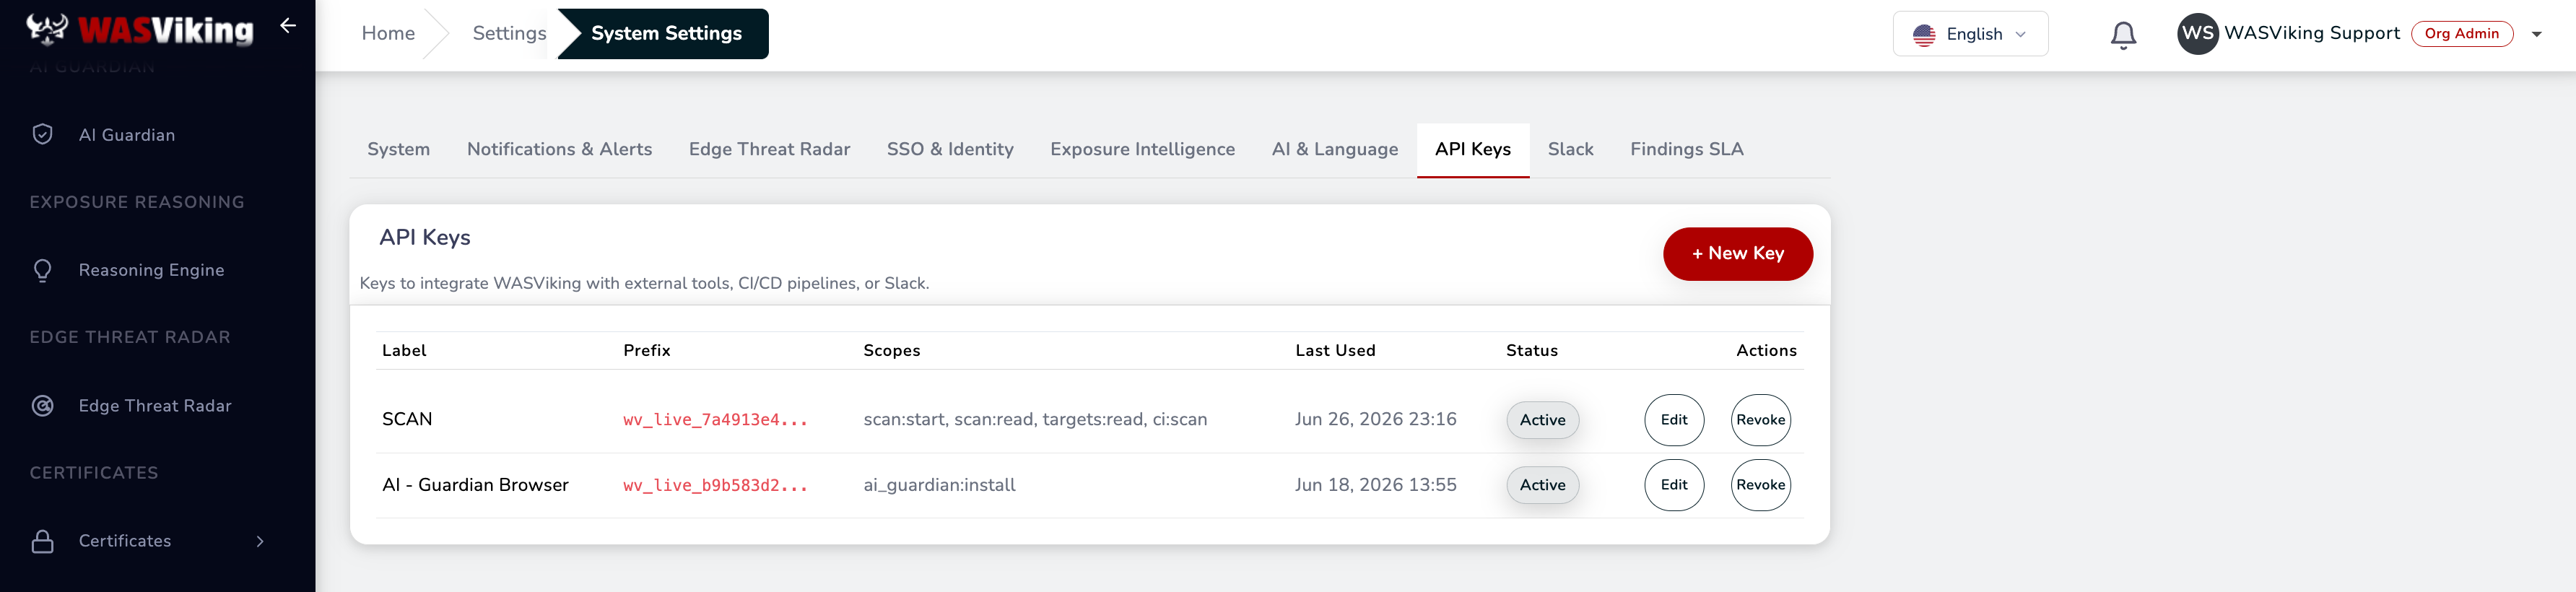 Settings → System Settings → API Keys.
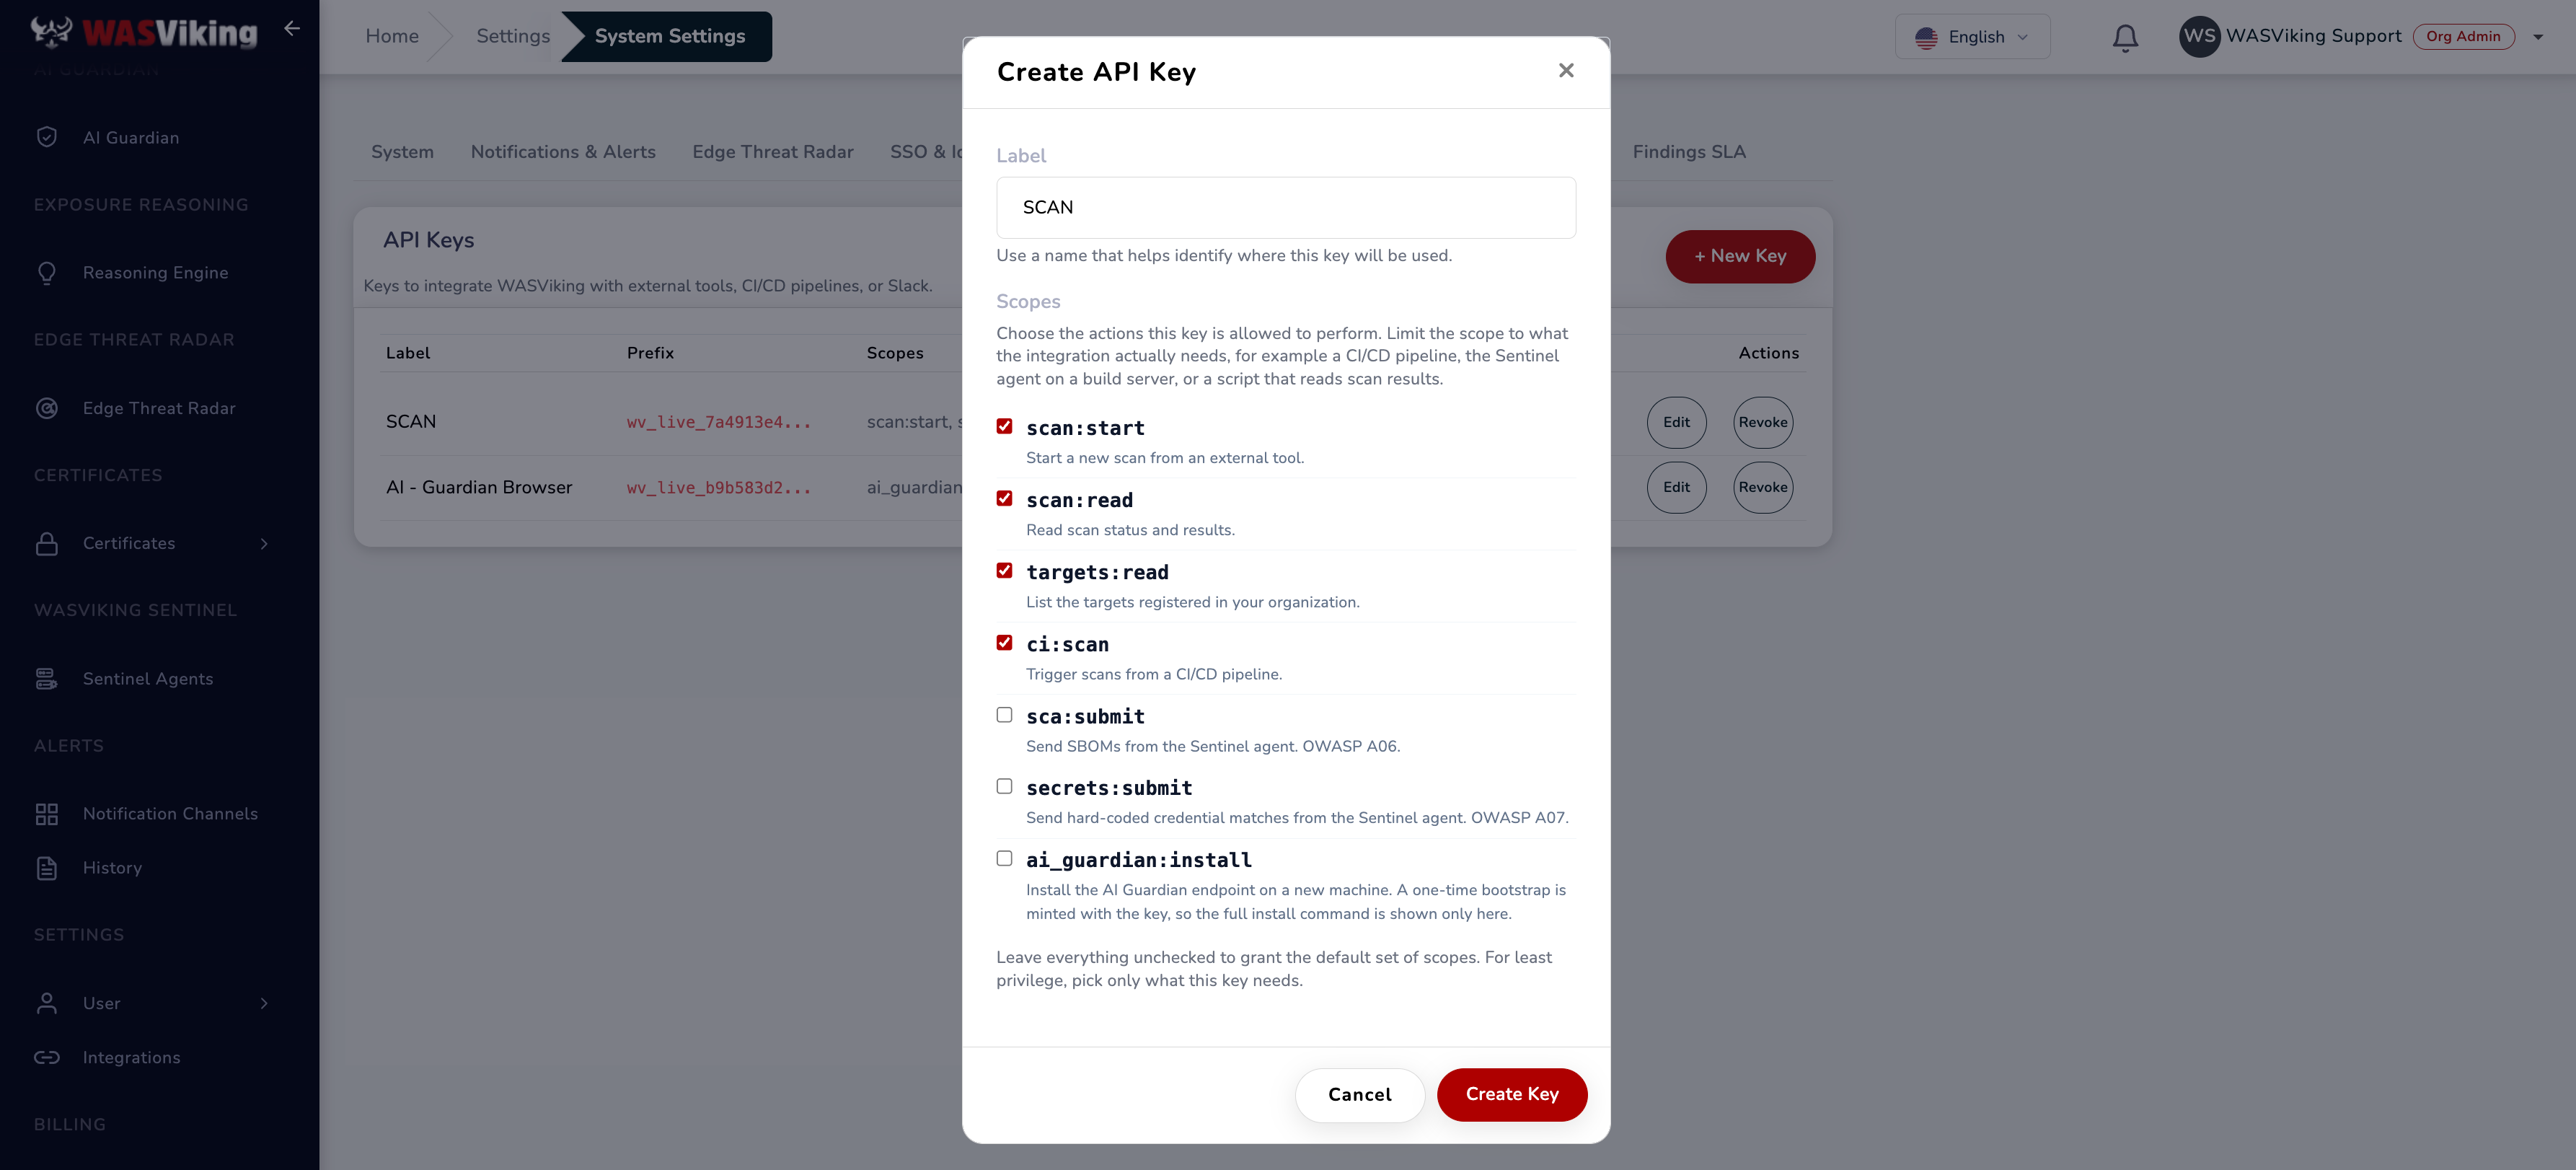 Select ci:scan only for a CI/CD pipeline key.
Step 3: Add the GitHub secrets and variable
Never commit a key to the repository. Store them as encrypted Actions secrets.
In GitHub, go to the repository's Settings → Secrets and variables → Actions.
Under Secrets, add:
| Name | Value |
|---|---|
WASV_SENTINEL_API_KEY |
The bootstrap token from Step 1. |
WASV_DAST_API_KEY |
The API Key from Step 2. |
Under Variables, add:
| Name | Value |
|---|---|
WASV_TEMPLATE |
The CI/CD slug of a Scan Template from the portal, for example ci-fast. |
Use Secrets (encrypted), never Variables, for the two keys. For multiple environments (staging, production), prefer Environment secrets with required reviewers and deployment protection rules.
Picking a Scan Template
A Scan Template is a reusable, named bundle of scan preferences (crawl,
auth, analyzer selection, AI commentary), so the pipeline does not
reconfigure those each run. Browse them in the portal under
Scans → Scan Templates; the CI/CD Slug column is exactly the
value you put in WASV_TEMPLATE.
For pipeline gates, use ci-fast: it runs crawl, security headers,
exposed ports, and TLS only, skipping the heavy active modules, so a
per-PR or per-commit merge gate returns in seconds. Pair it with a
scheduled full-coverage run (full-coverage) against staging to keep
deep coverage without slowing down PRs.
You can use the system templates as-is or create your own with + New Template (optionally starting from an existing one). See Scan profiles and templates for the full list and how to build one.
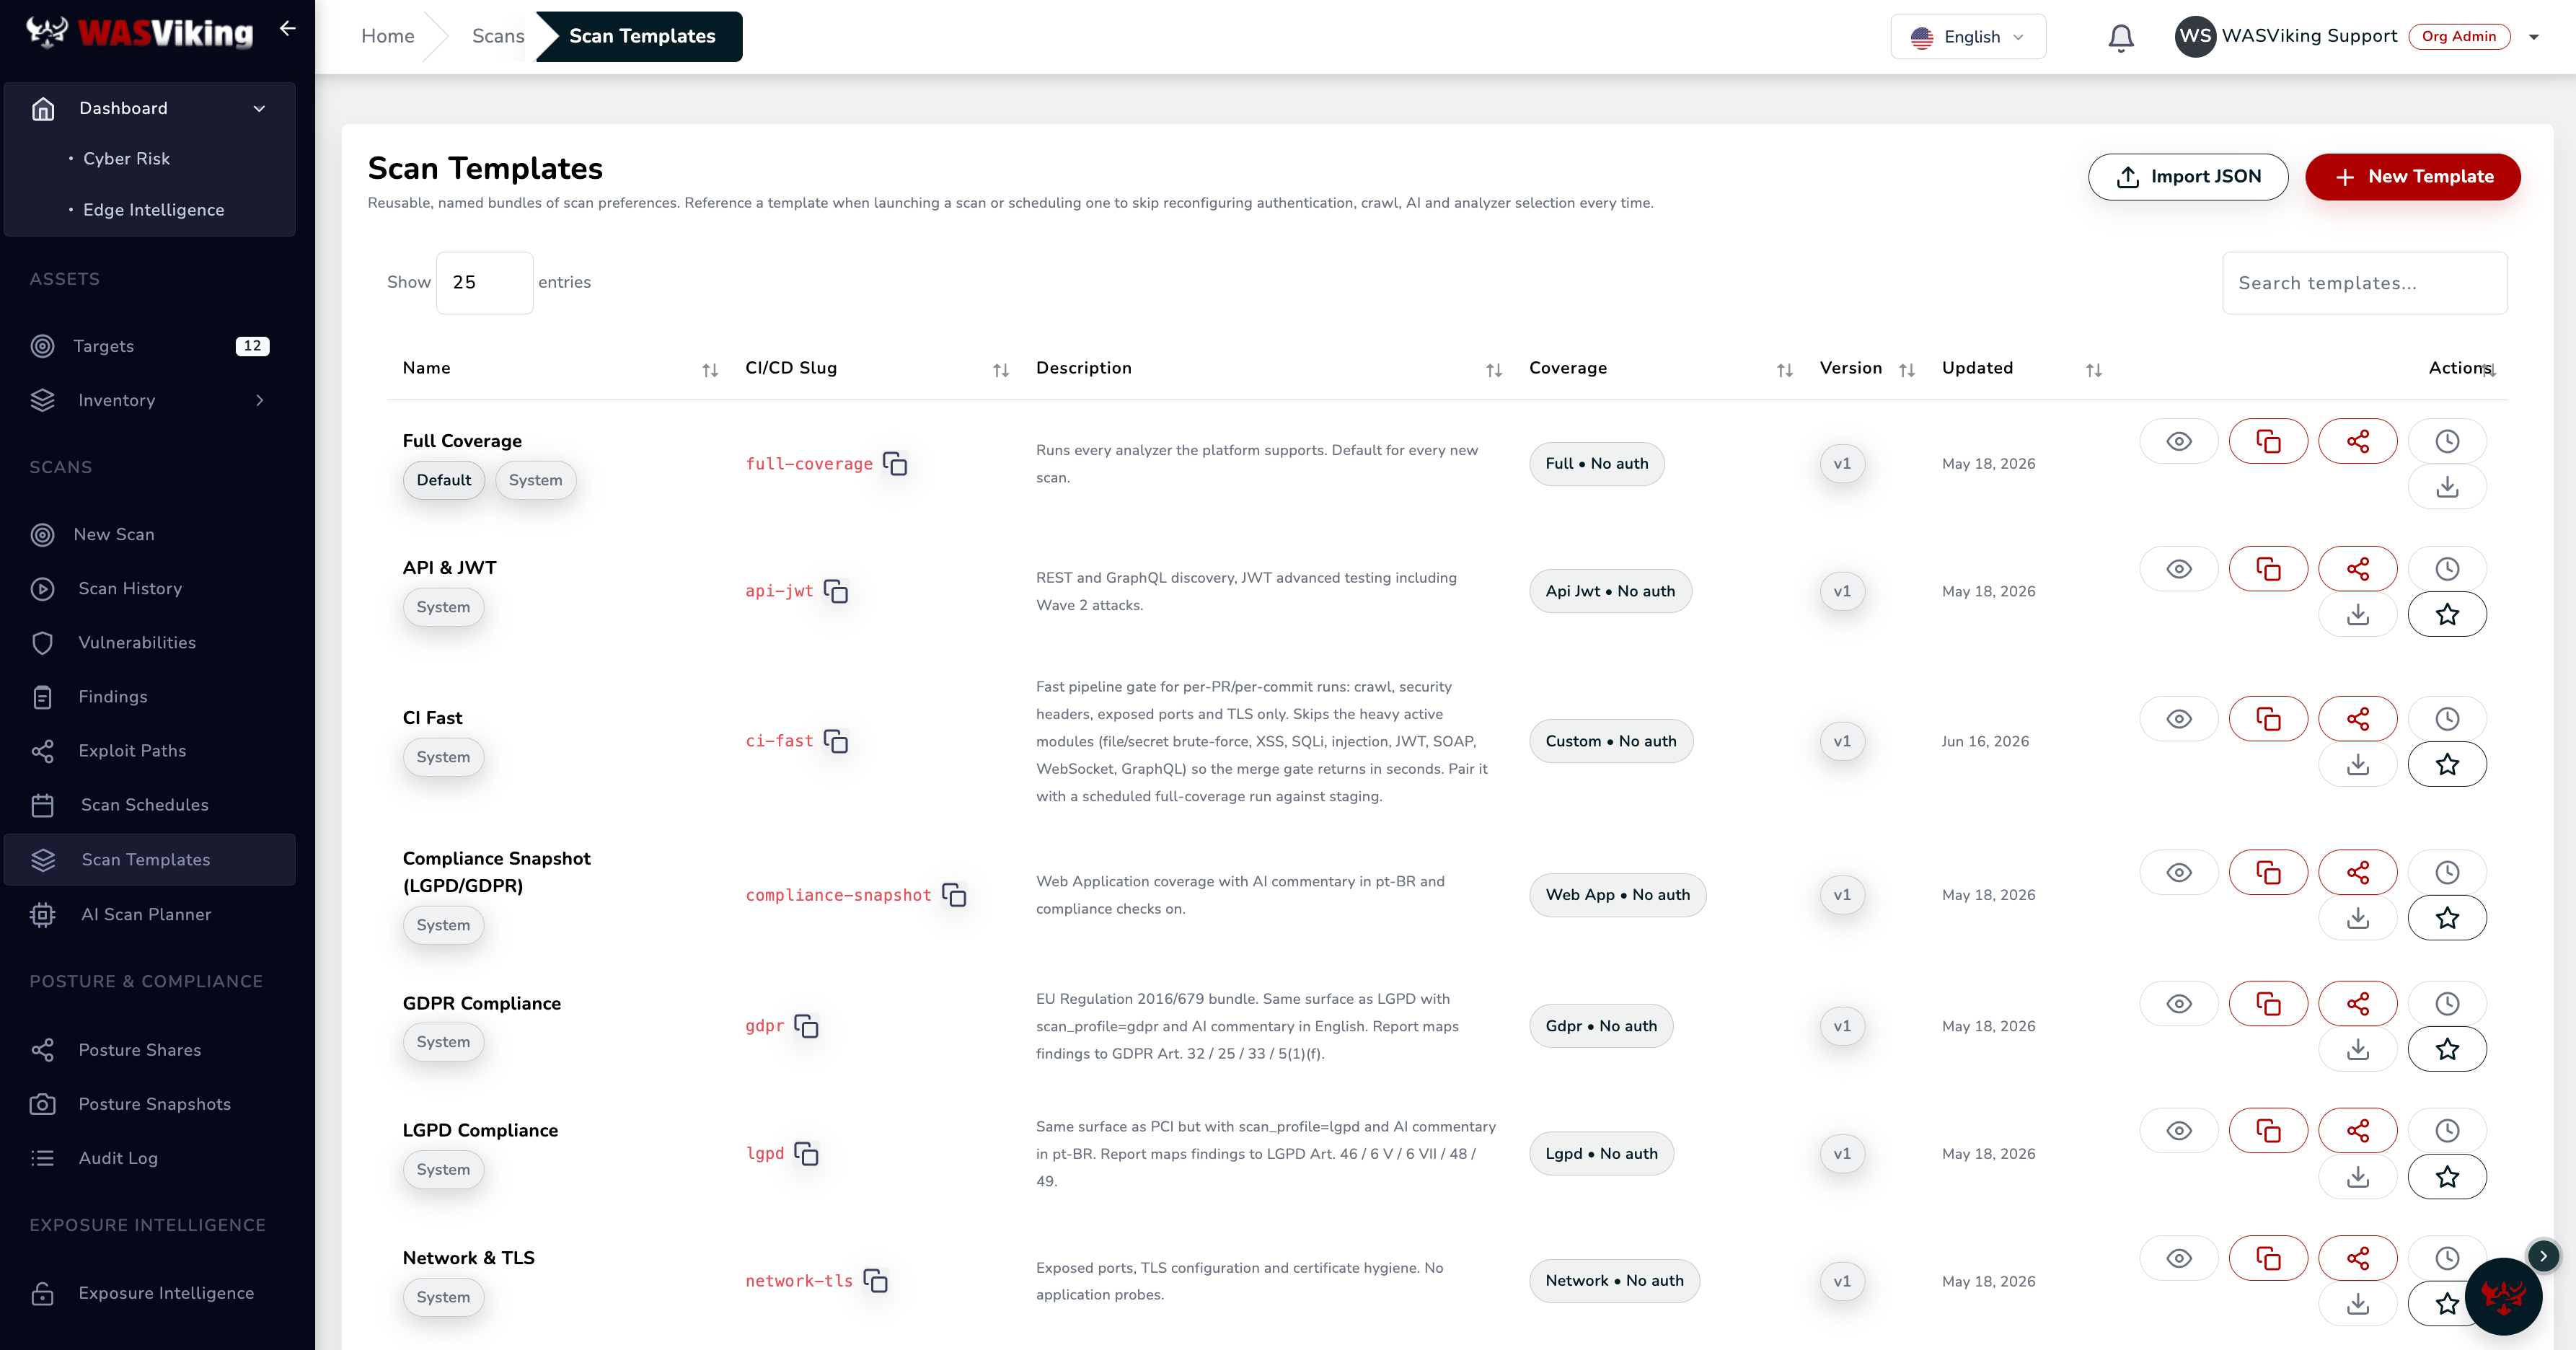 Scans → Scan Templates. The CI/CD Slug column is the WASV_TEMPLATE value.
Step 4: Add the workflow
Create .github/workflows/wasviking-dast.yml. The example below starts a
test app with Docker Compose; replace the Start app step with however
your application boots in CI.
name: WASViking DAST

on:
  push:
    branches: [main]
  pull_request:
    branches: [main]

permissions:
  contents: read
  security-events: write
  actions: read

jobs:
  dast:
    runs-on: ubuntu-latest
    timeout-minutes: 25
    steps:
      - name: Checkout
        uses: actions/checkout@v4

      - name: Start app
        run: |
          docker compose up -d
          for i in {1..30}; do
            curl -sf http://localhost:8080/ >/dev/null && break
            sleep 2
          done

      - name: Install WASViking Sentinel
        env:
          WASV_SENTINEL_API_KEY: ${{ secrets.WASV_SENTINEL_API_KEY }}
        run: |
          curl -sSL -H "Authorization: ApiKey $WASV_SENTINEL_API_KEY" \
            https://api.wasviking.com/api/v1/sentinel/install.sh | sh

      - name: Run WASViking scan
        env:
          WASV_DAST_API_KEY: ${{ secrets.WASV_DAST_API_KEY }}
          WV_TEMPLATE: ${{ vars.WASV_TEMPLATE }}
        run: |
          mkdir -p wasviking-reports
          ./.wasviking/wasviking-sentinel scan \
            --api-key "$WASV_DAST_API_KEY" \
            --template "$WV_TEMPLATE" \
            --fail-on critical \
            --baseline new \
            --out ./wasviking-reports \
            http://localhost:8080

      - name: Upload SARIF to GitHub code scanning
        if: always() && hashFiles('wasviking-reports/wasviking-scan.sarif') != ''
        uses: github/codeql-action/upload-sarif@v4
        with:
          sarif_file: wasviking-reports/wasviking-scan.sarif
          category: wasviking-dast

      - name: Upload raw reports as artifact
        if: always()
        uses: actions/upload-artifact@v4
        with:
          name: wasviking-reports
          path: wasviking-reports/
Code Scanning upload (the SARIF step) requires GitHub Advanced Security on private repositories. If you do not have it, drop that step and rely on the uploaded artifact instead.
Step 5: Scan flags
The scan command takes the target URL as its final argument:
wasviking-sentinel scan [flags] <URL_TARGET>
| Flag | Required | Description |
|---|---|---|
<URL_TARGET> |
Yes | Target URL. Must resolve to a private address. |
--api-key |
Yes | API Key with the ci:scan scope. |
--template |
Yes | Slug of a Scan Template from the portal, to reuse a standard scan config. |
--auth-bearer |
No | Bearer token to run the scan authenticated (Authorization: Bearer <token>). Prefer the WV_AUTH_BEARER env var so the token never lands in the process argv or CI logs. Overrides any auth in --template. |
--auth-header |
No | Custom auth header in Name: value form, e.g. X-Api-Token: <value>. Prefer the WV_AUTH_HEADER env var. Overrides any auth in --template. Use either --auth-bearer or --auth-header, not both. |
--path |
No | Extra endpoint to scan first, before the auto-discovered surface. Repeatable (--path /api/v1/users --path /api/v1/orders) or via WV_SEED_PATHS (comma-separated). Relative paths or same-origin URLs; max 500. |
--fail-on |
No | Single threshold: critical, high, medium, low, or none. "Or above" logic: --fail-on high fails on high and critical. Default: critical. |
--baseline |
No | new (only findings absent from the base branch count) or all. Default: all. |
--out |
No | Output directory for SARIF and JSON. Default: current directory. |
--timeout |
No | Total timeout. Default: 45m. |
Two files are produced:
wasviking-scan.sarif: SARIF 2.1.0 (GitHub Code Scanning, GitLab, and others).wasviking-scan.json: full output with WASViking metadata.
Authenticated scans
An unauthenticated scan only sees what an anonymous visitor sees. To scan the area behind a login, the part that actually holds your business logic, the engine needs a credential. Instead of storing static credentials in a Scan Template, mint a short-lived token in the pipeline and pass it to the scan. The token stays valid only for the duration of the run.
Two modes, pick one:
| Mode | Flag | Env var (preferred) | Sent as |
|---|---|---|---|
| Bearer token | --auth-bearer <token> |
WV_AUTH_BEARER |
Authorization: Bearer <token> |
| Custom header | --auth-header 'Name: value' |
WV_AUTH_HEADER |
Name: value (e.g. X-Api-Token: …) |
Always pass the token via the environment variable, not the flag. A
value on the command line ends up in the process argv and in the CI log;
an environment variable does not. GitHub masks it further when you use
::add-mask::.
How it behaves:
- Overrides the template. If a credential is supplied, it replaces the
authenticationblock of your--templateentirely; everything else in the template (crawl rules, analyzer selection, compliance profile) is preserved. So one template can serve both anonymous and authenticated pipelines. - Encrypted at rest, never logged. The secret travels over the same
TLS channel as the API Key, is encrypted at rest, and is stamped only as
a mode marker (
bearer/header) in the run's audit trail, never the value. - No silent downgrade. On success the CLI prints
Authenticated scan confirmed (mode=bearer). If you request an authenticated scan but the server does not apply the credential, the CLI fails the step (exit 2) instead of running unauthenticated and reporting a false all-clear.
Minting the token
The right step depends on how your app issues tokens. Two common patterns, both against the instance you started in the runner:
# Option A: OAuth2 client-credentials (machine-to-machine)
- name: Mint scan token (OAuth2)
  env:
    OAUTH_CLIENT_ID: ${{ secrets.SCAN_CLIENT_ID }}
    OAUTH_CLIENT_SECRET: ${{ secrets.SCAN_CLIENT_SECRET }}
  run: |
    TOKEN="$(curl -sf -X POST http://localhost:8080/oauth/token \
      -d grant_type=client_credentials \
      -d client_id="$OAUTH_CLIENT_ID" \
      -d client_secret="$OAUTH_CLIENT_SECRET" | jq -r '.access_token')"
    test -n "$TOKEN" && test "$TOKEN" != null || { echo "token mint failed"; exit 1; }
    echo "::add-mask::$TOKEN"
    echo "WV_AUTH_BEARER=$TOKEN" >> "$GITHUB_ENV"
# Option B: app login endpoint returning {"access_token": "..."}
- name: Mint scan token (login)
  env:
    TEST_USER: ${{ secrets.SCAN_TEST_USER }}
    TEST_PASSWORD: ${{ secrets.SCAN_TEST_PASSWORD }}
  run: |
    TOKEN="$(curl -sf -X POST http://localhost:8080/api/login \
      -H 'Content-Type: application/json' \
      -d "{\"username\":\"$TEST_USER\",\"password\":\"$TEST_PASSWORD\"}" \
      | jq -r '.access_token')"
    test -n "$TOKEN" && test "$TOKEN" != null || { echo "login failed"; exit 1; }
    echo "::add-mask::$TOKEN"
    echo "WV_AUTH_BEARER=$TOKEN" >> "$GITHUB_ENV"
Use a dedicated, low-privilege test account or client for scanning, never a real user or an admin credential.
Prioritizing specific endpoints (seed paths)
The engine auto-discovers your surface (crawl, robots.txt, sitemap,
OpenAPI/Swagger, GraphQL introspection). But API routes and SPA views
often have no crawlable HTML links, so the crawler never reaches them.
List them explicitly with --path and they are scanned first, before
the auto-discovered surface.
--path /api/v1/users \
--path /api/v1/orders \
--path '/api/v1/admin/dashboard'
Or, equivalently, via the environment (comma-separated):
WV_SEED_PATHS=/api/v1/users,/api/v1/orders,/api/v1/admin/dashboard
- Relative paths (
/api/v1/users) or same-origin URLs; up to 500. - Seeded endpoints are crawled and actively tested first; the engine then follows their links, so authenticated sub-pages get discovered too.
- Pair with authentication: the token unlocks the protected routes, and
--pathmakes sure the scanner actually visits them. On success the CLI printsPriority seed paths confirmed (N applied).
Full example: authenticated scan with prioritized endpoints
.github/workflows/wasviking-dast-auth.yml. This is the enterprise
shape: a protected GitHub Environment for the secrets, a token minted at
runtime, the developer's own API routes scanned first, and SARIF
published to Code Scanning.
name: WASViking DAST (authenticated)

on:
  push:
    branches: [main]
  pull_request:
    branches: [main]

permissions:
  contents: read
  security-events: write
  actions: read

jobs:
  dast-auth:
    runs-on: ubuntu-latest
    timeout-minutes: 25
    # Environment secrets add required reviewers and deployment
    # protection to the scan credentials. Configure under
    # Settings → Environments → dast.
    environment: dast
    steps:
      - name: Checkout
        uses: actions/checkout@v4

      - name: Start app
        run: |
          docker compose up -d
          for i in {1..30}; do
            curl -sf http://localhost:8080/ >/dev/null && break
            sleep 2
          done

      # Mint a short-lived token against the instance under test.
      # Swap for your own auth flow (see "Minting the token" above).
      - name: Mint scan token
        env:
          TEST_USER: ${{ secrets.SCAN_TEST_USER }}
          TEST_PASSWORD: ${{ secrets.SCAN_TEST_PASSWORD }}
        run: |
          TOKEN="$(curl -sf -X POST http://localhost:8080/api/login \
            -H 'Content-Type: application/json' \
            -d "{\"username\":\"$TEST_USER\",\"password\":\"$TEST_PASSWORD\"}" \
            | jq -r '.access_token')"
          test -n "$TOKEN" && test "$TOKEN" != null || { echo "login failed"; exit 1; }
          echo "::add-mask::$TOKEN"
          echo "WV_AUTH_BEARER=$TOKEN" >> "$GITHUB_ENV"

      - name: Install WASViking Sentinel
        env:
          WASV_SENTINEL_API_KEY: ${{ secrets.WASV_SENTINEL_API_KEY }}
        run: |
          curl -sSL -H "Authorization: ApiKey $WASV_SENTINEL_API_KEY" \
            https://api.wasviking.com/api/v1/sentinel/install.sh | sh

      - name: Run authenticated WASViking scan
        env:
          WASV_DAST_API_KEY: ${{ secrets.WASV_DAST_API_KEY }}
          WV_TEMPLATE: ${{ vars.WASV_TEMPLATE }}
          # WV_AUTH_BEARER was exported by the "Mint scan token" step and is
          # masked. It is NOT passed as a flag, so it never reaches argv/logs.
          WV_SEED_PATHS: /api/v1/users,/api/v1/orders,/api/v1/admin/dashboard
        run: |
          mkdir -p wasviking-reports
          ./.wasviking/wasviking-sentinel scan \
            --api-key "$WASV_DAST_API_KEY" \
            --template "$WV_TEMPLATE" \
            --fail-on high \
            --baseline new \
            --out ./wasviking-reports \
            http://localhost:8080

      - name: Upload SARIF to GitHub code scanning
        if: always() && hashFiles('wasviking-reports/wasviking-scan.sarif') != ''
        uses: github/codeql-action/upload-sarif@v4
        with:
          sarif_file: wasviking-reports/wasviking-scan.sarif
          category: wasviking-dast

      - name: Upload raw reports as artifact
        if: always()
        uses: actions/upload-artifact@v4
        with:
          name: wasviking-reports
          path: wasviking-reports/
Both
WV_AUTH_BEARERandWV_SEED_PATHSare read from the environment by thescancommand, so the scan step stays free of secrets and long path lists on the command line. To use a custom header instead of a bearer token, exportWV_AUTH_HEADER(e.g.X-Api-Token: <value>) in the mint step in place ofWV_AUTH_BEARER.
Fail-on policy
--fail-on sets the lowest severity that fails the build, and everything
above it also fails.
| Setting | Behavior |
|---|---|
--fail-on none |
Never fails. Report only. |
--fail-on critical |
Fails on critical only. |
--fail-on high |
Fails on high and critical. A good default for PRs. |
--fail-on medium |
Fails on medium and above. Stricter, more friction. |
A practical rollout: start at critical to keep early friction low,
then tighten to high once your baseline is clean (typically a couple
of sprints).
Baseline diff
--baseline controls what counts toward the fail-on policy.
| Mode | Behavior |
|---|---|
all (default) |
Every finding counts. Use for release branches, scheduled scans, and audits. |
new |
Only findings absent from the base branch count. Use for day-to-day pull requests, to avoid friction with pre-existing debt. |
What is and isn't collected
WASViking does not collect your repository source code, runner
environment variables beyond the keys you pass, runner filesystem
contents outside the .wasviking/ directory, or any production traffic
or data. Data is processed in the US region, encrypted in transit
(TLS 1.2+) and at rest (AES-256). A DPA and EU data residency are
available on request; see the
Trust Center for the full
compliance mapping (ISO 27001, SOC 2, LGPD, GDPR, NIST SSDF,
OWASP DSOMM).
Common problems
| Problem | Likely cause |
|---|---|
HTTP 401 Unauthorized |
API Key revoked, expired, or missing the ci:scan scope. |
HTTP 400 target must be private |
The target URL resolved to a public address. Scan localhost or a private range. |
HTTP 429 quota exceeded |
Monthly CI/CD scan quota reached. Wait for the cycle to roll over, upgrade, or buy an add-on pack. |
HTTP 429 concurrency limit |
Too many simultaneous scans for your plan. |
| Scan stuck in running | The target app did not respond. Add a health check before the scan step. |
| Empty SARIF | The app was not reachable or returned only 5xx errors. |
install.sh download error |
Network policy blocking api.wasviking.com or the release bucket. |
| Findings differ between runs | Non-deterministic app behavior (random IDs, timestamps). |
| Step exits 2, "server did not apply any credential" | You requested an authenticated scan but the token was not applied. Check the token was minted (not empty) and exported to WV_AUTH_BEARER/WV_AUTH_HEADER. |
token mint failed / login failed |
The mint step got an empty token. Verify the auth endpoint URL, the test credentials, and that the app was healthy before this step. |
| Authenticated pages still show as unreached | Token expired mid-run or lacks access to those routes; and list the routes with --path/WV_SEED_PATHS so the crawler visits them. |
choose only one of --auth-bearer / --auth-header |
Both a bearer token and a custom header were supplied. Use exactly one. |
Where this fits in the platform
- The CI/CD scan quota and run history live under User → CI/CD Pipeline in the portal.
- The same DAST gate on Bitbucket Pipelines is CI/CD DAST with Bitbucket Pipelines.
- Scan Templates are managed under Scan profiles and templates.
- Alert routing is documented under Slack and Teams and Webhooks.