
WASViking Sentinel Tunnel
Scan the applications that never touch the internet. Install the Sentinel agent inside your network, register it with a one-time token, and let it open an outbound mTLS tunnel that you can rotate or revoke at any time.
Your most sensitive applications are usually the ones a cloud scanner cannot see: the staging environment behind the VPN, the internal API that only the office network reaches, the admin panel on a private address. Testing them normally forces a bad choice: open a hole in the firewall for a vendor, or leave them untested.
The WASViking® Sentinel removes that choice. It is a small agent you install on one Linux host inside your network. The agent dials out to the WASViking cloud over mutual TLS and keeps a tunnel open; scan traffic for your internal targets flows through that tunnel. Nothing connects in. Your firewall keeps every inbound port closed, and the scans reach the private addresses of your Dev and STG infrastructure as if the scanner were sitting next to them.
Why your security team will approve this
This is the part to bring to the security and compliance review before installing anything:
- Outbound only. The agent opens one outbound HTTPS connection on port 443. No inbound ports, no NAT rules, no VPN accounts for a third party, nothing for an external attacker to find.
- Mutual TLS with a per-agent identity. During registration the agent receives its own client certificates, bound to your organization. Both sides authenticate; a connection without a valid client certificate for your org is refused.
- You hold the kill switch. Every agent can have its token rotated or be revoked from the portal, and a revoked agent is cut off immediately. Access by WASViking to your internal network exists only while you keep an agent registered and running.
- One-time bootstrap. The registration token is shown once and is valid for a single registration. After that, the certificate is the identity; the token is useless to anyone who finds it later.
- Scoped reach. The agent only scans the internal targets you register in the portal, and you can restrict its network reach further with your own firewall rules around the host it runs on.
The full transport and hardening detail lives in Sentinel architecture; it is written to be handed to a security reviewer.
Where this helps in the day to day
- Dev and STG before release. The same scan engine that covers your public site runs against pre-production addresses, so issues are caught before they ship.
- Internal-only applications. Intranet apps, internal APIs, and admin panels get the same findings workflow, risk scoring, and compliance mapping as everything else.
- Segmented networks. Install one agent per segment or data center; the portal routes each scan through the right agent.
- Evidence for the auditor. Internal applications show up in your posture with scan history, which answers the recurring audit question about coverage beyond the public perimeter.
Pre-requisites
| Requirement | Detail |
|---|---|
| A host inside the network | A Linux host (Ubuntu/Debian package shown here) that can reach the internal targets you want to scan. |
| Outbound network | TCP 443 to sentinel.wasviking.com (the tunnel) and api.wasviking.com (registration). No inbound access is needed, and TLS inspection must not touch sentinel.wasviking.com. |
| Clock sync | NTP enabled on the host; certificate validation depends on a correct clock. |
| Portal role | Admin, to register agents and copy the bootstrap token. |
Step 1: Open the Sentinel Agents page
In the portal, go to Sentinel → Sentinel Agents.
The page groups every Sentinel identity by what it does. Four cards across the top (Scan Tunnels, AI Guardian, CI/CD Pipelines and Infrastructure Defense) show how many agents each group has and how many are connected, waiting or need attention. Click a card to open its list. This guide uses Scan Tunnels.
The Scan Tunnels list shows each agent with its hostname, status, version, last check-in and the number of scan targets linked to it. Search and the status filters narrow the list, and Show revoked brings back revoked agents. The Actions column holds Details, Update (when a newer release is available), Rotate Token and Revoke.
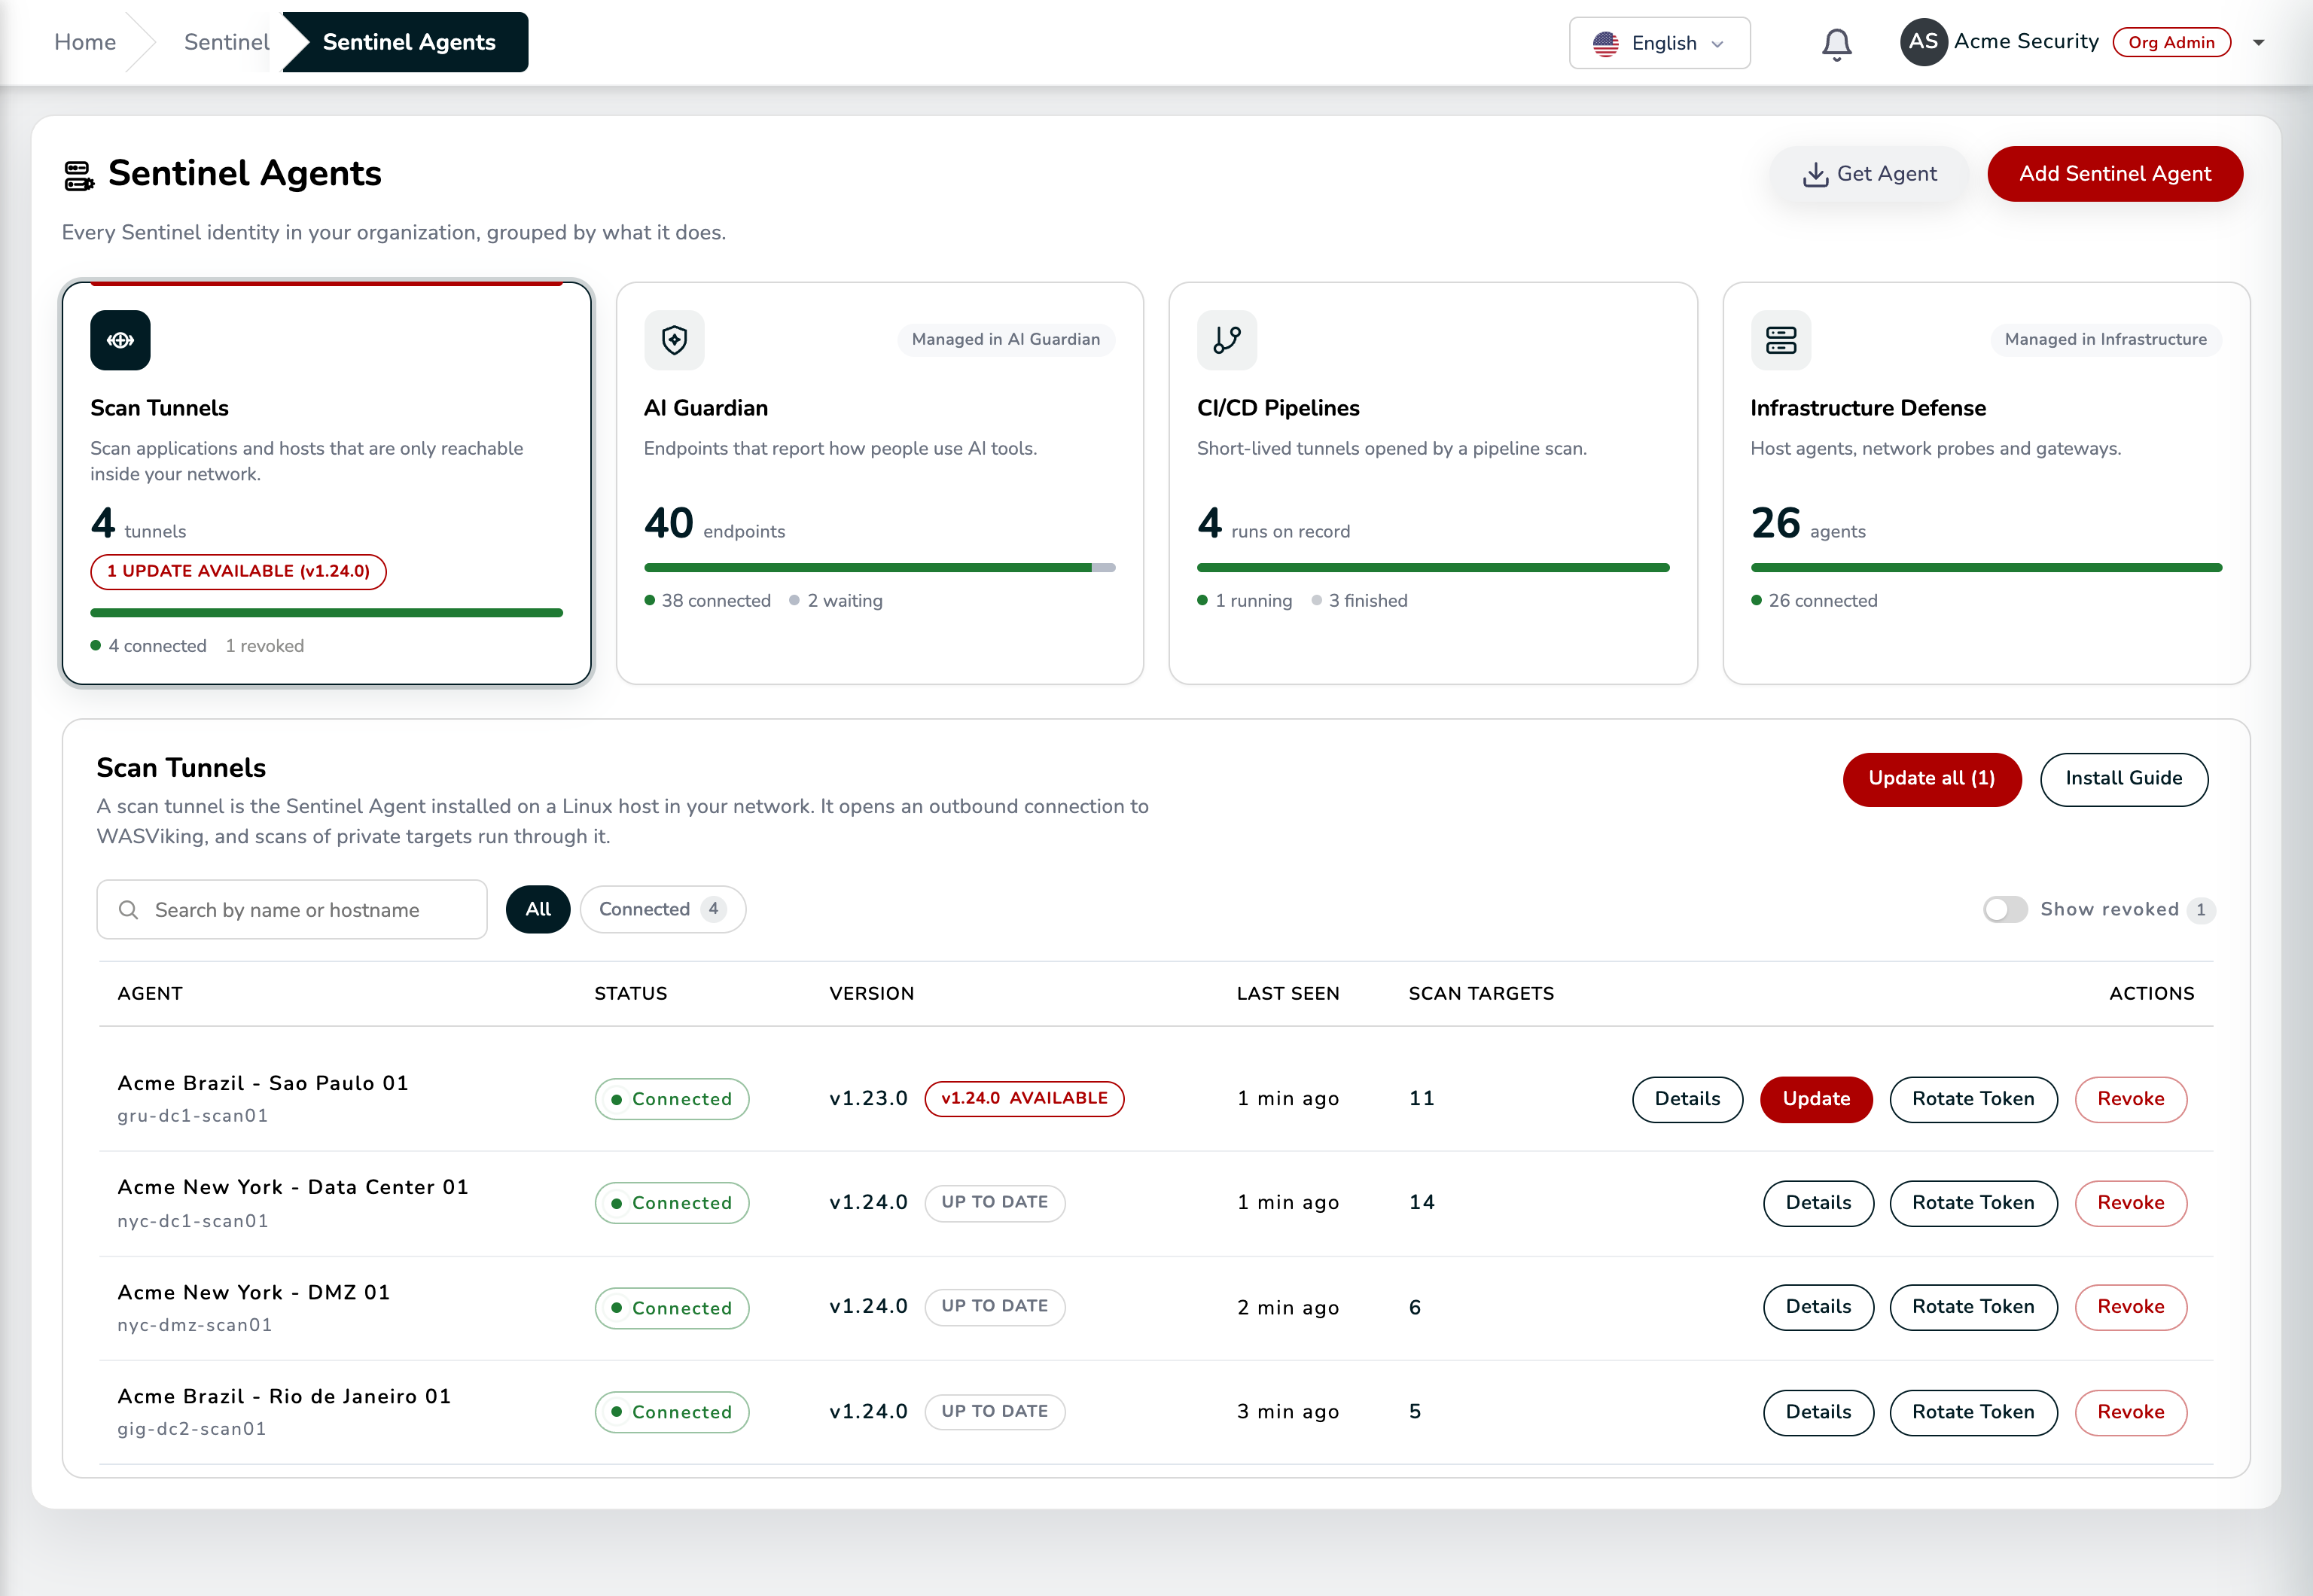 Sentinel → Sentinel Agents.
Step 2: Register the agent and copy the token
Click Add Sentinel Agent and give it a display name. This is a
human label shown in the portal, not the machine hostname, and it
must be unique in your organization. Name it after the site and
segment it will serve, for example Acme Brazil - Sao Paulo Staging,
so that a year from now the table still reads like a map of your
network.
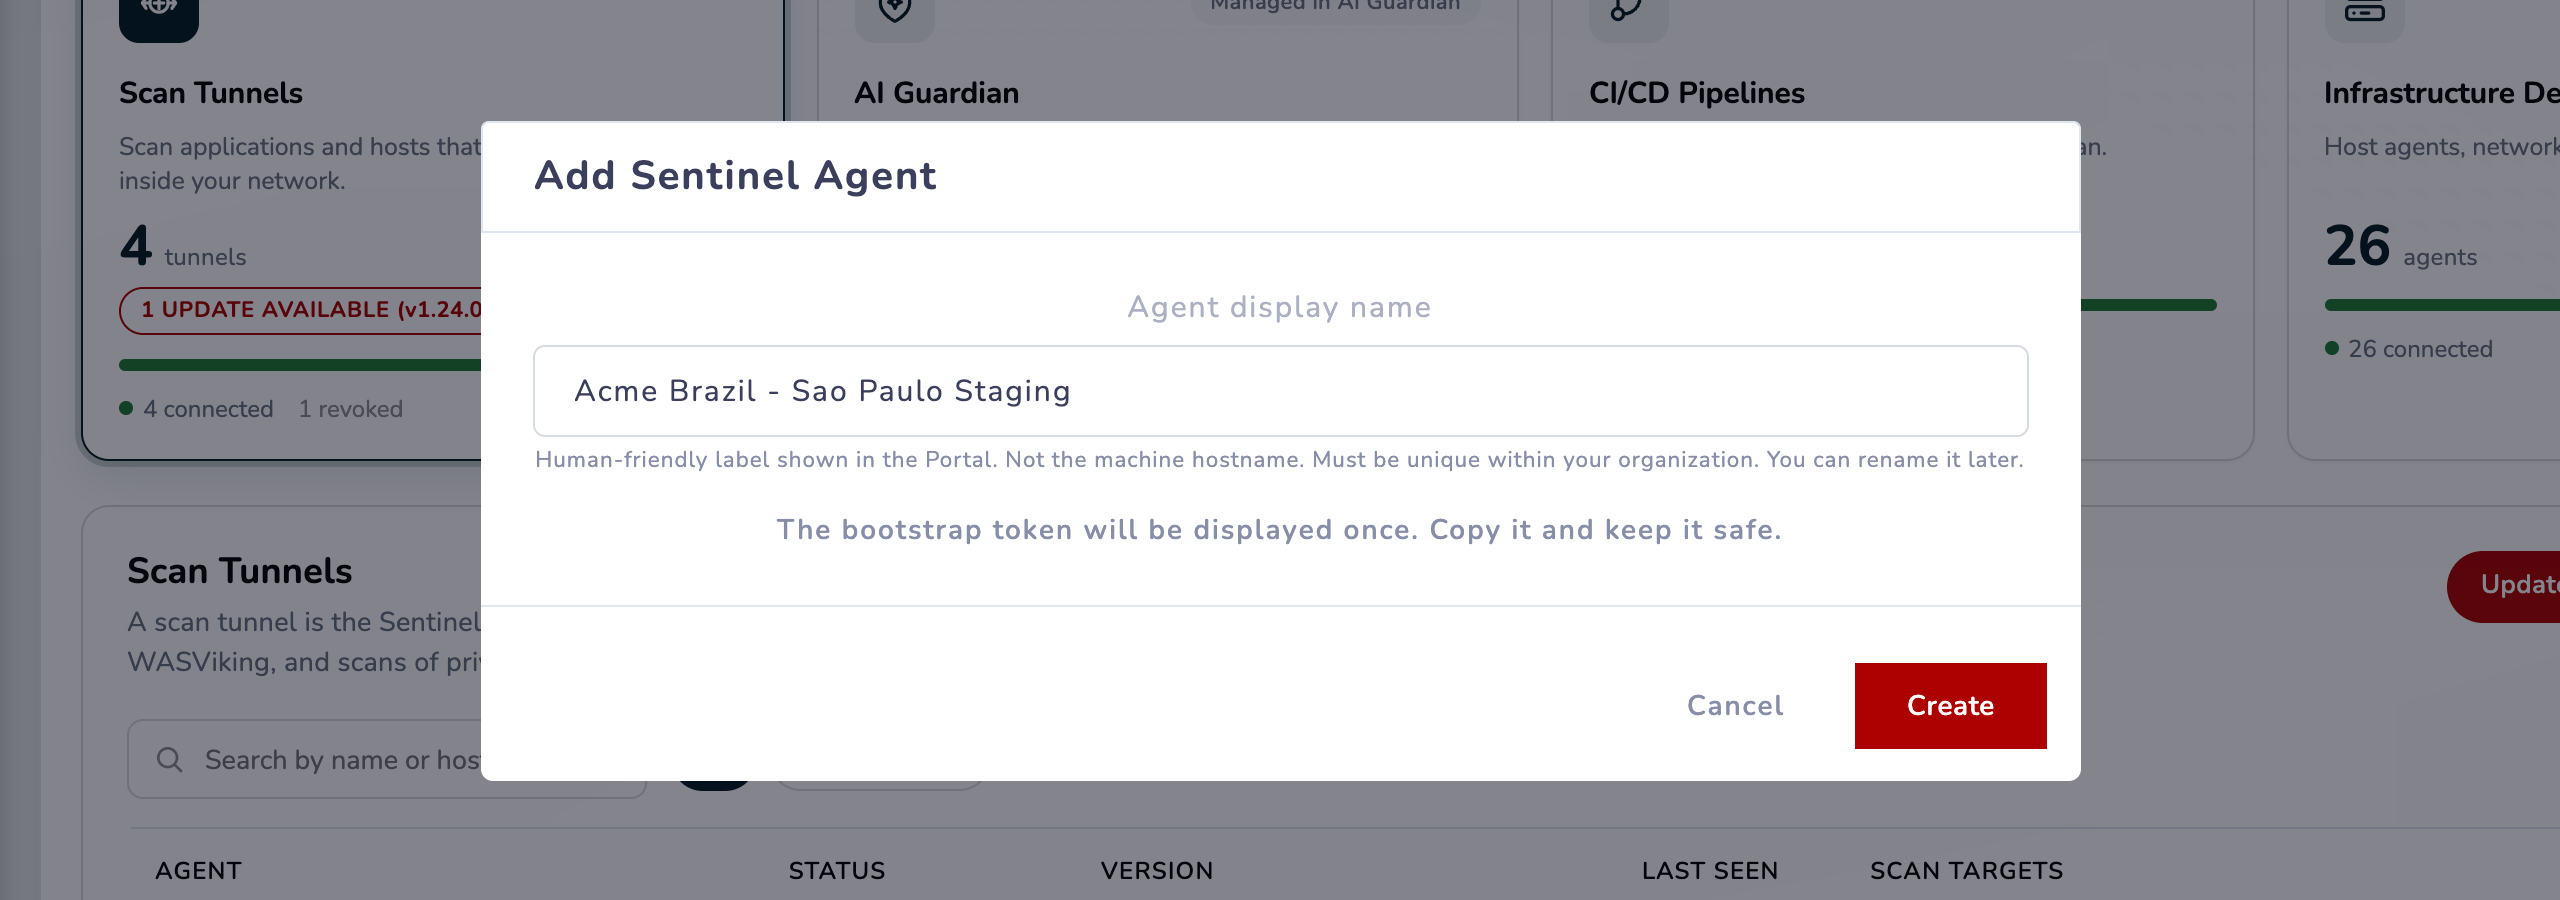 A human-friendly label, unique in your organization. You can rename it later.
Click Create. The portal shows the RAW bootstrap token once. Copy it and store it safely; it is what you will use on the host in the next step. The token authorizes a single registration, so if you lose it before registering, use Rotate Token on the agent row to mint a fresh one.
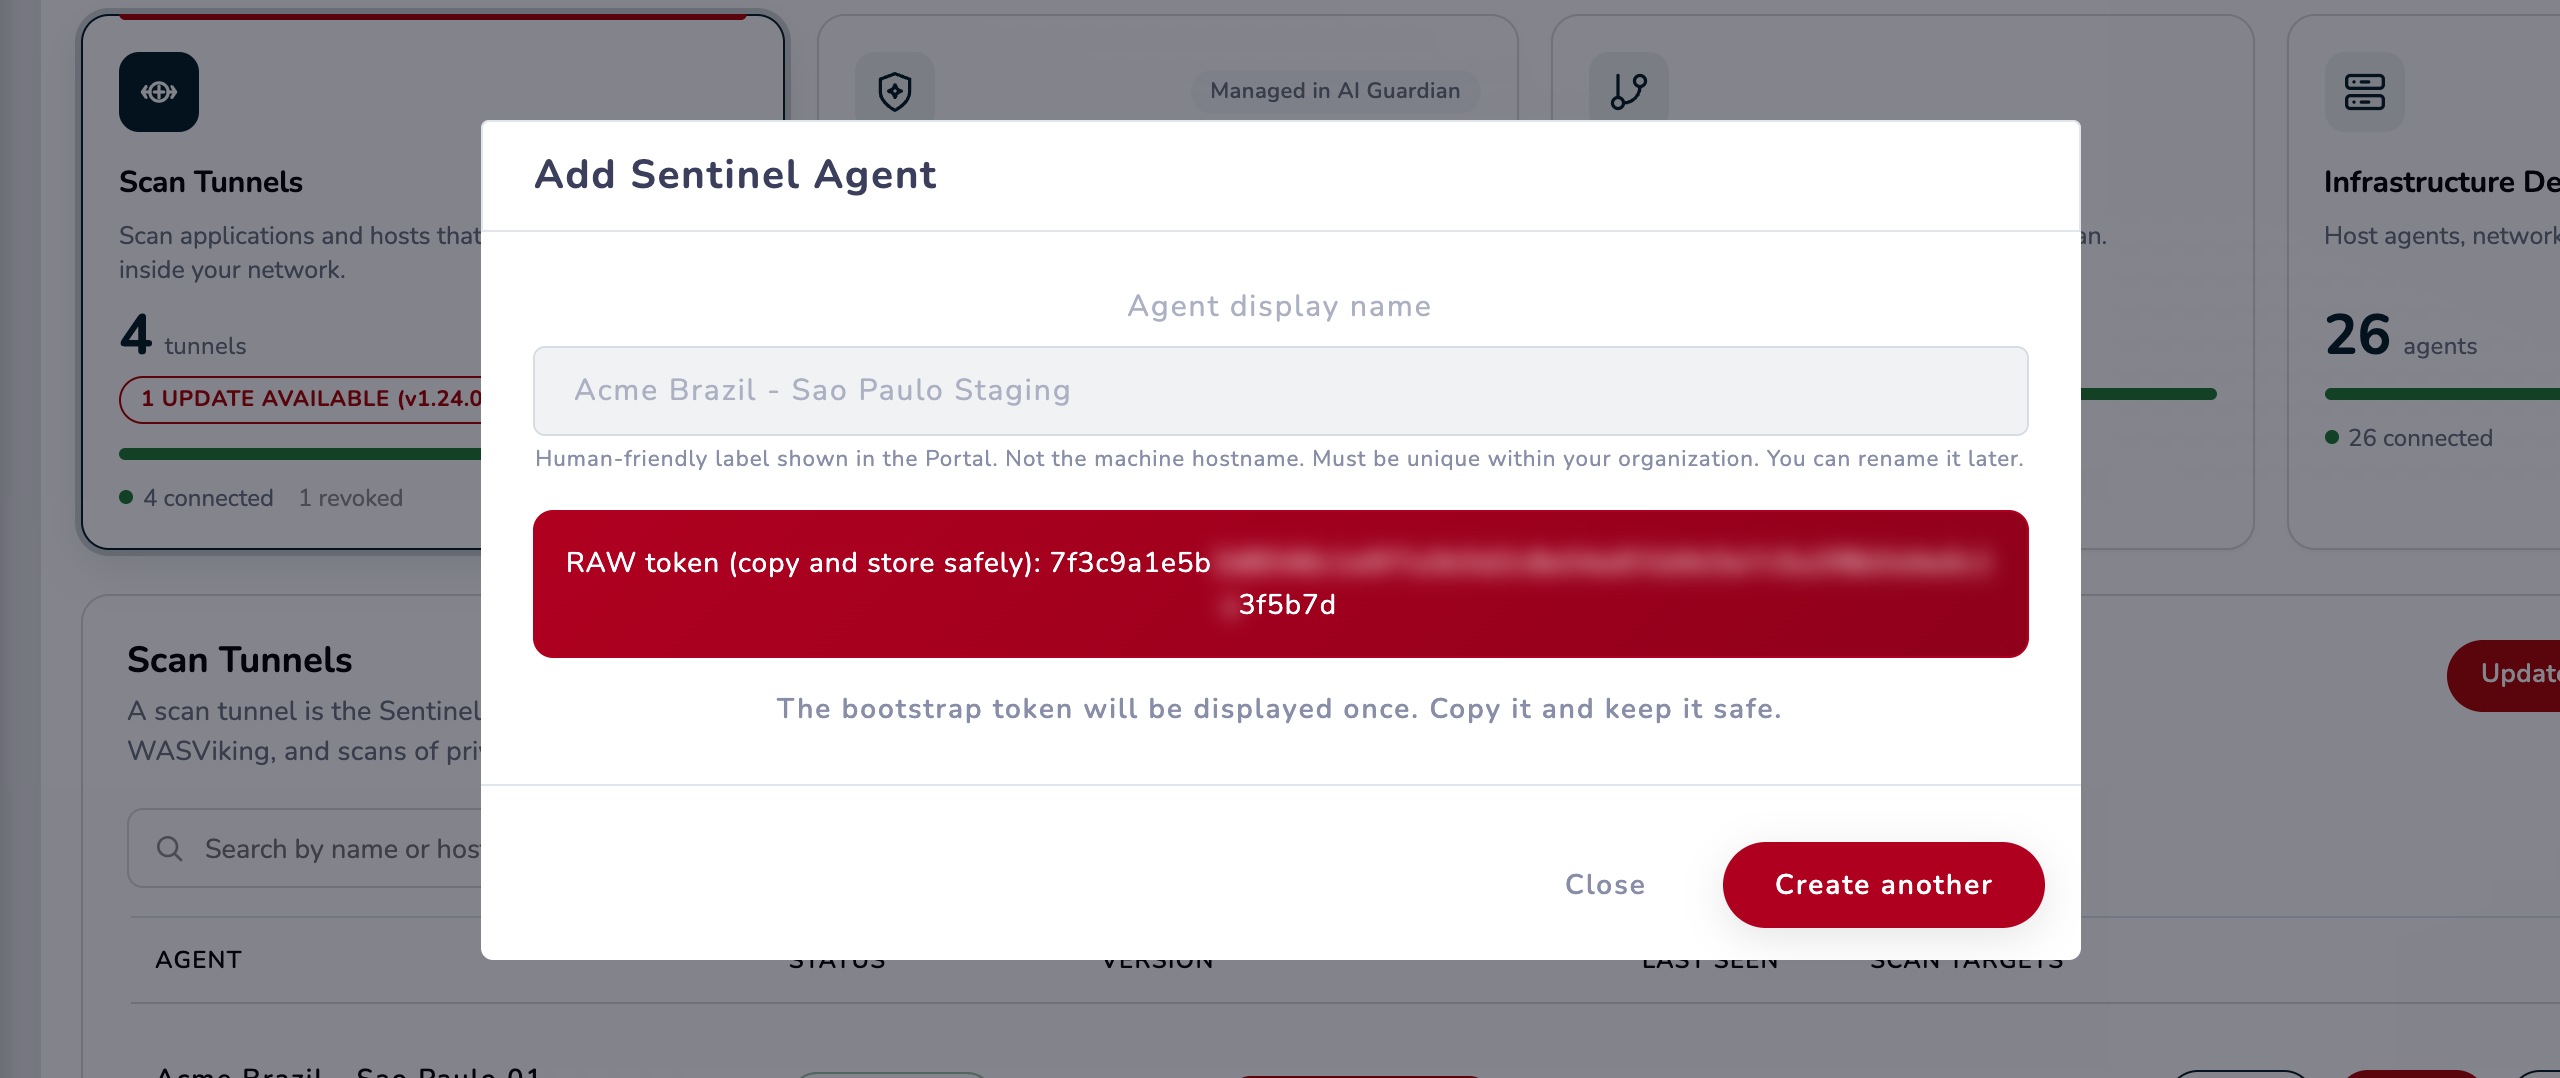 The bootstrap token is displayed once. Copy it before closing.
If you are rolling out several segments, Create another repeats the flow without leaving the dialog. One agent per segment or data center is the pattern that scales.
Step 3: Install and register on the host
Click Get Agent to open the install instructions for your platform. For Ubuntu/Debian the flow is three commands long.
Download the .deb package and, if your change process requires it,
check the SHA256 and signature with the Verify download link.
Then install and enable the service:
sudo dpkg -i wasviking-sentinel_<version>_amd64.deb
sudo systemctl enable --now wasviking-sentinel
The service starts right away and waits for the registration, so nothing else is needed before the next command.
Register the agent with the token from Step 2, from any directory.
Registration runs once per agent: it securely downloads the
client certificates that become the agent's identity, writes the
configuration to /opt/wasviking-sentinel/configs/config.yaml, and
hands the files to the service account.
sudo /opt/wasviking-sentinel/wasviking-sentinel register --token <YOUR_TOKEN_FROM_PORTAL>
The running service picks up the registration and connects by itself
within about 15 seconds, with no restart. If you see instructions
that run ./wasviking-sentinel register from inside the agent
directory without sudo, use the command above instead: the older
form fails on file permissions.
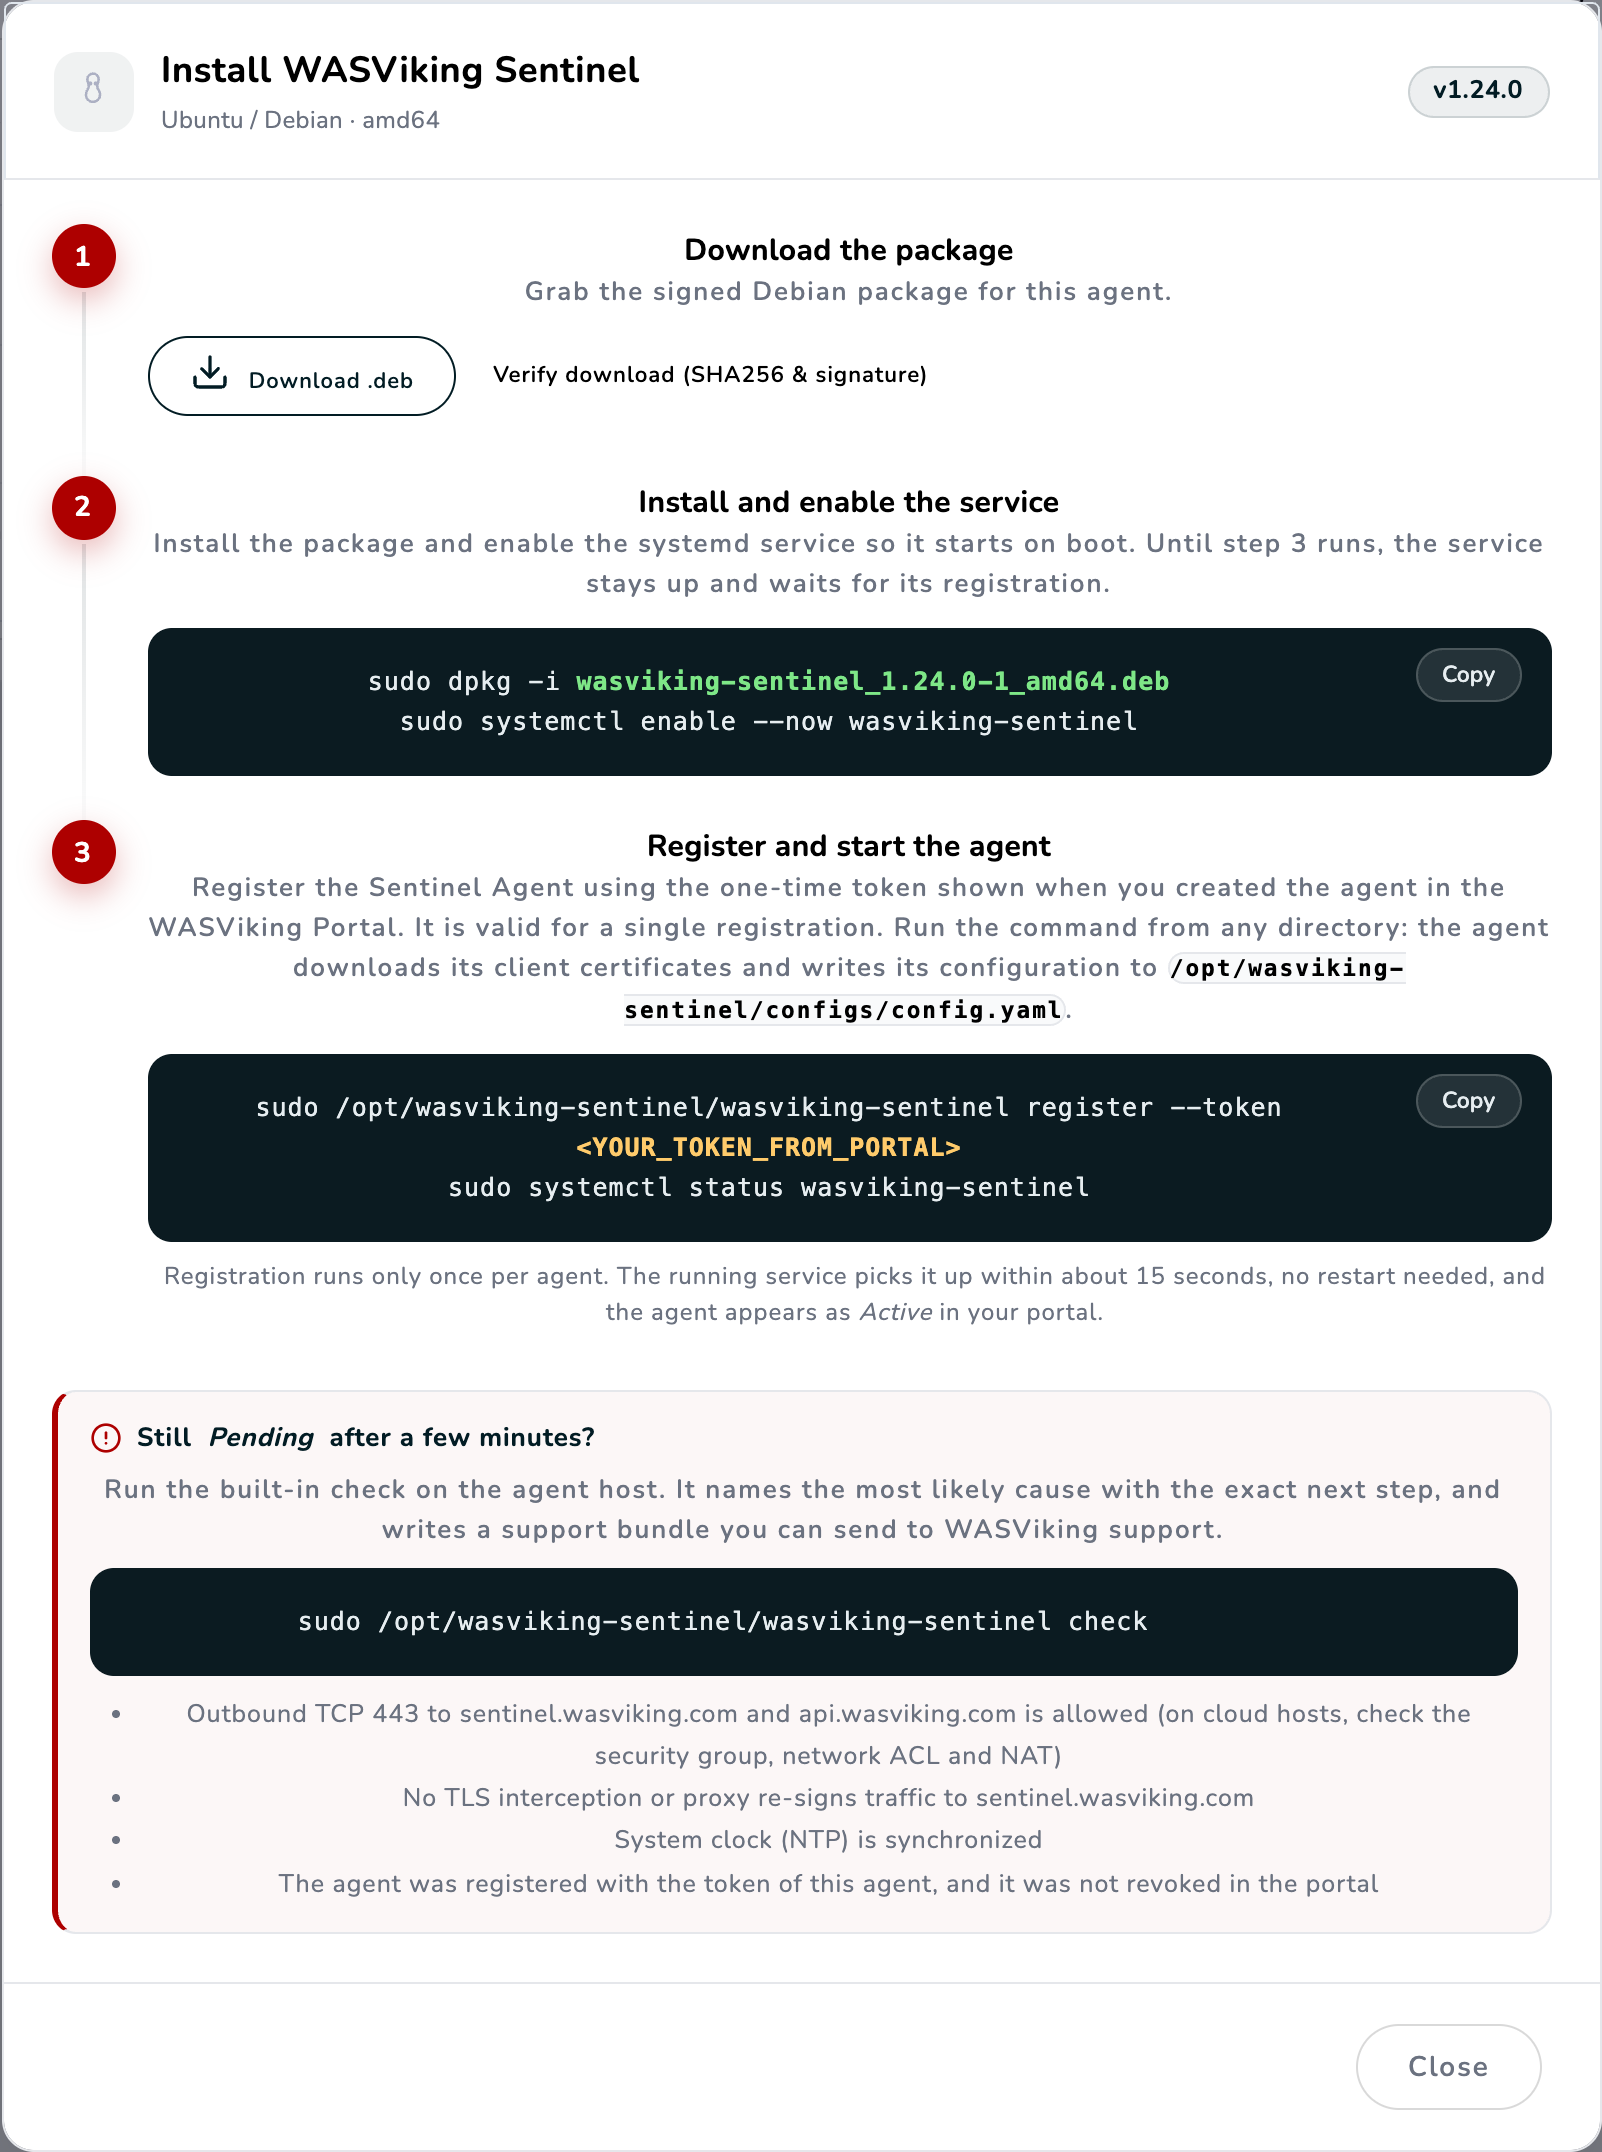 Get Agent: download, verify, install and register.
Step 4: Confirm the tunnel is up
Back on Sentinel → Sentinel Agents, the agent flips from Pending to Active and the Last Seen column starts updating with its heartbeat. That is your confirmation that the outbound tunnel is established.
On the host, the service status says the same:
sudo systemctl status wasviking-sentinel
The latest lines include Tunnel connected to sentinel.wasviking.com:443.
If the agent stays Pending for more than a few minutes, run the built-in check on the host:
sudo /opt/wasviking-sentinel/wasviking-sentinel check
It reads the installation and tests the path to the platform without
changing anything, then prints a verdict (PASS, WARN or FAIL)
with the most likely root cause and the exact next step. The cause is
almost always one of these:
- The agent was not registered, or the service cannot read its files.
- Outbound TCP 443 to
sentinel.wasviking.comis blocked for that host: host firewall, cloud security group or network ACL, NAT, or proxy. - A corporate proxy or TLS interception appliance is breaking the mutual TLS handshake. The tunnel needs to pass through untouched.
- The system clock is off; check NTP.
The check also writes a support bundle, a .json and a .txt file,
in the current directory. Send both to WASViking support if you need
help. The full reference, with the options and a table of common
problems, is in
Troubleshooting with the check command.
Step 5: Run the first internal scan
Register an internal target the same way you registered your first
public one, but point it at the private address (for example
https://erp.saopaulo.acme.internal or http://10.20.30.40:8080).
Then start the scan at Scans → New Scan
(/portal/scans/new). This is the step that actually routes the
scan through the tunnel: in Preferences → Scan Method, set
Execution Path to Sentinel Tunnel (Internal) and pick your
agent in the Sentinel Agent dropdown, for example
Acme Brazil - Sao Paulo Staging (Active).
When a scan template is selected, the settings below it follow the template and stay locked. Turn on Override template settings for this scan only, under the template, to choose the execution path for this scan.
Do not leave Execution Path on Direct (External) for an internal target. Direct is for addresses that are public on the internet; the cloud scanner cannot reach a private address, so an internal scan dispatched as Direct has nothing to test. Sentinel Tunnel (Internal) plus the right agent is what carries the scan safely to the internal address.
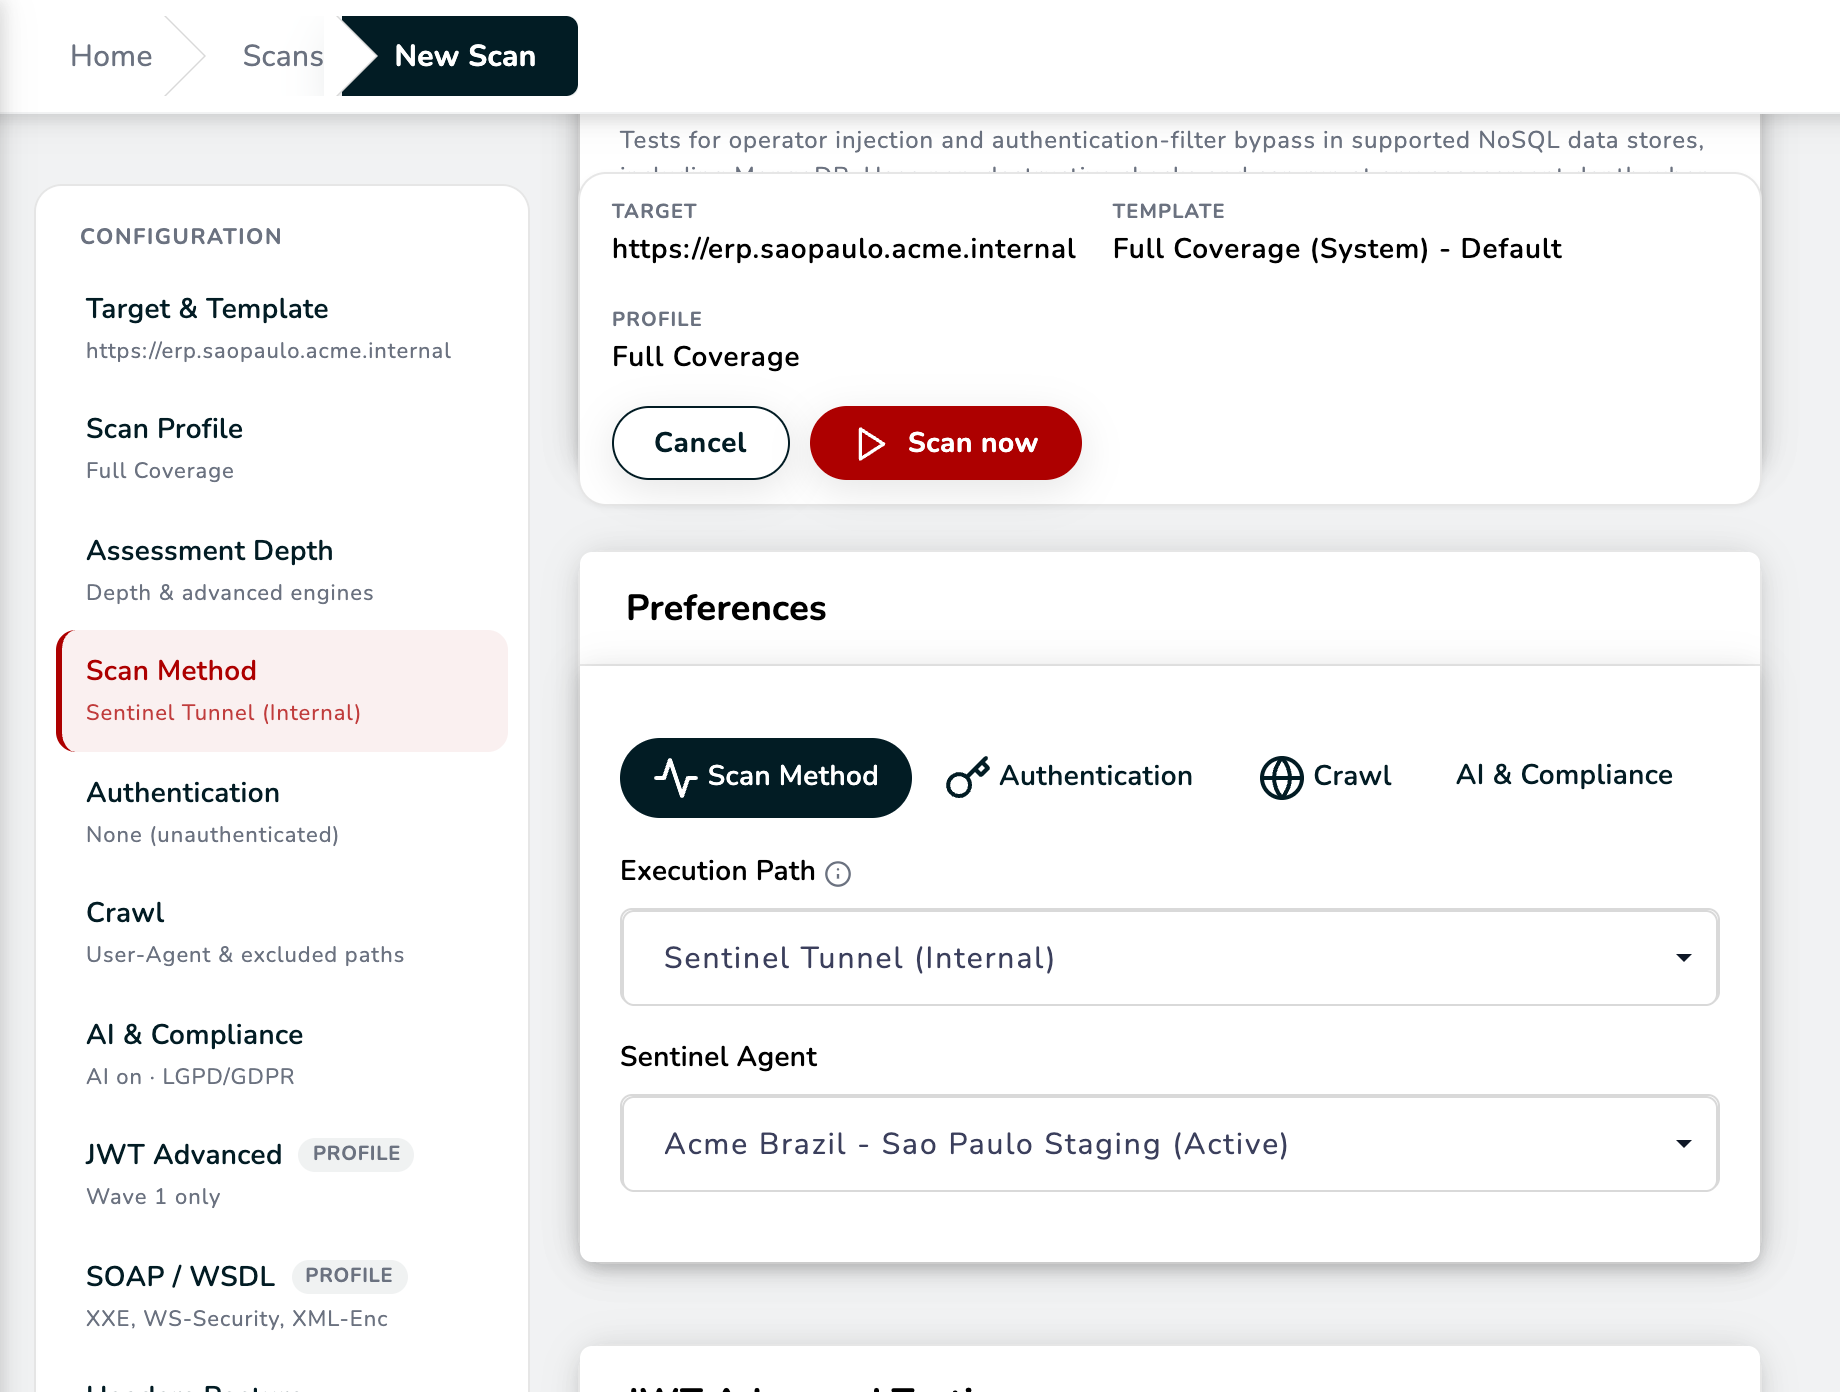 Preferences → Scan Method: Execution Path and the agent created in Step 2.
Click Scan now. The scan is dispatched through the tunnel, runs against the internal address, and the findings land in the same Findings workflow as everything else, with the target clearly marked as internal.
Before any test runs, the scan checks from the agent that the target
accepts connections on ports 443 and 80, and on the port in the
address when there is one. If nothing answers, the scan stops,
usually in under a minute, and the Scans list shows it as
Failed with Target unreachable. Hover over it to read the
reason, which names the target, the ports checked and the agent.
Confirm that the application is running and that the target's
firewall accepts connections from the agent's host, for example with
curl -v http://10.20.30.40:8080/ run on that host, then start the
scan again.
The target fields, authentication options, and per-agent routing are documented in Internal scanning.
Operating the fleet
- Rotate Token issues a new bootstrap for an agent, which is the move when a token leaked before registration or when you rebuild a host and need to re-register.
- Revoke cuts the agent off immediately. Registered certificates stop being accepted, scans stop routing through it, and the row stays in the table for the audit trail.
- Update installs a newer release on a connected agent, and Update all does the same for every agent that can be updated. It applies to agents installed from the Debian package, version 1.23.0 or later. Only packages signed by WASViking are installed, and a host administrator can turn remote updates off. See Update from the portal.
- Details opens the agent page. From version 1.24.0 it shows Host and tunnel health: the host's CPU, memory and network, how busy the tunnel is, and observations that say what to check when scans through it run slow. See Host and tunnel health.
- One agent per segment. Agents are cheap to run; give each network segment or data center its own, name them consistently, and target routing picks the right one.
- The same installed binary also runs
sbomandsecretsagainst your repositories, so the host you just set up can feed the supply chain modules too.
Where next
- Point your first internal target at the agent: Internal scanning.
- Hand the transport design to your security team: Sentinel architecture.
- Put the same binary in your pipeline: wasviking-sentinel in CI/CD.
- Schedule recurring internal scans: Scan Schedules.