
Jira
Step by step setup of the Atlassian Jira integration, from the API token to the first synced issue.
The Jira integration turns WASViking® findings into issues in your Jira Cloud project and keeps both sides in step. When your team moves the issue in Jira, the finding follows. When a scan reopens the finding, the issue gets a note.
This page is the full setup, in order, with the two screens you will actually be looking at.
What you need before you start
- A Jira Cloud site on
atlassian.net. The address you type in WASViking has to end in.atlassian.net, so a custom domain in front of Jira is not accepted. - An Atlassian account that can create issues in the target project. Use a service account owned by the team, not a personal login. The integration acts as that account, and it inherits exactly that account's permissions.
- An administrator in WASViking. Settings → Integrations is open to the Admin and Manager roles.
Step 1. Create the API token in Atlassian
Sign in to Atlassian with the account the integration will use, then open id.atlassian.com/manage-profile/security/api-tokens. The same page is reachable from the Atlassian account menu under Security → API tokens.
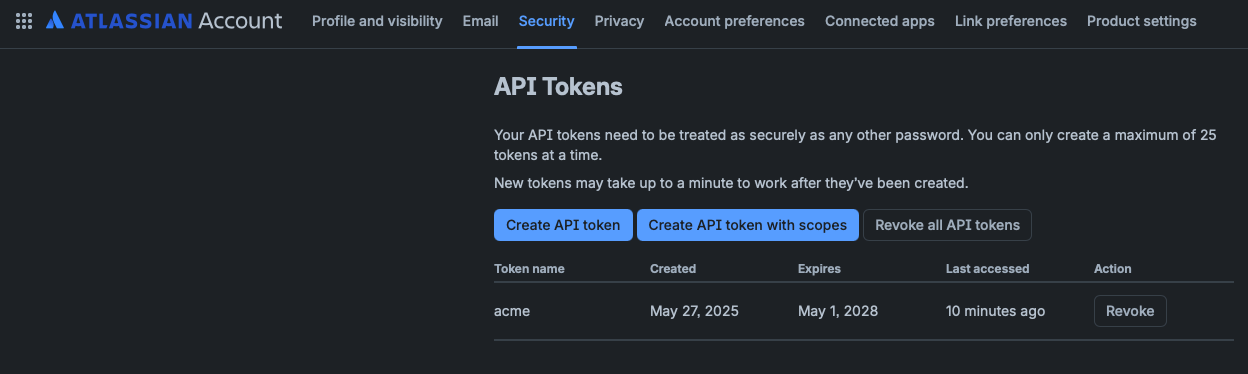 The API Tokens page of the Atlassian account. One token per integration keeps the audit trail readable, and the Revoke action on the right is how you cut access later.
- Select Create API token. That is the plain one on the left. The button next to it creates a scoped token, which adds a permission step you do not need here.
- Give the token a name you will recognize a year from now, for example
WASViking. The name is only a label, so it can be anything. - Pick an expiry date and write it down. When the token expires, the sync stops until you paste a new one, so treat the date as a maintenance task.
- Copy the token. Atlassian shows it once. If you lose it, revoke that token and create another.
Treat the token like a password. It carries the full access of the account that created it.
New tokens can take up to a minute to become usable, which matters in the next step.
Step 2. Test and save the credentials in WASViking
In the portal, open Settings → Integrations and select the Atlassian Jira tab. Section 1 is the only place the token is entered.
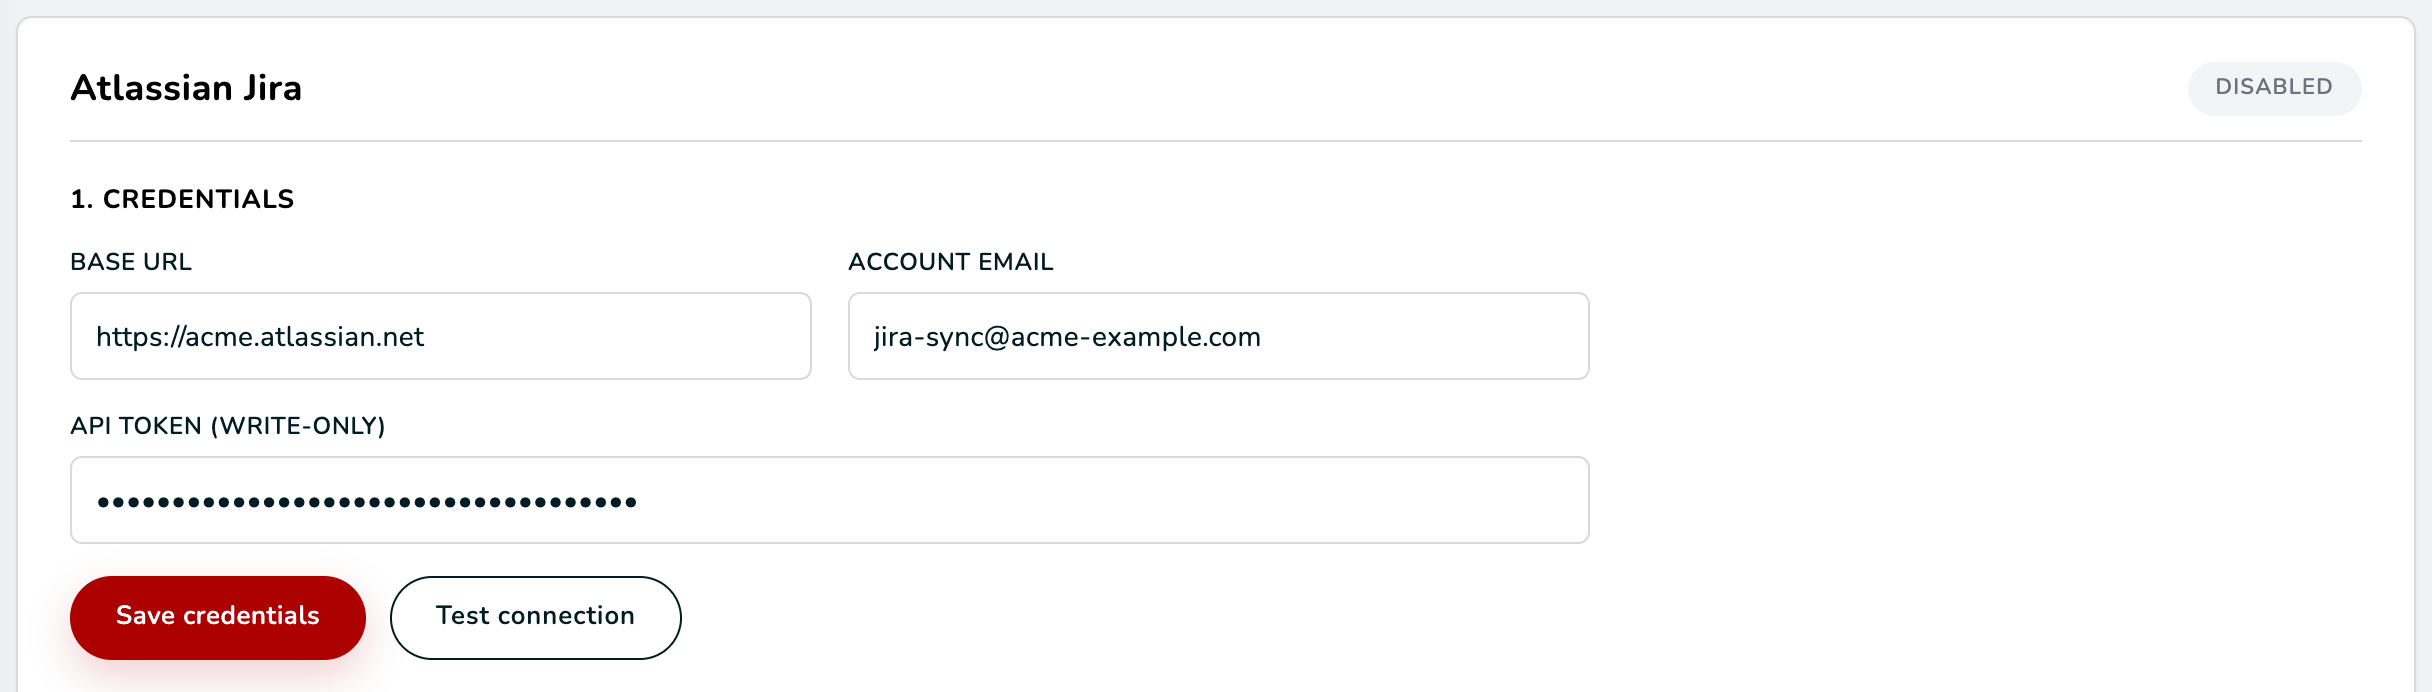 Section 1 filled in for the ACME example. Test connection proves the three values work together before anything is stored, and Save credentials then keeps the token encrypted.
| Field | What to type | ACME example |
|---|---|---|
| Base URL | Your Jira site address, nothing after the domain | https://acme.atlassian.net |
| Account email | The Atlassian account that created the token | [email protected] |
| API token | The value you copied in Step 1 | pasted, then hidden |
The Base URL always follows the same shape:
https://your-company.atlassian.net. Leave out /jira, /browse and any
project path. If you are unsure of the company part, look at the address bar
while you are inside Jira.
The API token field is write-only. After you save it, the portal shows that a token exists but never shows the value again, not to you and not to anyone else in your organization. Replacing it means pasting a fresh one.
Select Test connection first. The test runs against the values typed in
the form, not against anything stored, so you can correct a typo before it
reaches the database. The page answers connection ok when Atlassian
accepted the three values together. If the test fails within the first
minute after creating the token, wait and try again before changing
anything.
Then select Save credentials. The token is stored encrypted and the page loads your projects, issue types, fields and statuses from Jira, which is what sections 2 to 4 need. Until that first save, those three sections say so instead of showing empty pickers. The chip next to 1. Credentials tracks where you are: Not connected yet, Unsaved changes, or Saved.
Step 3. Choose the project and issue type
Section 2 reads the projects the account can see and the issue types that project defines. Pick the project that owns security work and the issue type your team triages, usually Task or Bug. Both lists come from your own Jira, so a custom issue type shows up on its own.
Step 4. Map the fields
Section 3 decides which finding data lands in which Jira field. Select Auto-detect and the page proposes the obvious matches, then review them. Out of the box the mapping is:
| WASViking | Jira |
|---|---|
| Title | Summary |
| Description (composed body) | Description |
| Severity | Priority |
Everything else is optional and yours to add: category, CWE, OWASP category, risk score, asset URL, SLA window, due date, first and last seen, times seen, fingerprint hash, finding id, and the pretty-printed evidence. Each one can go to a Jira system field or to a custom field you already have.
The schema of every Jira field is read from your site, so the value is converted to the shape Jira expects. Severity mapped to Priority becomes Highest through Lowest. Severity mapped to a select field becomes Critical through Informational. Numbers go to number fields and dates to date fields.
Jira rejects a create that carries a field the project does not accept. When that happens WASViking drops the offending field, retries, and records what it dropped, so one bad mapping never blocks the issue.
Step 5. Map the statuses
Section 4 has two columns, and both matter.
Outbound is what WASViking does to the issue when the finding changes status. Open, In progress and Resolved are mandatory, the rest are optional. Reopened left blank uses the Open transition, so an issue in Done comes back to the board when a scan detects the finding again. Inbound is the reverse: it reads the Jira status category, not the status name, so any workflow your team invented still lands somewhere sensible. New maps to open, In progress to in progress, Done to resolved.
Auto-detect fills both sides with the common model. Review it, because this is where a custom workflow usually needs one manual choice.
Step 6. Choose what gets forwarded
Section 5 keeps the Jira project from filling up with tickets nobody asked for.
- Forward general findings covers the engine findings: DAST, SSL, secrets, headers, JWT and the rest.
- Forward SCA and SBOM findings covers vulnerable third-party components. It is off by default. Agree on the expected volume with the Jira project owner before turning it on.
- Minimum severity forwards only findings at or above a threshold.
- Categories to forward picks the finding categories that deserve an issue. Leaving every category selected means a category the engine gains later is forwarded too.
- Repositories to forward is the one rule that adds instead of narrowing. Add a repository and everything it owns reaches Jira, whatever the category, the severity or the SCA toggle say, because picking a repository means that repository goes to the tracker. Everything that does not belong to a listed repository keeps answering to the rules above. Search by name and add one at a time, so the list stays readable whether you have three repositories or six hundred. An empty list adds nothing. The block only appears when your findings carry a repository.
- Forward only findings from these repositories flips that around. On, the list stops adding and becomes the whole scope: only those repositories reach Jira and the rules above no longer matter. Off is the default.
Each repository you add shows how many open findings it has, counted the way the findings page counts them, next to how many of those are reaching Jira right now.
Every filter is applied together. A finding reaches Jira when its bucket is on, its severity is at or above the minimum, its category is on the list and, if it belongs to a repository, that repository is on the list.
The page previews the effect of the filters before you save. It answers three things: how many open findings match, how many of those already have an issue, and how many a backfill would create. The breakdown underneath reads step by step, each filter counting what was left after the one before it, so the numbers always add up to the total.
Step 7. Turn the sync on
At the bottom of the mapping, turn on Enable bidirectional sync and select Save mapping. Nothing is pushed until this is on.
Recreate Jira issue automatically if deleted on Jira side is the neighbor switch, and it is covered further down.
Step 8. Backfill what already exists
Section 6 pushes the findings you already have. Findings that are linked to an issue are skipped, so the backfill is safe to run more than once. Pushes are spaced two seconds apart and capped at thirty minutes, which keeps your site inside the Jira rate limits.
Two options change the scope:
- Include resolved / accepted-risk / false-positive brings closed work across as well. Most teams leave it off.
- Force resync pushes every finding again, linked or not. It is the repair tool for a mapping you fixed after the fact, not part of a normal setup.
Run the backfill once, after the filters are the way you want them.
What the Jira issue looks like
The summary is the finding title, trimmed to what Jira accepts. The description is composed rather than copied: severity, category, CWE, OWASP category and risk score, then the component and CVE when the finding came from a dependency, then the engine summary and the recommendation. Near the end comes the WASViking finding id, which is what makes an issue traceable back to the platform months later, followed by a link that opens that exact finding in the portal.
The link is a shortcut, not a key. It asks for sign-in and second factor like any other page, and the portal resolves the organization from the session before it reads the link, so it shows nothing to someone outside your organization. Existing issues pick the link up on their next update.
Evidence is appended to the description unless you mapped it to a field of its own.
Labels for routing
Every issue also carries labels, so a team can pick up its own work from a board filter or a JQL query without opening the card. The set is small and always follows the same grammar.
| Label | Meaning | Example |
|---|---|---|
wasviking |
On every issue the integration creates. labels = wasviking lists them all. |
wasviking |
wasviking-area-<area> |
The part of the platform that found it, which is usually the team that fixes it: web, mobile, code, supply-chain, infrastructure or exposure. |
wasviking-area-mobile |
wasviking-category-<category> |
The finding category. | wasviking-category-xss |
wasviking-repo-<repository> |
The repository, for findings that came from a pipeline or repository scan. | wasviking-repo-acme-payments-api |
wasviking-app-<identifier> and wasviking-platform-<platform> |
The application and its platform, for findings from a mobile assessment. | wasviking-app-com.acme.bank, wasviking-platform-android |
Values are lowercase and hyphenated, with no spaces, so Jira always accepts
them. A repository named acme/payments-api reads
wasviking-repo-acme-payments-api.
Labels your team adds in Jira are left alone. The sync only ever adds or
removes labels that follow the grammar above, and it does that through label
operations rather than by rewriting the field, so a sprint-42 or
needs-review your team put on the card survives every update. If the labels
field is not on the project's create or edit screen, the issue is created
without labels and everything else still syncs. Issues created before labels
existed receive theirs on their next update, or right away through a
Force resync backfill.
The complete catalog, the rules the sync follows and a playbook for organizing boards, automation and reporting by team are on the Jira labels page.
What comes back from Jira
WASViking polls the linked issues every five minutes and maps the Jira status category back to the finding status through your inbound mapping. A short anti-loop window keeps a push and its own echo from bouncing the status between the two systems.
Only a status that actually changed is read back. An issue still in the status WASViking last saw or set carries no news, even when a field update or a notice comment refreshed it, so a finding a scan just reopened stays reopened until your team moves the issue.
Closure and reopen notices
Whenever WASViking closes or reopens a finding, the linked issue receives a comment saying who did it, when and why, so nobody reading the ticket sees a status move without an explanation:
- Closed by a scan. The finding was no longer detected. The comment names the scan, the date and the reason (a component no longer present in the latest SBOM, say) and tells the reader the issue reopens if a later scan detects it again.
- Closed by a person. The comment names the operator, the status they chose (Resolved, Accepted risk or False positive), the standardized reason and the note they left. An accepted risk also carries its expiry date.
- Closed by a suppression rule. The comment names the rule.
- Reopened. A scan that detects a resolved finding again, a risk acceptance that expired, or an operator moving the finding back all produce a comment with the reason, the date and the finding's severity and category.
Each comment ends with a link back to the finding in WASViking. It is posted once per status change, after the issue status is synced, and only for changes made in WASViking: a status your team changes in Jira is never echoed back as a comment. A manual push or a Force resync re-sends fields and never comments. When the status could not be moved (the workflow has no transition to the mapped status, say), the comment says so, so the card can be moved by hand.
When someone deletes the issue in Jira
The link in WASViking is left pointing at nothing. With Recreate Jira issue automatically off, which is the default, the next push records the error in the sync history and stops trying. With it on, the push detects the missing issue, creates a new one, and carries on. Choose based on whether deleting a ticket in Jira means the work is cancelled or means someone made a mistake.
Rate limits
Jira throttles per site. WASViking retries with a growing pause when Jira answers 429 or a gateway error, and large backfills spread themselves out. Nothing is dropped on the floor.
Turning the integration off
Turn off Enable bidirectional sync. The issues already in Jira stay where they are, and WASViking stops pushing and polling. The links are kept, so turning it back on later picks up where it left off instead of creating duplicates.
To cut Atlassian access as well, revoke the token on the Atlassian API tokens page from Step 1.
Troubleshooting
| What you see | What it means | What to do |
|---|---|---|
base_url must be https |
The address was typed with http or without a scheme |
Type the full https://your-company.atlassian.net |
The base URL is refused because it must end with .atlassian.net |
A custom domain in front of Jira, or a typo in the domain | Use the atlassian.net address of the site, not a vanity domain |
auth failed (http 401) |
Email and token do not match, or the token was revoked | Confirm the email owns the token, then paste a fresh token |
auth failed (http 403) |
Credentials are valid, permissions are not | Give the account access to the project, or point the integration at a project it can already see |
| Connection fails right after creating the token | Atlassian has not finished propagating it | Wait a minute and test again |
| The project list is empty | The account cannot browse any project | Check the account's project permissions in Jira |
| No Jira fields loaded yet | Credentials were never saved | Save credentials first, then return to the field mapping |
Test connection says connection ok, not saved yet |
The test used values that differ from the stored ones | Select Save credentials to keep them |
| Issues are created but stay in the first status | The outbound status mapping has no transition for that status | Re-run Auto-detect on the status mapping and save |
| Nothing reaches Jira after setup | Bidirectional sync is off, or the filters exclude everything | Check the toggle in section 5 and the filter preview |
Prefer building your own sync? Subscribe to finding events directly via Webhooks.