
Set up Sentinel Probes
Bring the network view to Infrastructure Defense. A Sentinel Probe is a virtual scanner appliance that discovers every device on the networks you authorize and checks it for exposure, with no agent on the target. This guide covers what it is, why it satisfies PCI DSS internal scanning, and how to install, scope and read it.
The Sentinel Host agent gives you a deep, authenticated view from inside every server you can install it on. Plenty of things on your network will never run an agent: a managed switch, a printer, an IP camera, a database appliance, a payment terminal, a contractor's laptop. The Sentinel Probe is how you see those, and how you produce the internal vulnerability scan an auditor asks for. It is the network side of WASViking® Infrastructure Defense, and it works alongside the agent rather than replacing it.
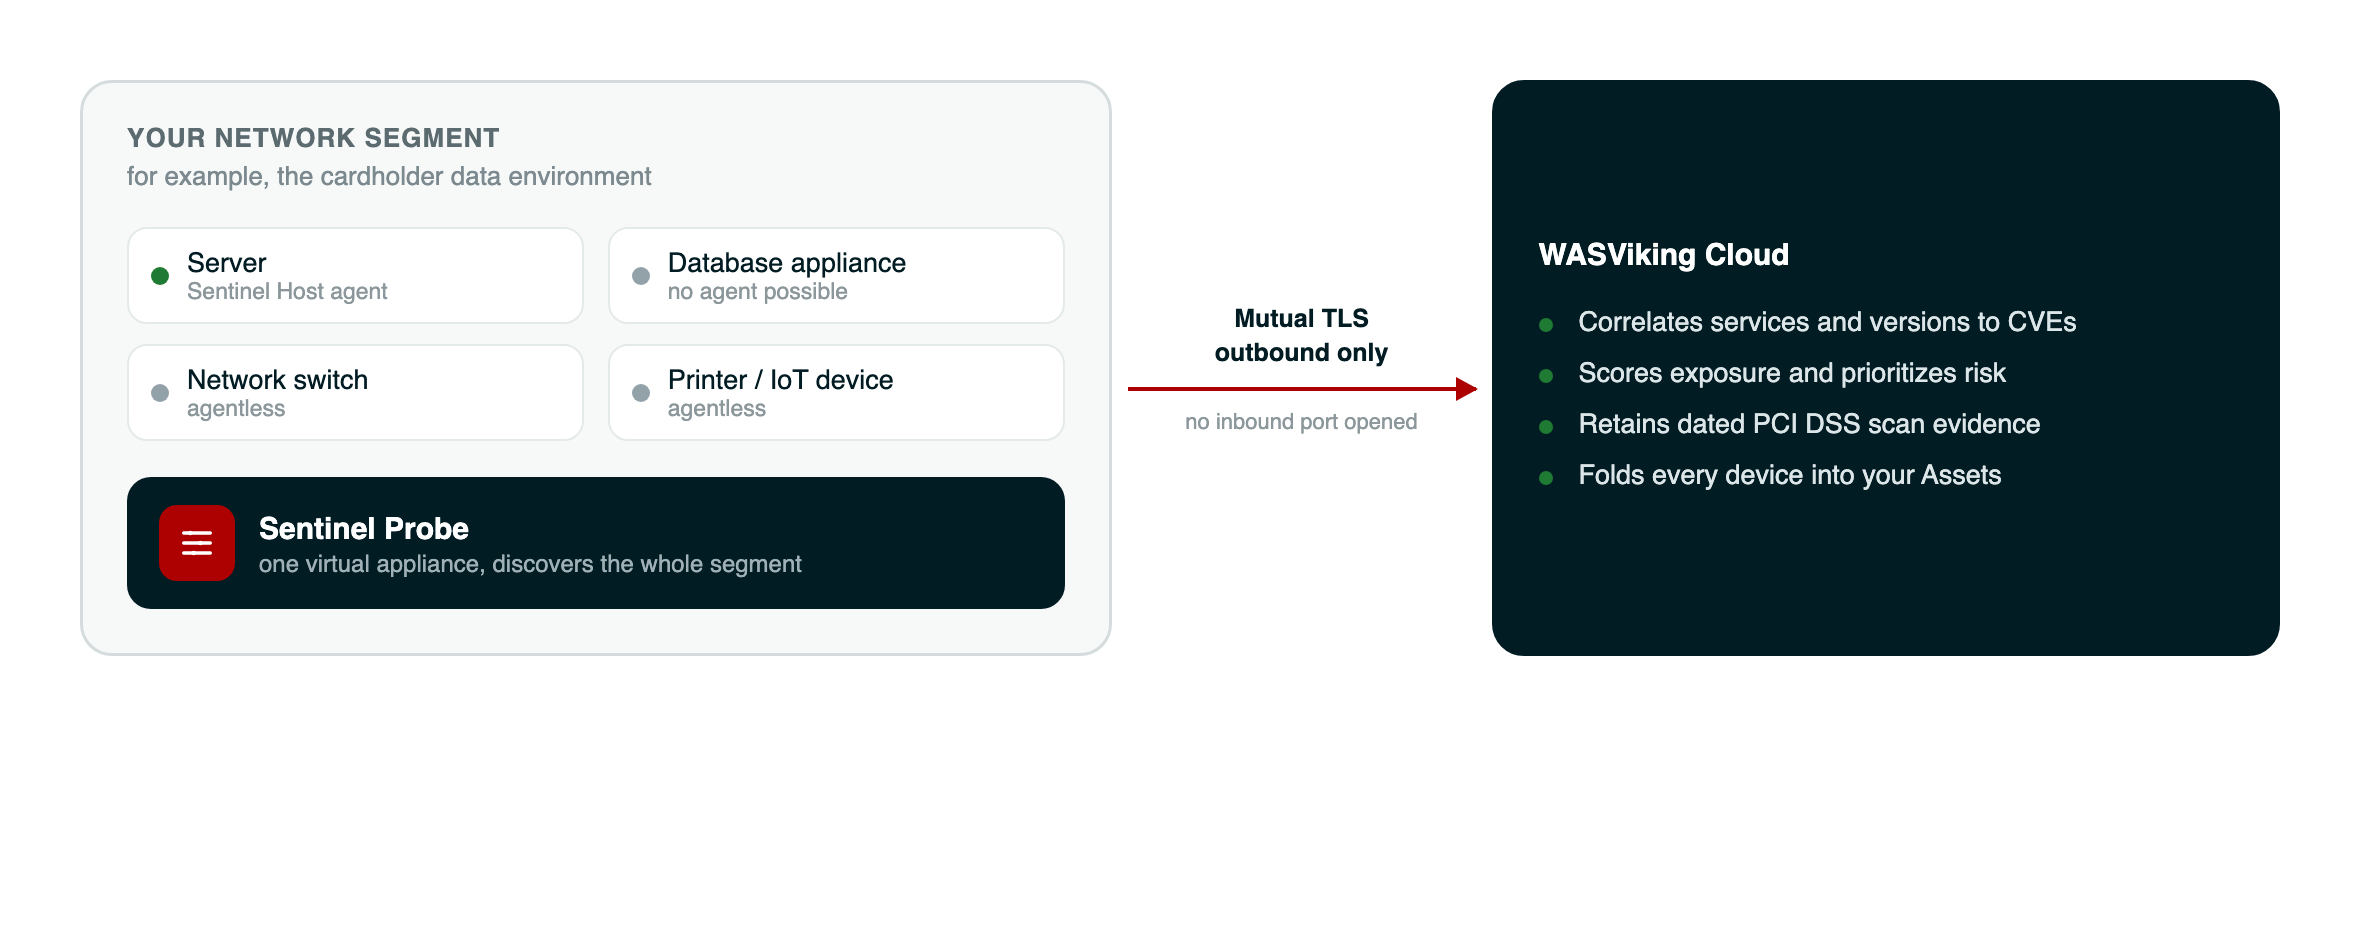 One probe on a segment, discovering everything on it, reporting outward over mutual TLS. Nothing is installed on the devices it scans.
What a Sentinel Probe is
A Sentinel Probe is a virtual scanner appliance. You install one lightweight program on a single machine inside a network segment, and from there it discovers every reachable device on the networks you have authorized, identifies the services and versions they expose, and reports what it finds to the WASViking cloud for correlation and scoring. Nothing is installed on the devices it scans. One probe covers a whole segment.
It never opens an inbound port. Like the Host agent, the probe connects outward over mutual TLS, so placing one inside a sensitive network does not widen your attack surface.
The agent and the probe answer different questions. The agent is the view from inside one machine, complete down to the installed package. The probe is the view of the segment, including everything the agent can never reach. A device the probe finds that carries no agent shows up in your inventory as unmanaged, so you always know the difference between what you manage and what merely exists on the wire.
Why it matters for PCI DSS
PCI DSS asks you to run internal vulnerability scans of the systems in scope, at least once every three months and again after any significant change, and to keep the dated results as evidence. Where a system accepts credentials, the standard expects an authenticated scan that looks past the network surface. The Sentinel Probe is built to produce exactly that evidence.
- It scans the internal networks you declare, on the cadence you set, and records a dated run for every scan (requirement 11.3.1).
- It supports authenticated scanning over SSH on Linux and WinRM on Windows, so a credentialed check finds what an unauthenticated one cannot (requirement 11.3.1.2).
- A one-click Scan now runs an off-cycle scan after a change and files the run as on demand, with who asked for it and why (requirement 11.3.1.3).
- Each finding closes itself when a later scan no longer sees it, which is the rescan that confirms a fix.
What you get is an internal scan program an assessor can actually read: the current cadence, the retained history and an export they can take away, with no spreadsheet to maintain in parallel.
Before you start
Infrastructure Defense is enabled per organization by your WASViking contact or partner. Once it is on, open Infrastructure Defense → Sentinel Probes in the portal sidebar. Configuring a probe needs the Manage permission on the module.
One rule shapes everything else: a probe sees a network at the depth of where it sits. On its own segment it reads the full layer-2 picture, including a host that answers no other traffic. A network it reaches only through a router is seen at layer 3, where a firewalled host can stay hidden. For complete coverage of every in-scope system, place one probe inside each segment you need to certify. The probe screen tells you, per network, whether it is on the local segment or reaching it over routing, so you always know where a blind spot could be.
The two tabs: Probes and Activation keys
The Sentinel Probes screen has two tabs, and they answer two different questions.
Activation keys is where onboarding lives. An activation key is a reusable credential that lets a probe enroll itself: you create a key, and the install command carries it. It is the same idea as the host activation keys, and one key can bring up more than one probe. You create, cap, expire and disable keys here.
Probes is where the running appliances live. Every probe that has enrolled appears here with its health and version, and opening one shows its detail: the networks it is authorized to scan, its scan settings, any credentials for authenticated scanning, and its scan history with the 90-day cadence indicator. In short, you use Activation keys to bring a probe online, and Probes to operate it from then on.
Step 1: create an activation key
Open the Activation keys tab and create a key. Give it a title your team will recognize, and optionally cap how many probes it may enroll and when it expires. Generate it, and keep the value handy for the install command in the next step.
Step 2: install the probe
Pick a Linux machine inside the segment you want to scan. A small virtual machine is enough, because the probe is light. It runs on Linux and scans Windows, Linux and network devices alike, so one Linux appliance covers a mixed segment. From the key's Install page, copy the single command:
sudo wasviking-sentinel-probe install --activation-key <your-activation-key>
That one line copies the program into place, registers the probe under its own certificate identity, and starts it as a service. Within moments the probe shows Online on the Probes tab. There is nothing to schedule for upgrades: the probe updates itself when a new version ships.
Step 3: authorize the networks it may scan
A probe scans nothing until you tell it what it may touch. Open the probe
from the Probes tab, and under Authorized networks add each network in
CIDR form (for example 10.20.0.0/24), with a label and your affirmation
that you are authorized to scan it. Only networks that are both enabled
and authorized are ever contacted, public ranges are refused by default,
and you can exclude individual addresses inside a range. The probe reads
its scope from the portal, so it can never widen its own reach.
The Segment column next to each network tells you whether the probe is on that segment or reaching it over routing, which is your cue for where a second probe would close a gap.
Step 4: tune the scan
Under Scan settings you choose how the probe works: the intensity, the port profile (a common set, a PCI-relevant set, or every port), and how often it scans. Two options are off by default and safe to leave that way at first. ICMP and ARP discovery finds hosts that answer no TCP port and needs a small privilege on the probe host. Scanning public ranges stays disabled unless you deliberately need it. A change you make here reaches the probe within about a minute, with no restart.
Step 5, optional: authenticated scanning
An unauthenticated scan sees a host from the outside. An authenticated scan logs in and reads what is actually installed, which is how PCI expects credentialed systems to be checked. Under Credentials for authenticated scanning, add an SSH login for Linux hosts or a WinRM login for Windows hosts, and scope it to the addresses it applies to. The secret is stored encrypted and is only ever handed to the probe over mutual TLS at scan time. On the probe it stays in memory, drives read-only inventory commands, and is never written to disk. This is the deeper view, and it is where the probe finds the vulnerabilities the network surface hides.
Step 6: read the results
Everything the probe discovers lands in the places you already use.
- On Assets, each discovered device appears with a Probe source. Filter by source to separate what the probe found from what an agent manages, and to spot the unmanaged devices that deserve an agent or a closer look.
- Open a device to see its exposures and, where a service could be matched, its vulnerabilities, alongside the same Viking Exposure Score the rest of the fleet carries.
- On the probe's own page, Scan history and cadence is your audit trail: the dated runs, whether you are inside the 90-day window, and the findings a later scan confirmed remediated. Export CSV hands the whole record to an assessor.
When you change something on a scoped network, open the probe and choose Scan now. The probe runs an off-cycle scan on its next check, and the run is filed as on demand with the reason you gave, which is the evidence PCI asks for after a significant change.
What to look at next
- Set up Infrastructure Defense is the host agent guide; it pairs the deep per-machine view with the network view you just enabled.
- Infrastructure Defense in Capabilities explains how the score is built and what the module assesses.
- Compliance and Configuration turn the same facts into the CIS-aligned and PCI-mapped results your auditor reads.
A network you cannot see is a network you cannot defend. With a probe on each segment, Infrastructure Defense stops being a story about the servers you happened to install an agent on, and becomes the honest picture of everything on your network, scored and ready for the audit.