
Set up Infrastructure Defense
Enroll your first servers step by step. Create an activation key, install the Sentinel Host agent on Windows, Linux or macOS (including MSI mass deployment), meet your fleet on the Assets screen, and set the policies that govern assessment and patching.
This guide takes you from an empty module to a scored fleet: by the end you will have agents reporting from your servers, every host carrying a Viking Exposure Score with its factors visible, and the rules of engagement (what gets assessed, who approves changes, when changes are allowed) written down as policies. Nothing here requires opening an inbound port or touching a firewall rule: the agent always connects out, over mutual TLS.
Before you start
Infrastructure Defense is an add-on module enabled per organization by your WASViking contact or partner. Once it is on, the Infrastructure Defense section appears in the portal sidebar. Enrolling and managing agents needs the Manage permission on the module; approving patch jobs needs the dedicated Remediate permission, so you can keep those two responsibilities in different hands from day one.
Step 1: choose how you will enroll
Open Infrastructure Defense → Sentinel Hosts. The screen offers the two onboarding paths side by side:
- Use an activation key is the recommended path: one reusable credential enrolls any number of servers, each machine registers itself under its own hostname and certificate identity, and a reinstall on the same machine resumes the same asset. This guide follows it.
- Enroll a single server mints a one-time token for one machine, for a one-off host. The token expires unused after the window set in Fleet housekeeping (seven days by default).
Either way, a host counts against your monitored hosts allowance only after its first inventory: enrollments that never complete are attempts, not assets, and the platform retires them on its own once the machine reports.
If the server sits behind an antivirus, endpoint detection or a TLS inspection device, read Endpoint protection exclusions for Sentinel Host first. The installer checks its path to the cloud before registering and stops on a blocked path, naming the product in the way.
Step 2: create an activation key
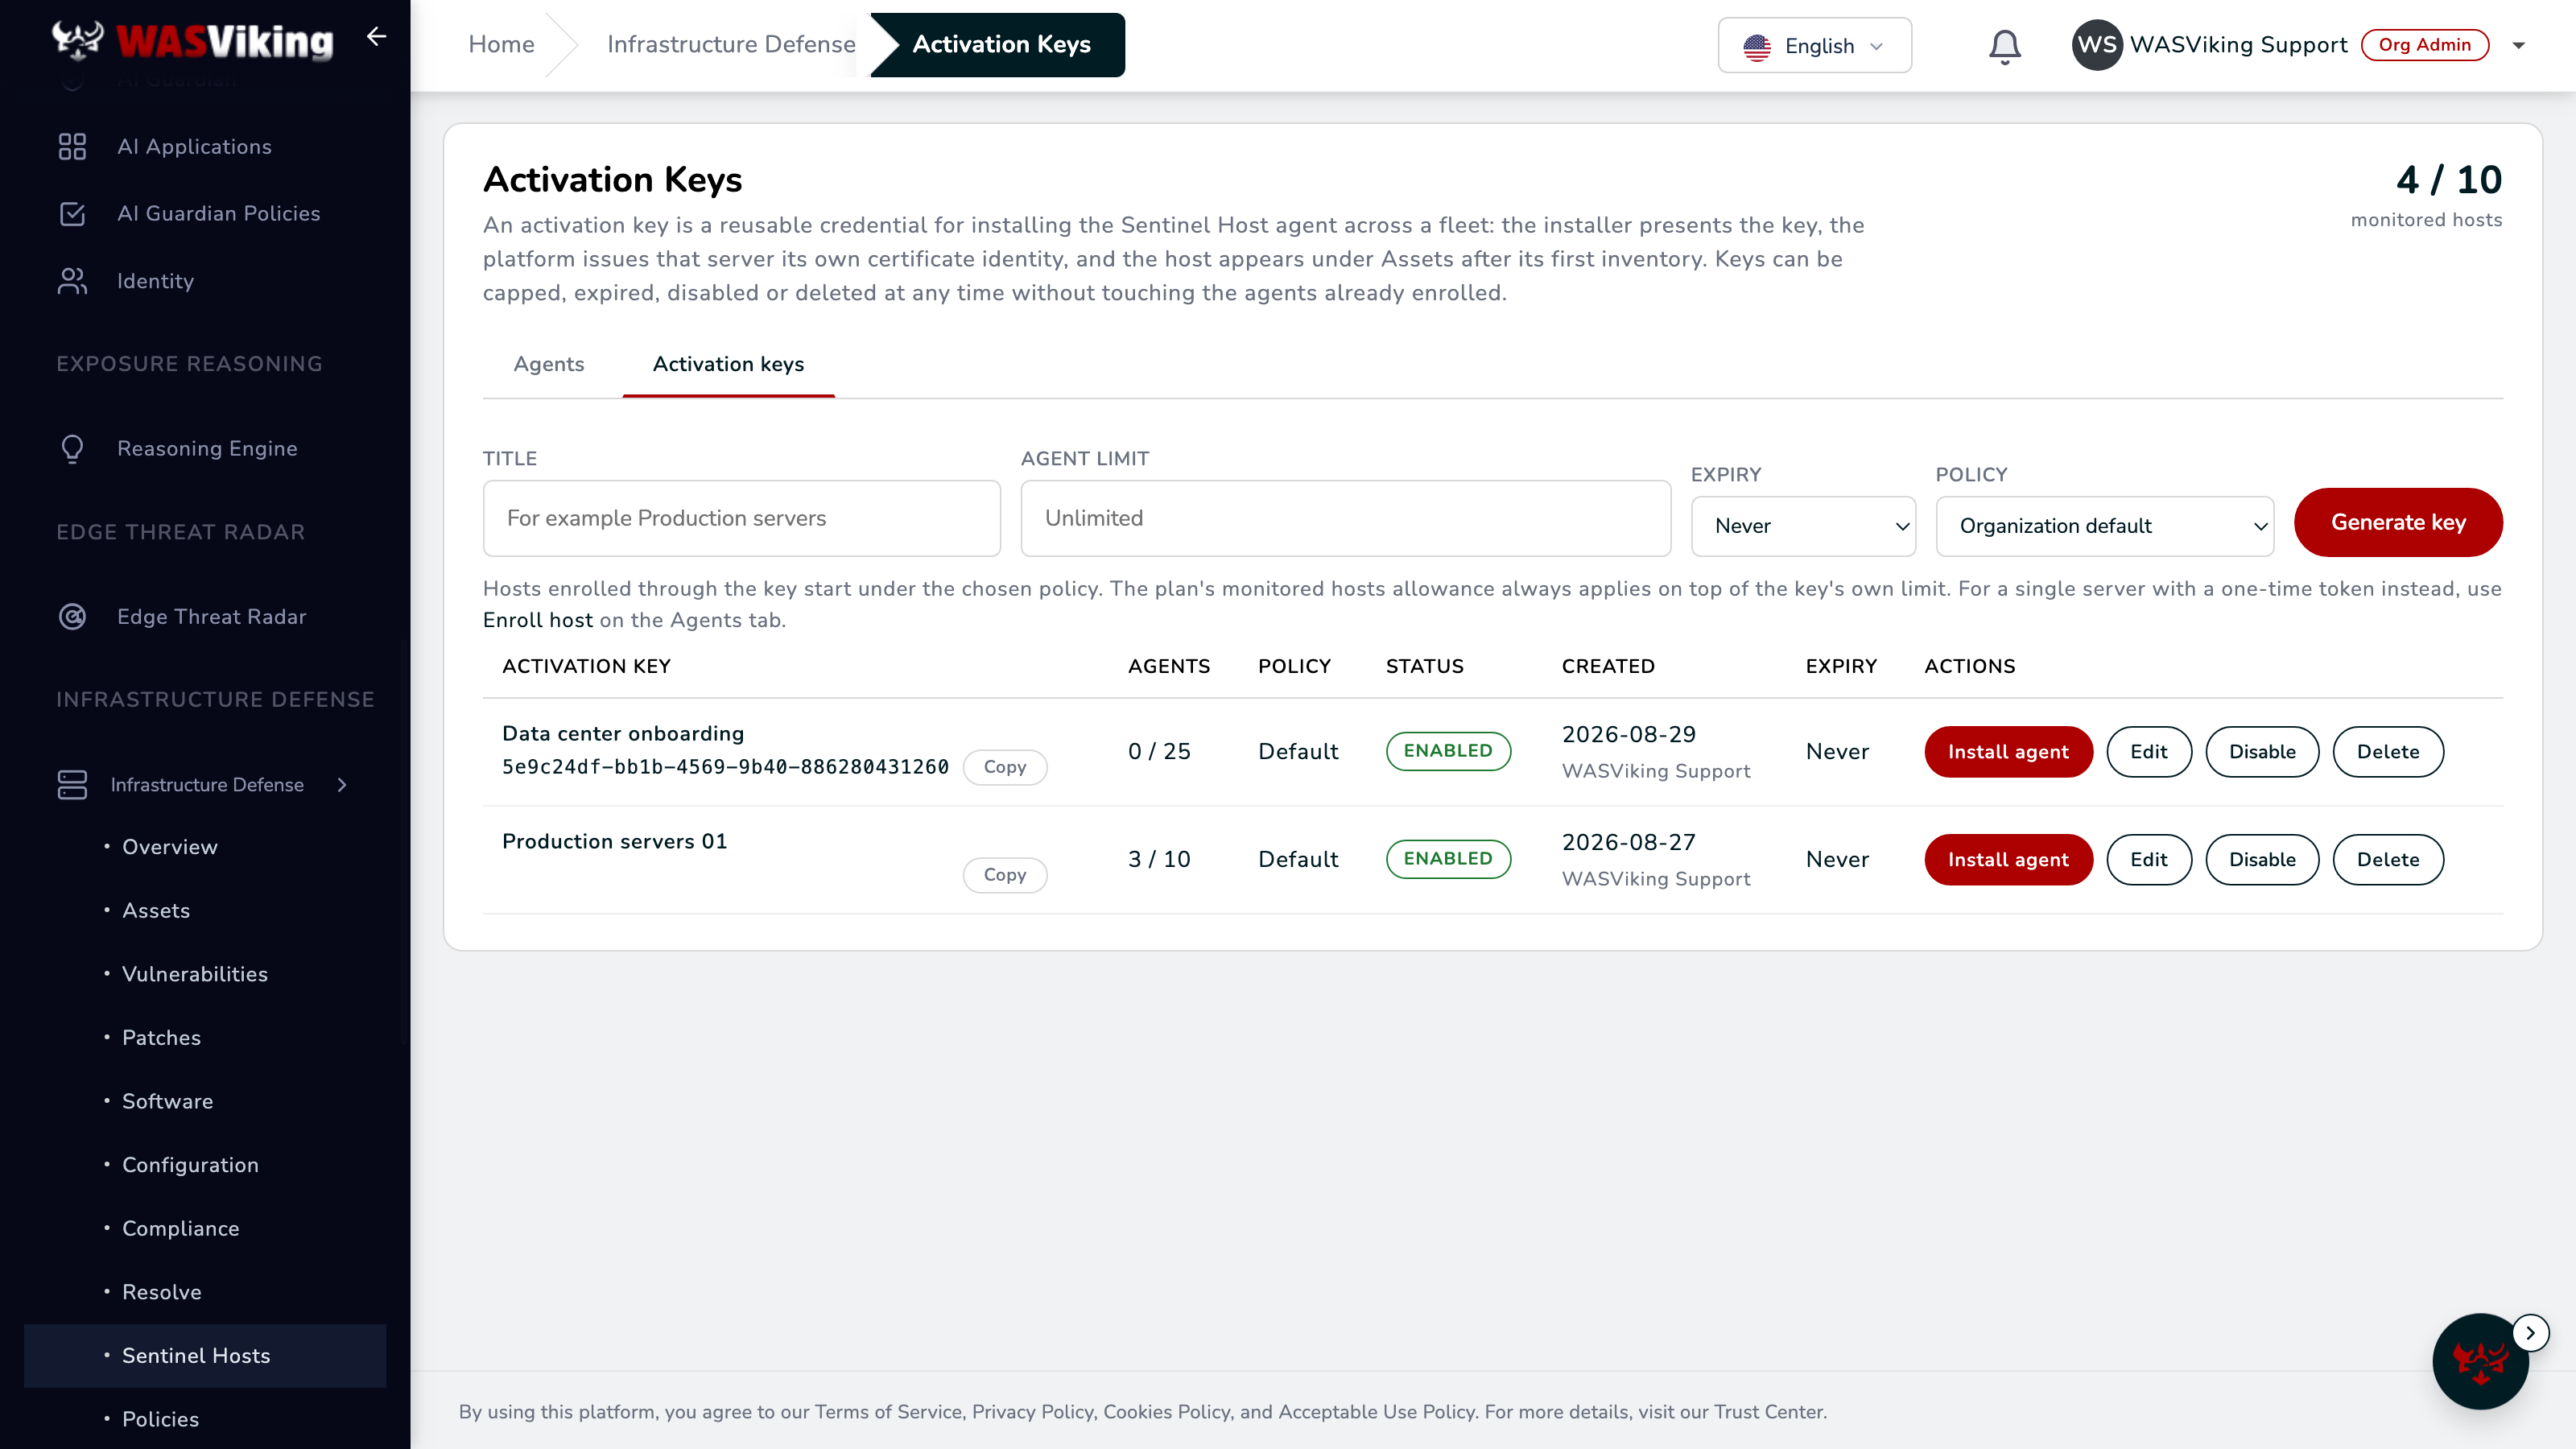
Open the Activation keys tab, give the key a title your team will recognize ("Production servers", "Data center onboarding"), optionally cap how many agents it may enroll and when it expires, pick the policy its hosts start under, and generate it. You can disable, edit or delete a key at any time without touching the agents already enrolled, and the counter next to each key shows how much of your plan's host allowance it has consumed.
Step 3: install the agent
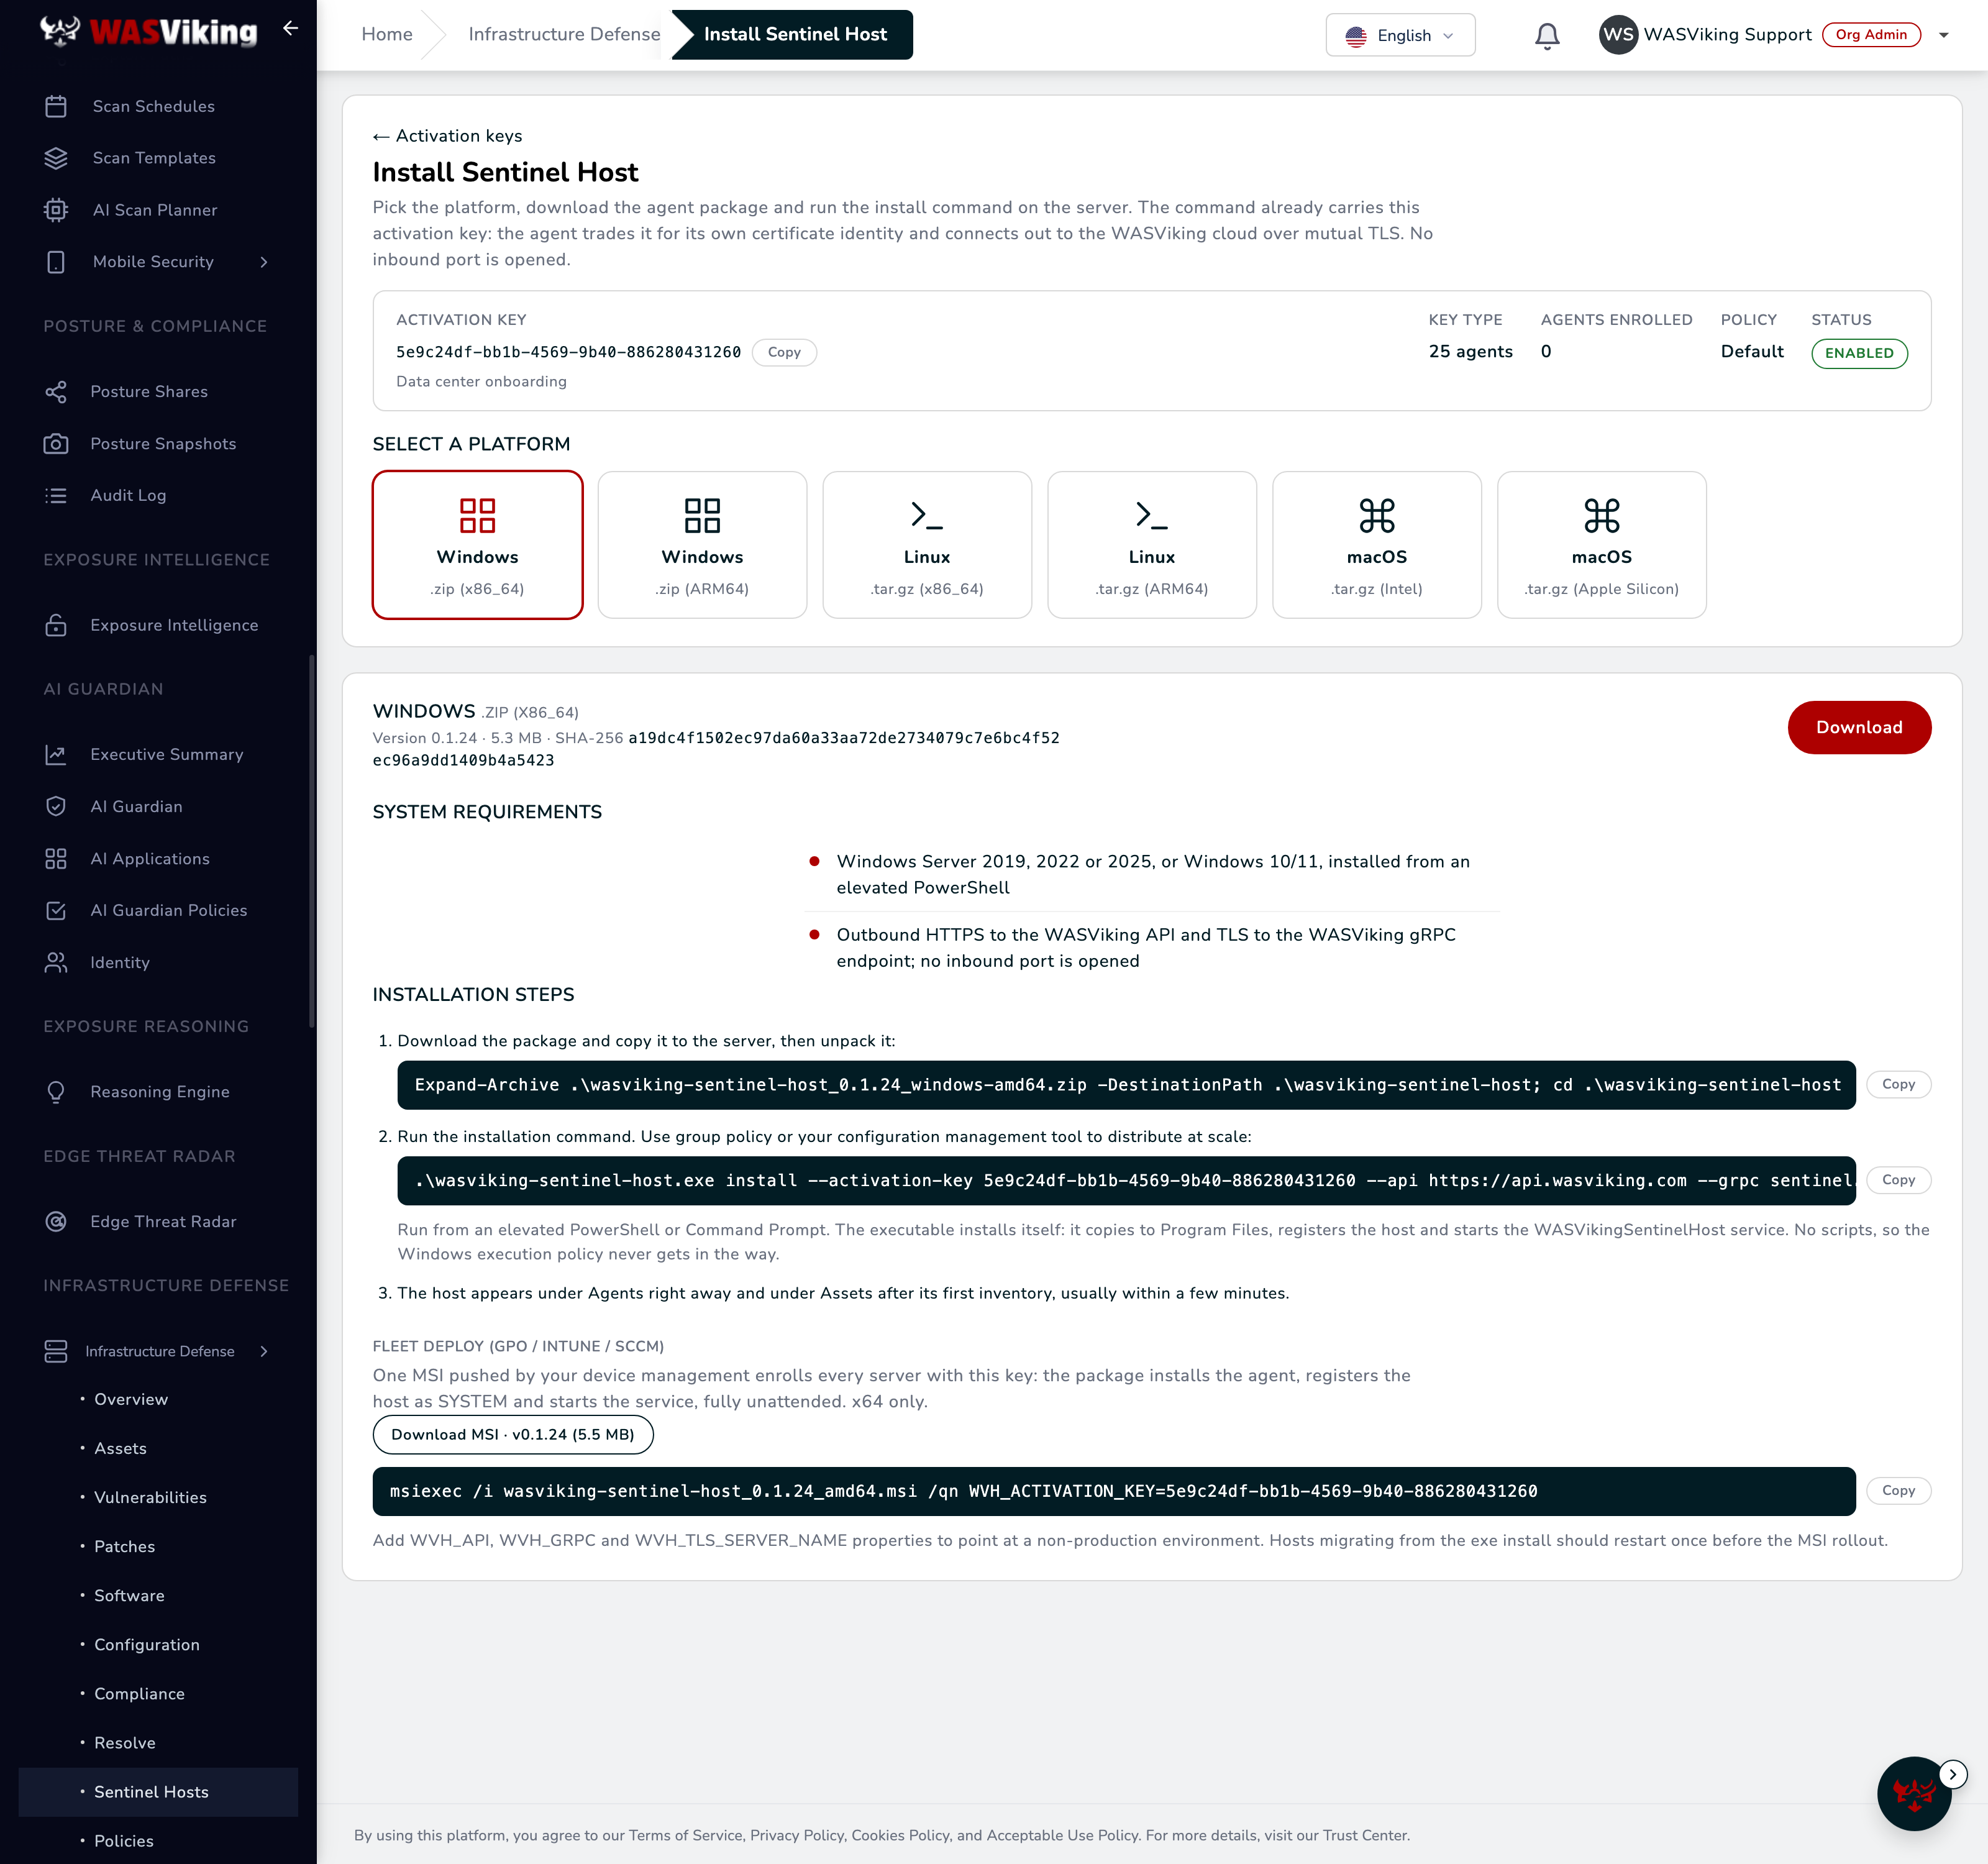
Click Install agent next to the key. The install page carries the key inside every command, so installation is one download and one line on the server: the agent trades the credential for its own certificate identity and starts the service, always connecting outbound over mutual TLS. Copy the command straight from that page, or use the reference below.
One line, two credentials
The install command is the same everywhere; the only thing that changes is which credential you hand it.
--activation-keytakes the reusable key from the Activation keys tab. Any number of machines can use it, within the cap you set; each one enrolls under its own hostname and identity. This is the right choice for rollouts and automation, and the path this guide follows.--tokentakes the one-time token from Enroll a single server on the Agents tab. It is shown once, works for exactly one machine, and you name the agent up front. The right choice for a first try on one or two hosts.
Swap one flag for the other and everything else in the commands below stays exactly the same.
Windows
Unpack the zip from an elevated PowerShell. An elevated PowerShell
opens in C:\Windows\System32, so the line below switches to the
Downloads folder first; if you saved the package somewhere else, cd
there instead (swap amd64 for arm64 on ARM64 hosts):
cd $env:USERPROFILE\Downloads; Expand-Archive .\wasviking-sentinel-host_<version>_windows-amd64.zip -DestinationPath .\wasviking-sentinel-host -Force; cd .\wasviking-sentinel-host
Then, from the unpacked folder, run the install command:
.\wasviking-sentinel-host.exe install --activation-key <your-activation-key>
Or, with a one-time token from the Agents tab:
.\wasviking-sentinel-host.exe install --token <your-one-time-token>
The executable copies itself to Program Files, registers the host and starts the Windows service. No scripts, so the execution policy never gets in the way.
For fleets there is a second, fully unattended path on the same page: the MSI package (x64). Push it through group policy or the device management tool you already run, with the activation key passed as an installer property, and every server enrolls itself with no interaction:
msiexec /i wasviking-sentinel-host_<version>_amd64.msi /qn WVH_ACTIVATION_KEY=<your-activation-key>
While testing the rollout, add /l*v C:\wvh-install.log to the line:
msiexec fails silently under /qn, and the log answers why in
seconds.
Linux
As root, on x86_64 or ARM64:
tar -xzf wasviking-sentinel-host_<version>_linux-amd64.tar.gz
sudo ./wasviking-sentinel-host install --activation-key <your-activation-key>
The agent registers and starts under systemd.
macOS
Same one-command flow on Intel or Apple Silicon, started under launchd:
tar -xzf wasviking-sentinel-host_<version>_darwin-arm64.tar.gz
sudo ./wasviking-sentinel-host install --activation-key <your-activation-key>
In production, that is the whole command
The commands above are complete for a production install: the agent ships already knowing how to reach the WASViking cloud, and everything else it needs, certificates included, arrives during registration. When in doubt, trust the install page: it always shows the exact command for your organization, ready to copy as is.
One more habit worth keeping: to upgrade a machine that is already
enrolled, run install with no credential at all; the agent reuses its
enrollment and identity. In practice you will rarely need even that:
when a new agent version ships, the console offers a one-click update
per agent, or for the whole selection at once.
Step 4: meet your fleet
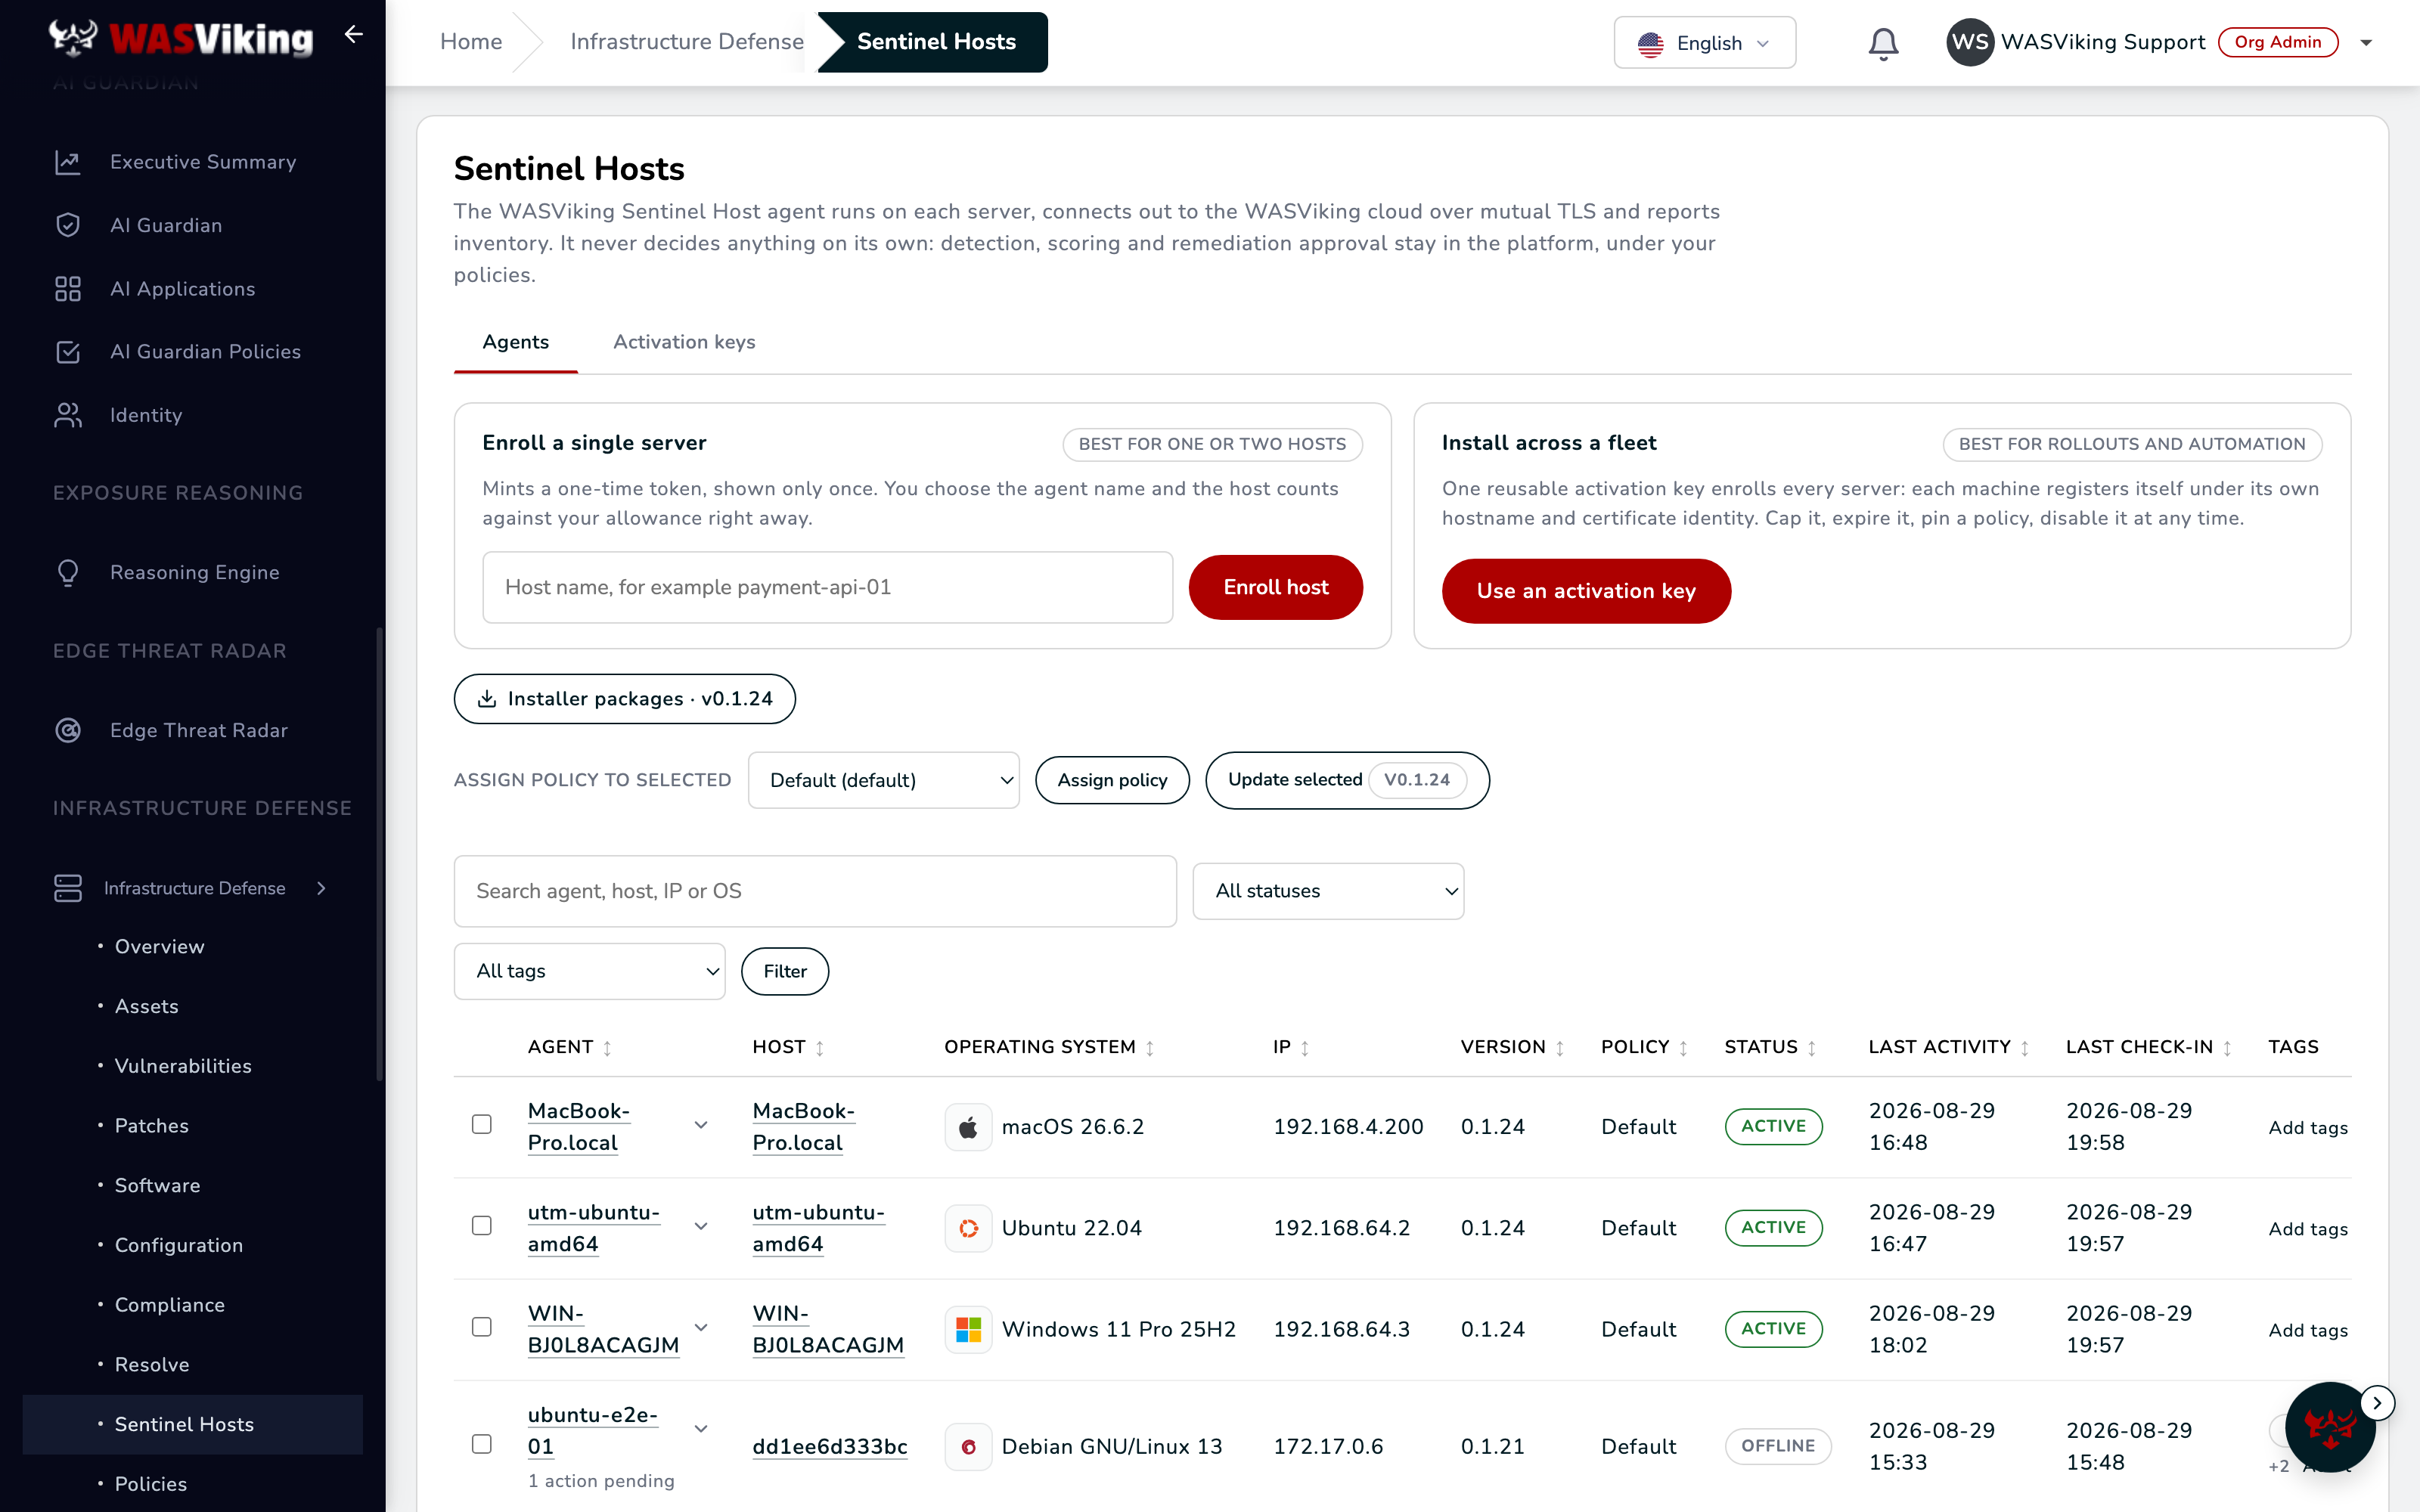
Back on Sentinel Hosts → Agents, every enrolled machine appears right away with its operating system, IP, agent version, policy and status. Windows Server and Windows 10/11, Ubuntu, Debian, the RHEL family and macOS all sit in the same table with their own icons, so a mixed fleet stays readable at a glance. From the row menu you can run an inventory on demand, request the agent's logs, restart it, or uninstall it remotely; tags let you slice the fleet the way your team thinks about it ("web servers", "payment zone", "staging").
Within a few minutes of its first inventory each host also appears on the Assets screen, and its first assessment follows: packages correlated against published vulnerabilities, missing security updates, configuration checks, and the score.
Step 5: read the score, then tell the platform what the host is
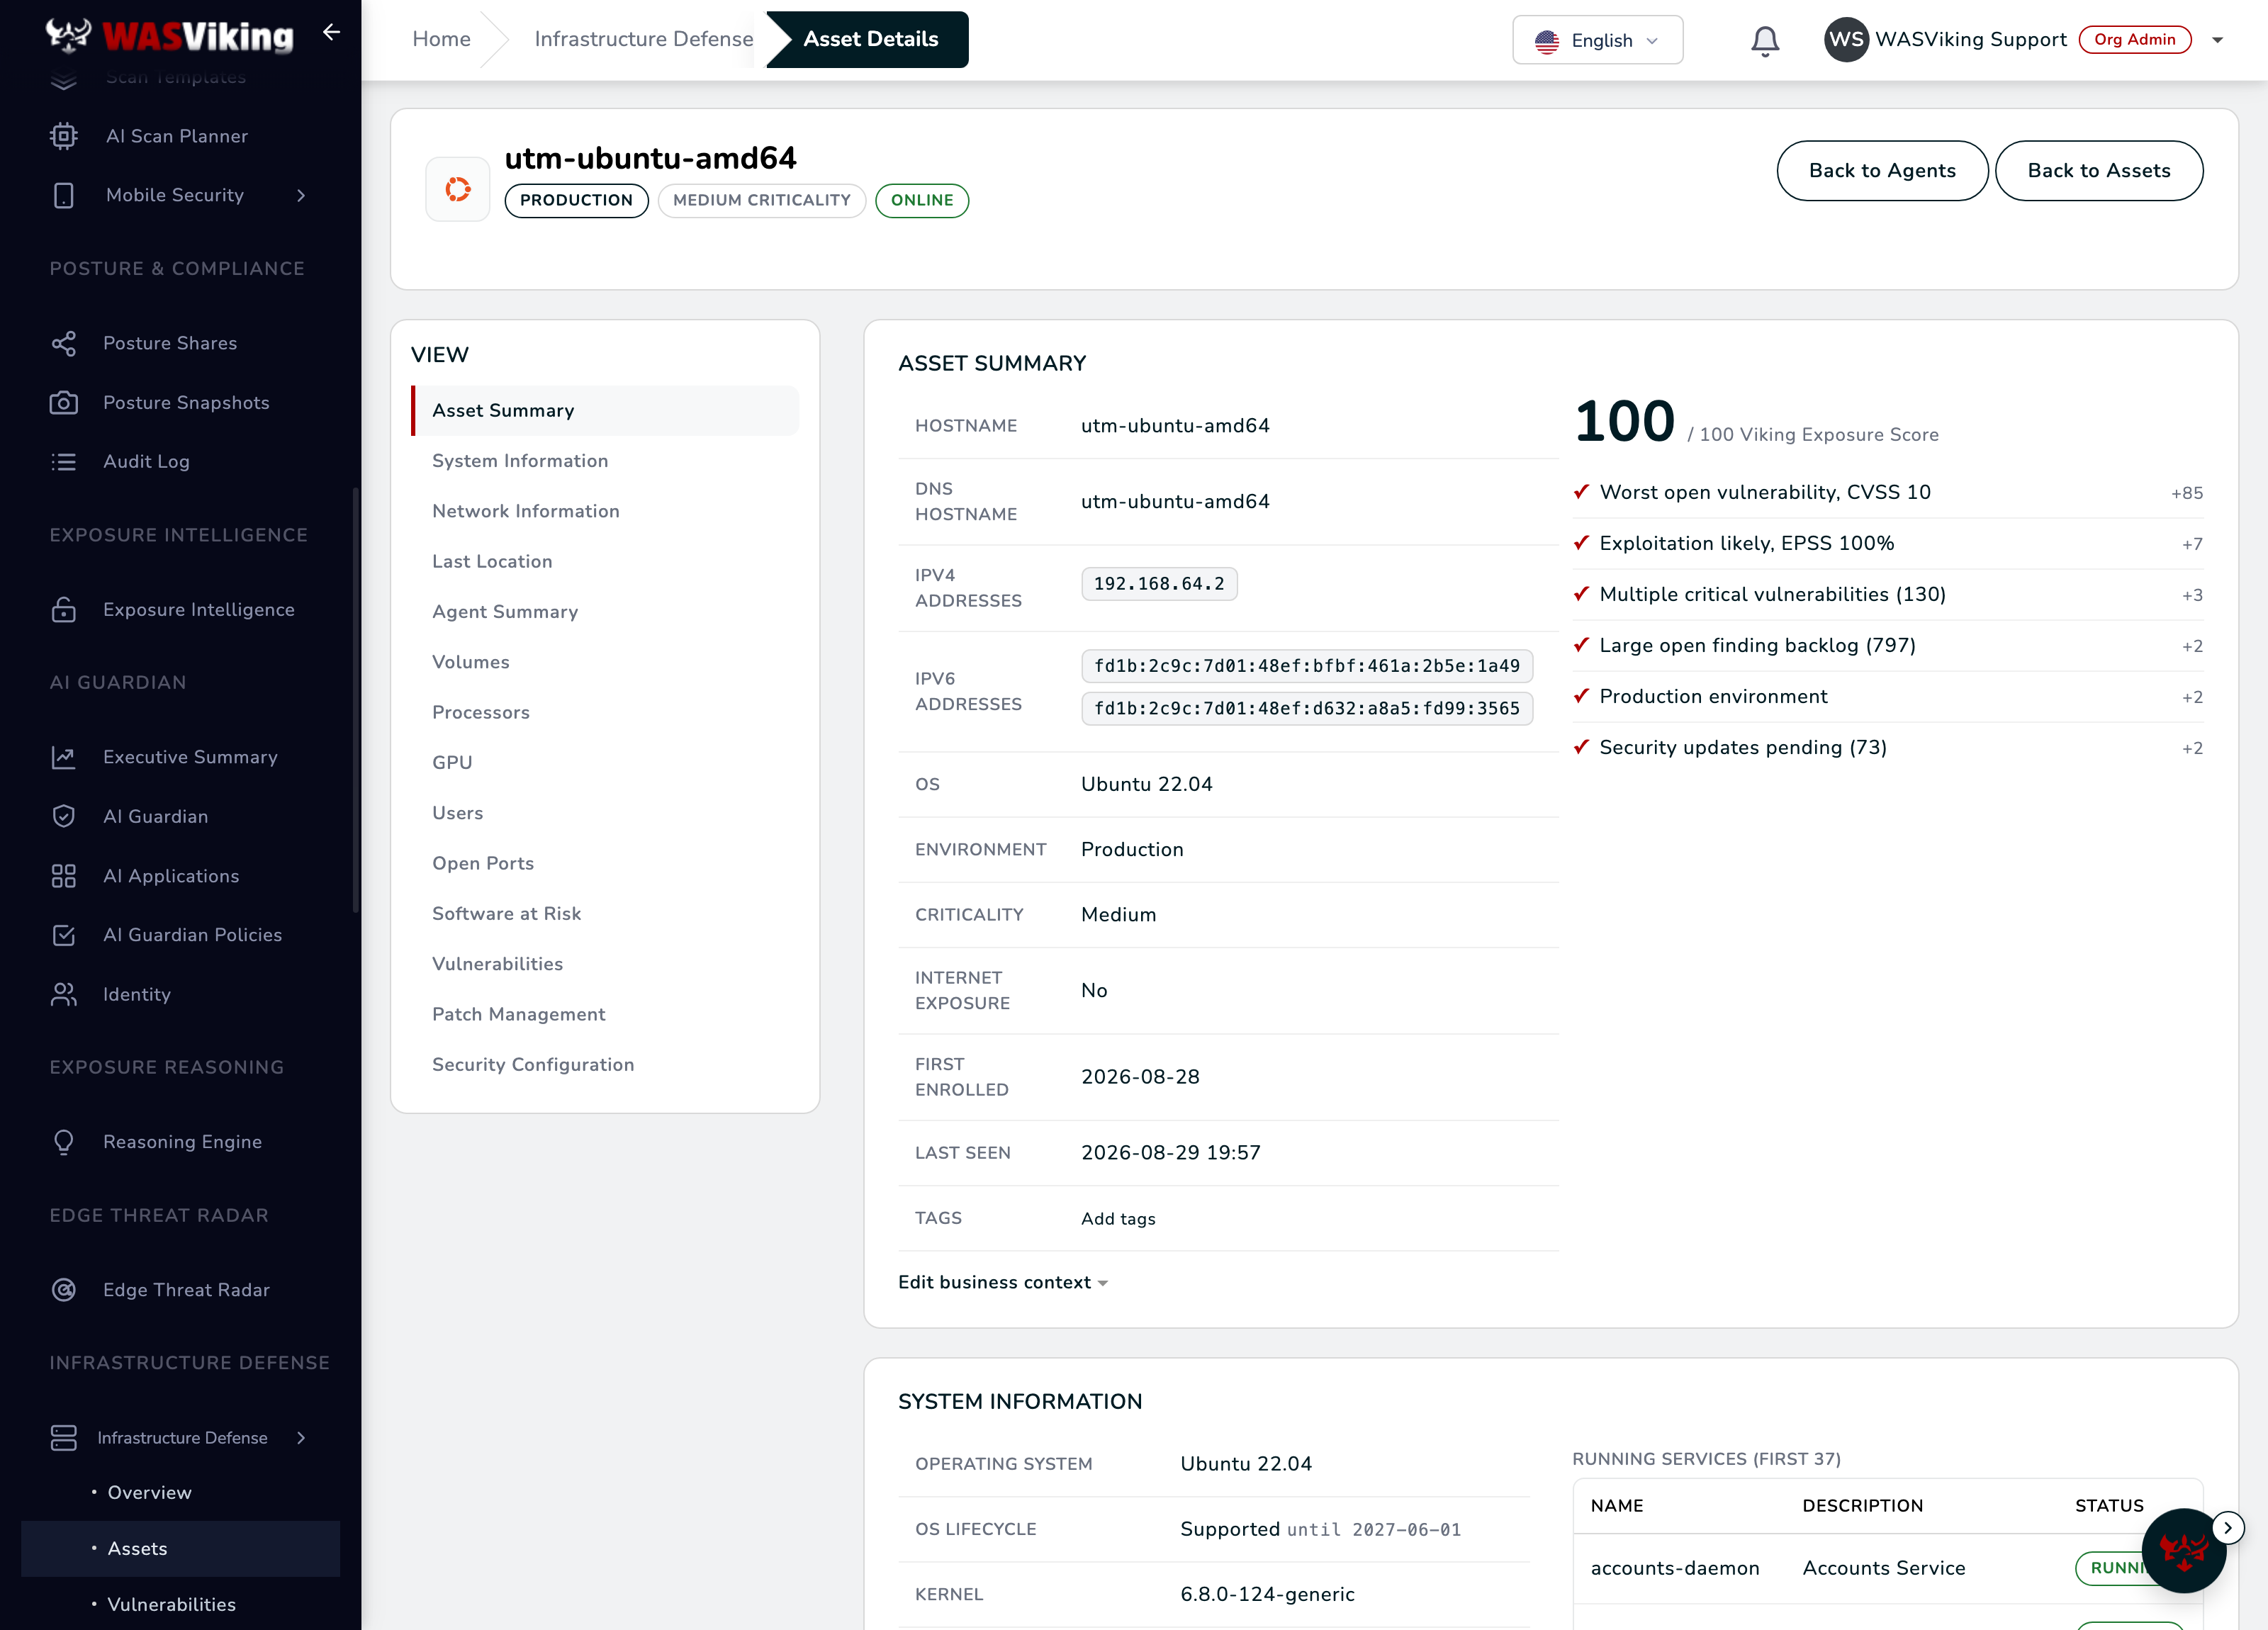
Open any host on the Assets screen. The Asset Summary shows the Viking Exposure Score with every factor and its points listed next to it, so the number is never a mystery: worst open vulnerability, exploitation evidence, exposure, pending updates, end of life state.
Two inputs here are yours to set, and both move the score: under Edit business context, set the environment (production raises the stakes, staging lowers them) and the criticality of the asset. Internet exposure you can leave on automatic: the platform's own attack surface discovery proves it, names the evidence on the screen, and a manual choice always wins if you disagree.
Step 6: write the rules down as policies
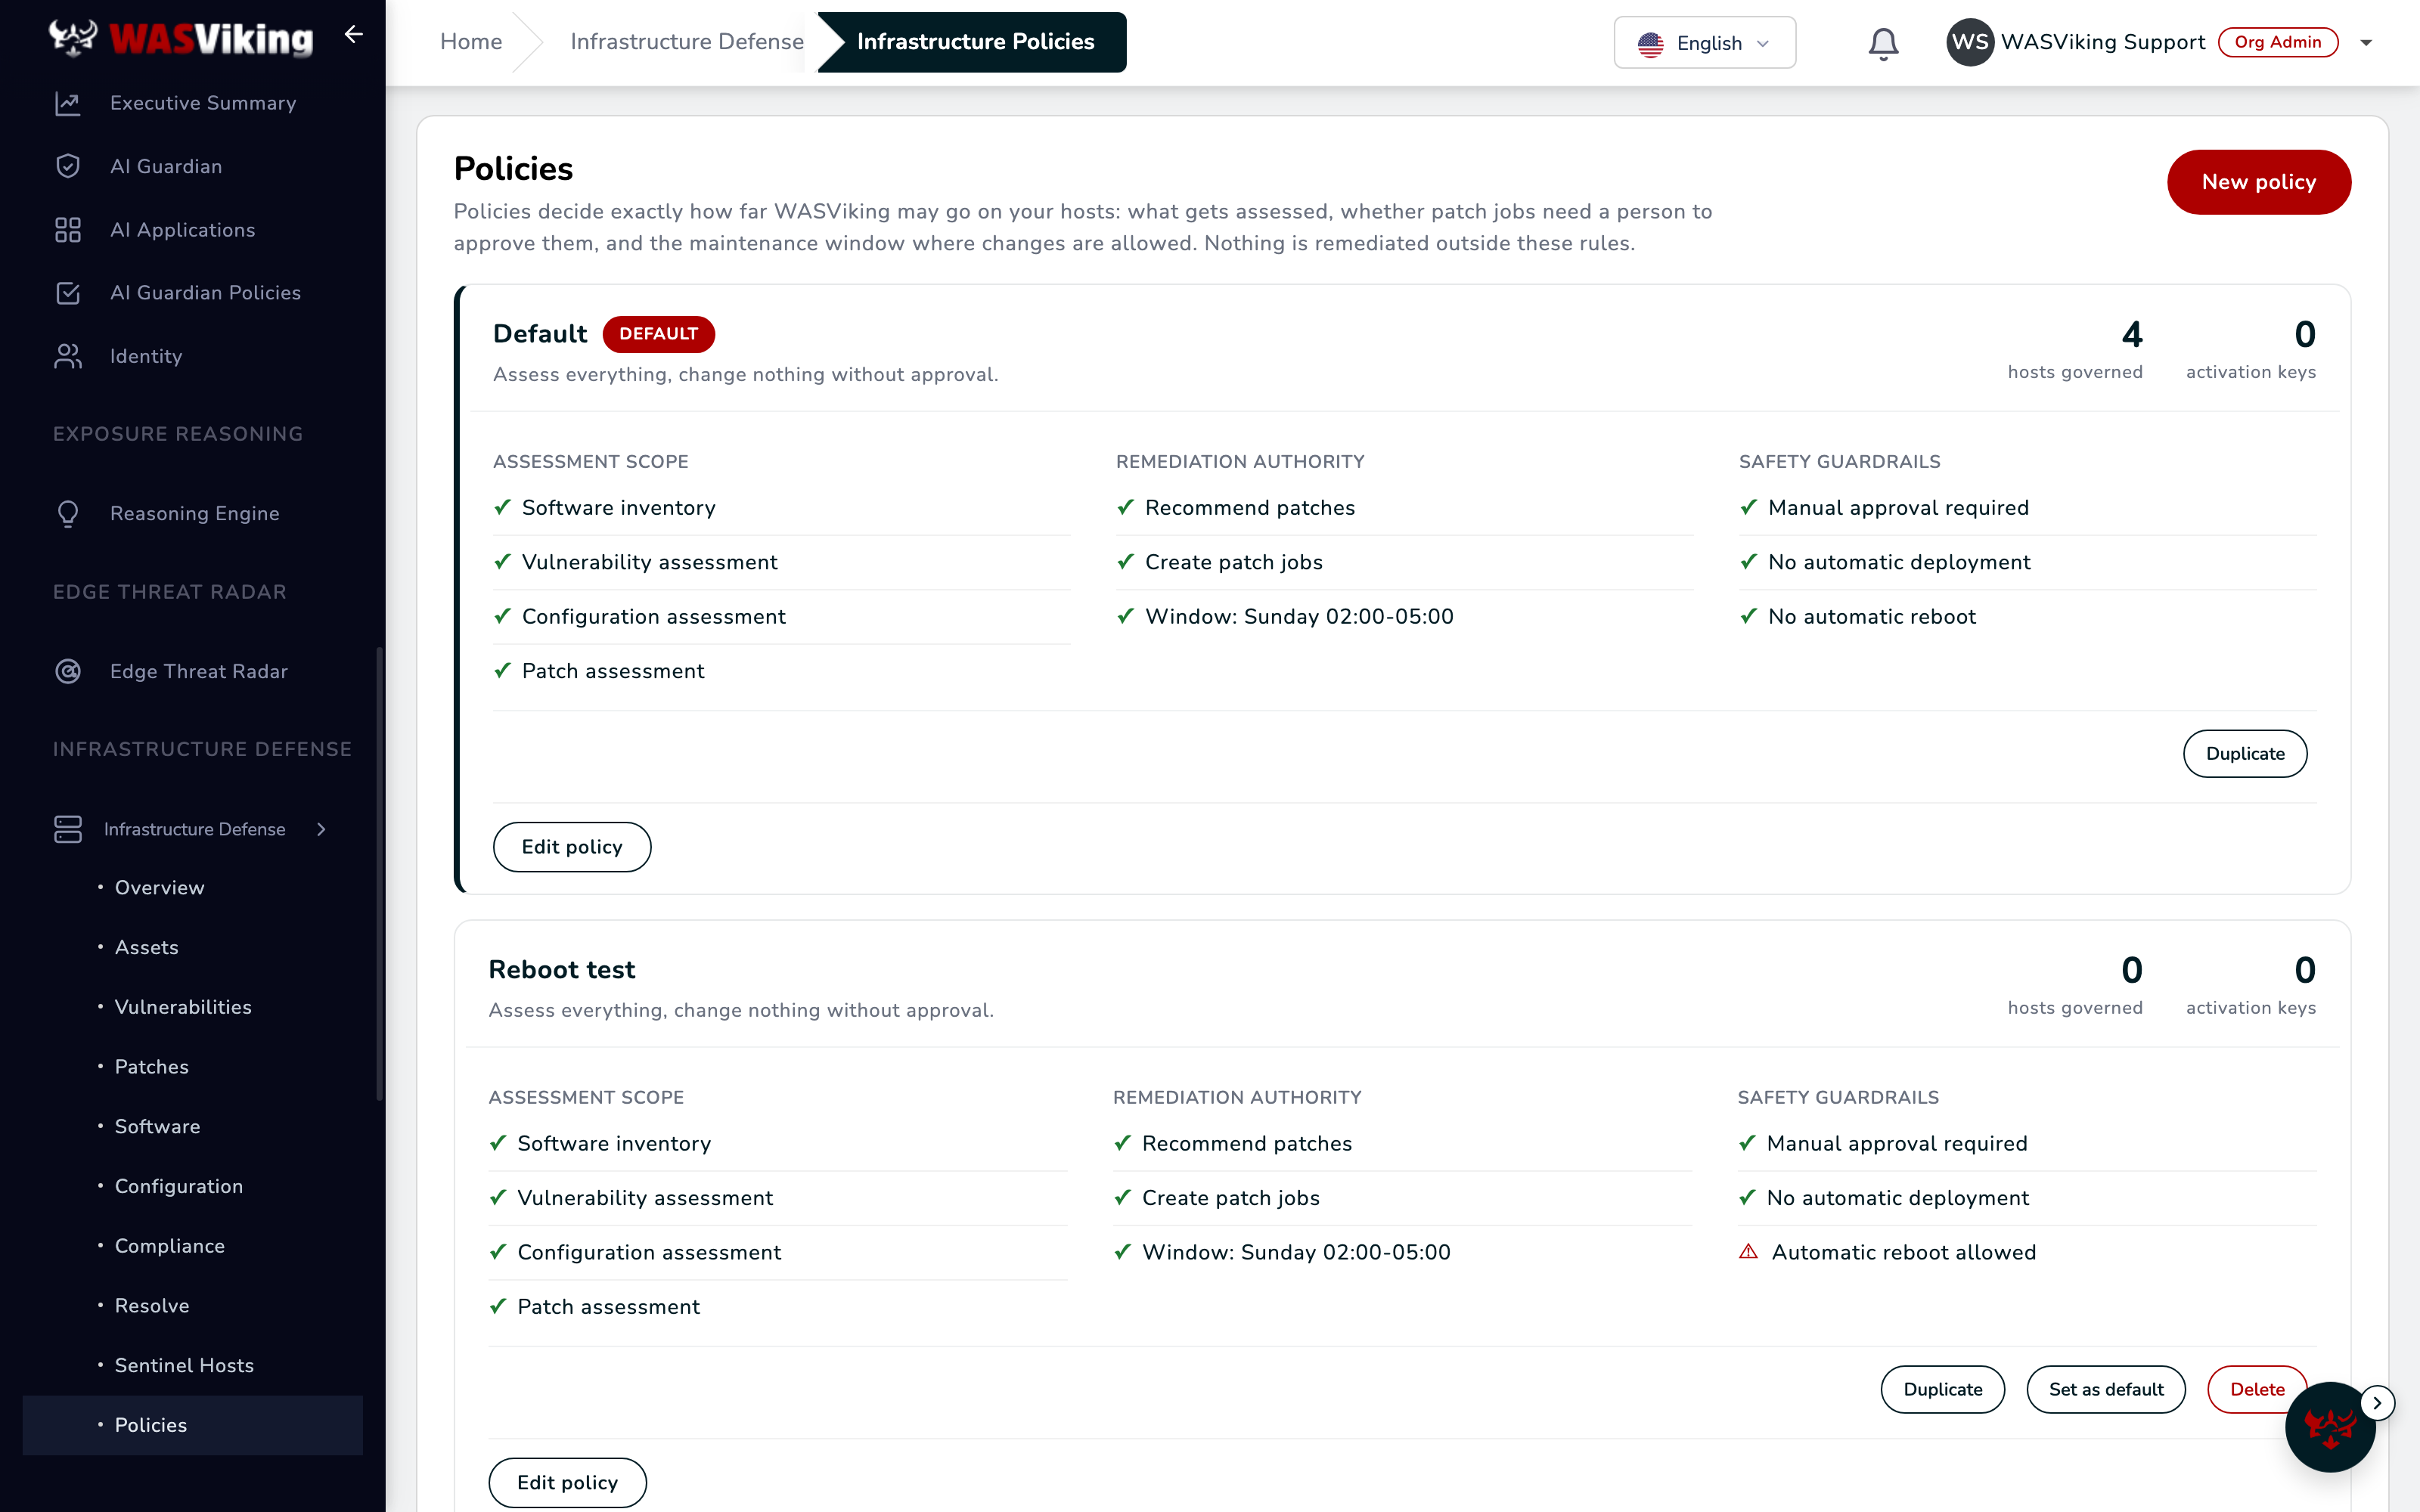
Open Infrastructure Defense → Policies. A policy states exactly how far the platform may go for the hosts under it: which assessments run, whether the platform may recommend and create patch jobs, whether a person must approve them (on by default), whether anything may ever deploy or reboot automatically (both off by default), and the maintenance window where changes are allowed. Assign a policy per activation key, per agent, or in bulk from the Agents tab. The default policy ships safe: assess everything, change nothing without approval.
The same policy carries the performance and resource protection profile of its hosts: pick Conservative for critical production (a tenth of the machine, assessment twice a day, work waits as soon as the host gets busy), Balanced for the fleet at large, Performance for development, or Custom to set every number yourself, including a reduced activity window in host local time (08:00 to 18:00 keeps business hours quiet). The agent enforces the CPU share as a hard cap on Linux and Windows and as scheduling priority on macOS, and postpones scheduled assessments and approved patch jobs while the host is above the thresholds you set. Each asset page shows what the agent reports.
Step 7: route the outcomes to your team
In Alert Destinations, enable the Infrastructure patch job event on the channels your team watches (Slack, Teams, email or webhook). A verified job announces itself with the measured numbers (score before and after, vulnerabilities closed); a failed job arrives with the reason. Decisions a person made in the portal, like rejecting a job, are deliberately never broadcast.
Step 8: run your first remediation
When the first assessment lands, open Resolve. Recommended actions group the pending security updates per host, ranked by the score reduction they are expected to deliver. Schedule one, approve it (run now, or let it wait for the maintenance window), and watch the cycle finish honestly: the agent runs pre-checks, applies the updates through the platform's native mechanism, and the job only completes when the next inventory proves which vulnerabilities closed and how far the score dropped. If a reboot is still pending, the job says so instead of declaring victory early.
What to look at next
- Configuration and Compliance show the CIS-aligned check results and the compliance percentage per host and for the fleet.
- Software answers inventory questions across the fleet, down to which hosts run a specific package and version.
- Download report on the Overview exports the branded PDF: fleet posture, verified risk reduction and top risks, ready for a stakeholder who will never open the portal.
- Coverage, the third tab of Assets, crosses your Attack Surface with the fleet: which internet-facing assets you own are served by a host you manage, and the next step for the ones that are not. See Bring your internet-facing assets under management.
- Roll back this change on a completed job undoes an update that misbehaved, with the same approval and a measured verdict. See Roll back a change that misbehaved.
For the full picture of what the module assesses and how the score is built, see Infrastructure Defense in Capabilities.