
Set up Cloud Security
Connect your first AWS account step by step. Register the account, deploy the read-only assessment role from the generated template, validate the permissions, choose whether changes are evaluated in real time, optionally allow assisted remediation through a separate role, and read the first results.
This guide takes you from an empty module to a scored cloud estate: by the end you will have an AWS account connected through a role you own, an inventory with every resource evaluated, a Cloud Risk score with its factors visible and the first contextual risks and attack paths on screen. Nothing here installs software or shares a credential: you create a read-only role in your account and WASViking assumes it with temporary sessions.
Before you start
Cloud Security is an add-on module enabled per organization by your WASViking contact or partner. Once it is on, the Cloud Security section appears in the portal sidebar. Registering and validating accounts needs the Manage permission on the module. On the AWS side you need someone who can create an IAM role in the account you are connecting (through CloudFormation, Terraform or the console), and, for an AWS Organization, access to the management account or a delegated administrator if you plan to deploy the role to many accounts at once.
Have at hand the 12-digit AWS account id and the e-mail of the team that owns the account.
Step 1: register the account
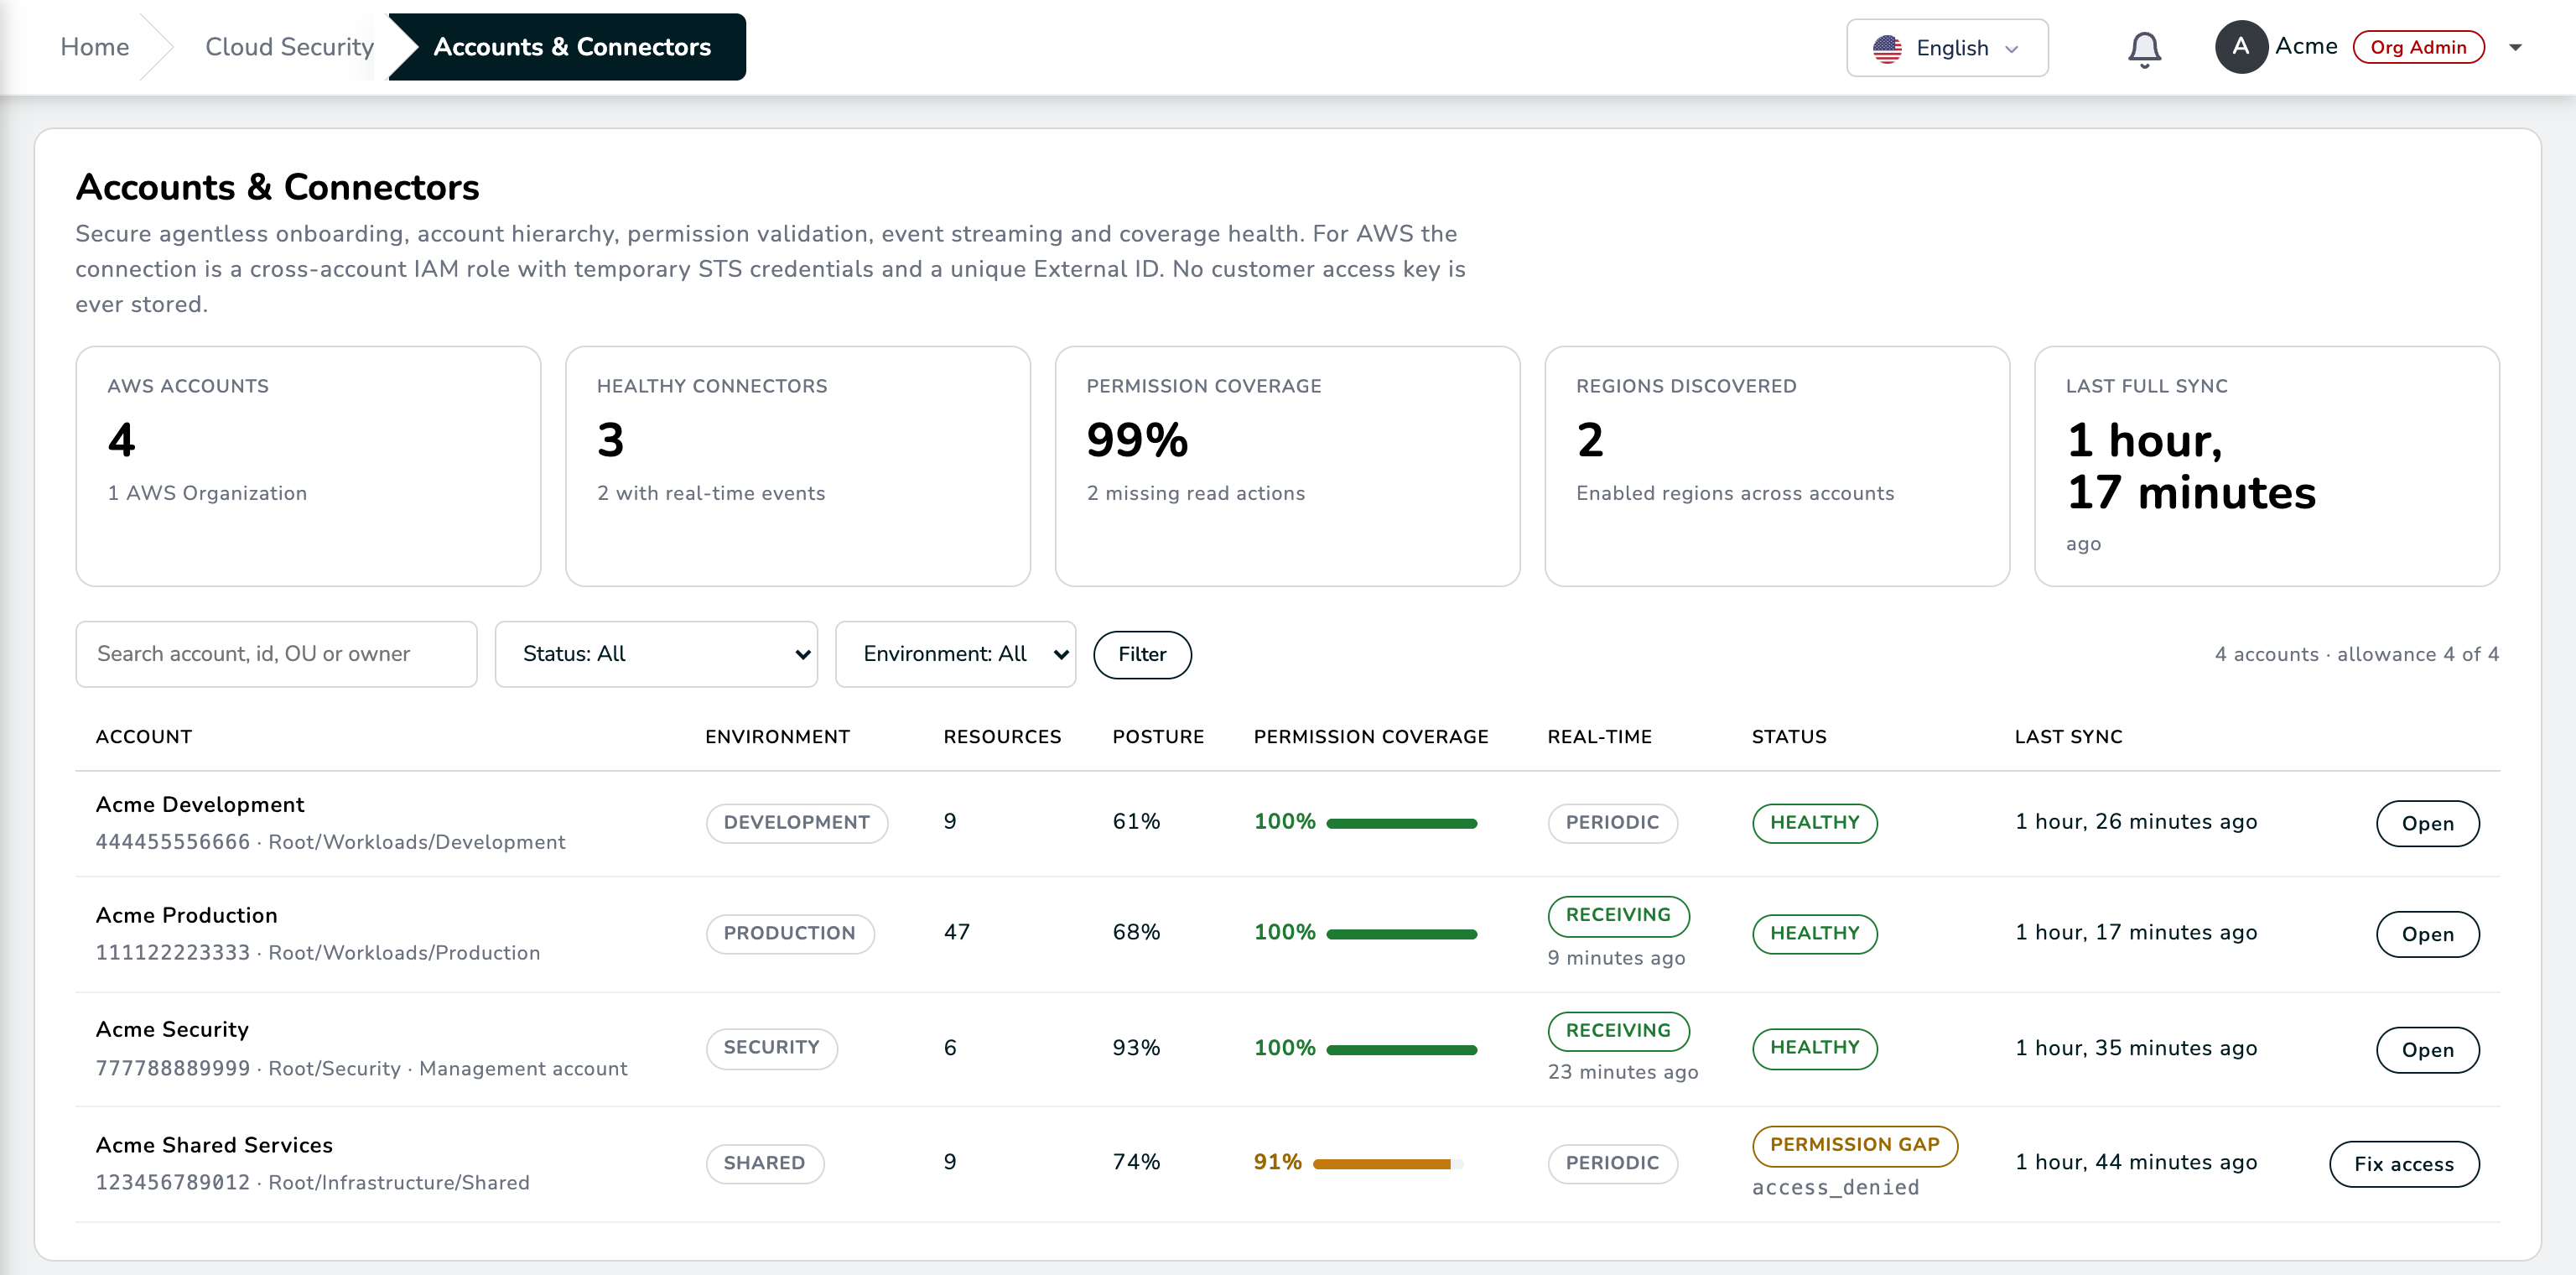
Open Cloud Security → Accounts & Connectors and click Connect AWS. Fill in:
- Account name, as your team calls it ("Production", "Payments shared services").
- The AWS account id (12 digits).
- Environment: Production, Staging, Development, Shared, Security, Sandbox or Audit. The environment weighs the risk score of every resource in the account, so pick the one that matches what runs there.
- Owner: the e-mail that receives the account's health notices.
The right panel shows what the role you are about to create will trust:
the WASViking AWS account, an External ID generated for this account
only, the role name (WASVikingCloudSecurityRole, which you may rename)
and Write access: No. Click Register and get the deployment
artifacts. The account now exists as Pending role and the wizard
can be resumed from the accounts table at any time.
Step 2: deploy the assessment role
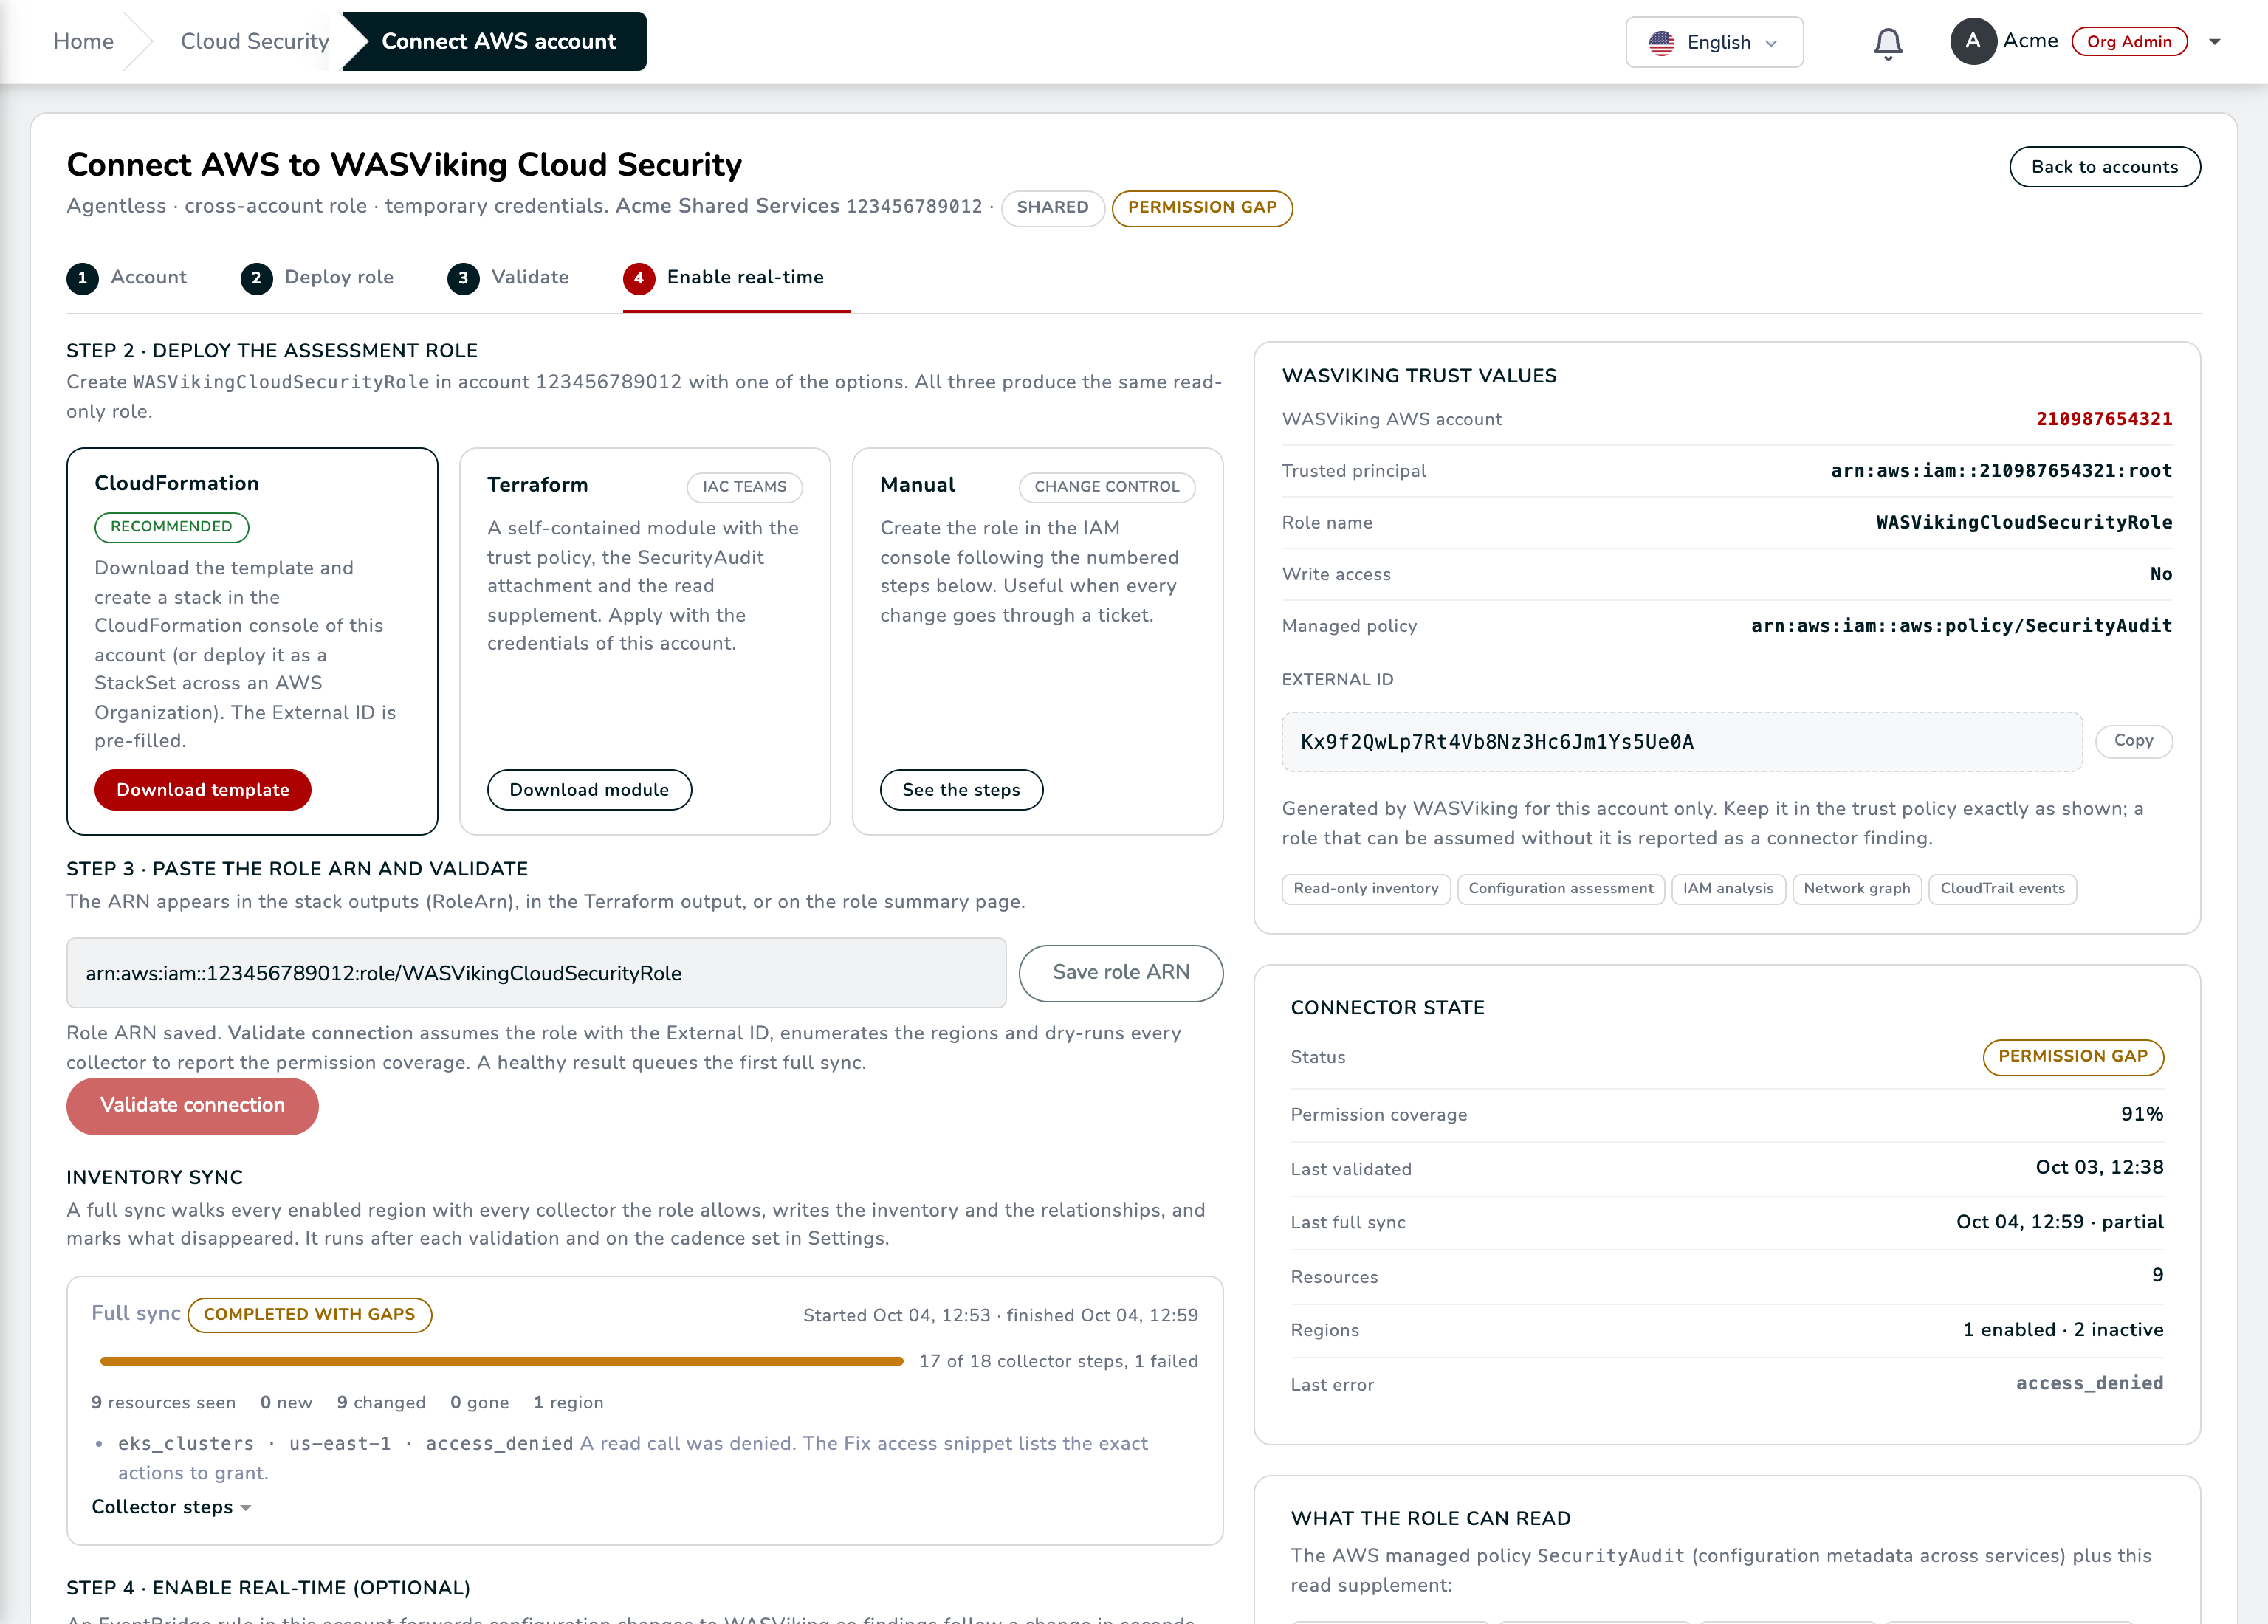
The deploy page offers three ways to create the same role. Pick the one your change process allows:
- CloudFormation (recommended): Download template and create a stack with it in the account, in any region. The template creates the role with the trust policy (your External ID included) and attaches the AWS managed read-only audit policy plus the small supplement of list and describe actions the inventory needs. Nothing in it can write. For an AWS Organization, deploy the same template as a StackSet to the organizational units you want; one role per member account.
- Terraform: Download module and apply it from your IaC repository. The role name, the WASViking account and the External ID are variables already filled in.
- Manual: follow the step list on the page (create the role, paste the trust policy with the External ID, attach the two policies).
The External ID is shown on this page to members with the Manage permission, with a copy button; it never appears in lists, notifications or exports. If it ever leaks, Rotate External ID issues a new one and keeps the previous one valid for 24 hours so you can update the trust policy without an outage.
When the stack finishes, the console lands on its Stack info tab.
The Stack ID shown there is a CloudFormation identifier, not the value
you need. Open the Outputs tab of the stack and copy the value of
RoleArn: it reads arn:aws:iam::<account id>:role/WASVikingCloudSecurityRole.
With Terraform, the apply prints the same value as its output; with the
manual steps, copy the ARN from the role's summary page in IAM.
Step 3: paste the role ARN and validate
Back on the deploy page, paste the ARN into the Role ARN field and click Validate connection. The validation assumes the role, checks that the identity belongs to the account you registered, discovers the enabled regions and dry-runs every read the inventory makes. The result shows:
- the role assumed and the account id matched,
- the regions that will be scanned (opt-in regions you have not enabled are listed as inactive and never called),
- Permission coverage: the share of reads the role can make,
- the missing actions, if any, with a Fix access snippet you can attach to the role to reach 100 percent,
- the estimated duration of the first sync.
A validation that fails stays on this step with the reason and what to change (see Troubleshooting). A validation that succeeds marks the account Healthy, or Permission gap when some reads are denied, and queues the first full sync at once. Both states are synced; a gap only means some controls read Not evaluated until you add the actions.
Step 4: enable real-time evaluation (optional)
Without this step the account is read every 24 hours (configurable in Settings) and every change is recorded from the difference between two syncs. With it, a change in your account is evaluated within seconds of happening and judged as risk introduced, removed or none, with the actor and the tool that made it.
Click Download events template and create that second stack in each region you want covered. It creates an EventBridge rule for the services the module evaluates and the small role the rule needs to deliver the events to WASViking; it sends configuration events only, never data. The step shows a state rather than a switch: Waiting for events until the first one arrives, Receiving events with the time of the last one afterwards, or Paused when the organization turned real-time evaluation off in Settings. The accounts table reads Periodic, Receiving or Paused for each account.
Step 5: allow assisted remediation (optional)
Every finding ships with a guided plan you apply yourself. Step 5 lets WASViking apply a short list of fixes for you, each one a reversible configuration change (turn on Block Public Access on a bucket, close an administration or database port open to the world, require IMDSv2 on an instance, make a database instance or a snapshot private, deactivate a stale access key, enable log file validation, key rotation, point-in-time recovery or scan on push). Nothing runs without a request on a work item and an approval under the governance policy you set.
The step creates a second role in your account, separate from the read-only assessment role, with its own External ID and a policy that allows only the actions you tick. Tick them, click Enable assisted remediation, download the remediation role template, create that stack, paste the role identifier and click Validate remediation role; the step reads Ready when the role was assumed with its External ID and answers for this account. Changing the list later asks you to update the stack and validate again; Disable assisted remediation forgets the role on our side, and you delete it in AWS.
Then open Settings, turn on Assisted remediation governance, choose whether every action needs an approver or only the high impact ones, keep the rule that the requester never approves their own request, and tick the actions and the environments you allow. On a work item the block Assisted actions lists what applies to its resource with what changes and how it rolls back; Request this action creates a record that an approver decides on the same page (Approve and run or Reject with a note), and the approvers' channels receive the request when they subscribed to the event. The record keeps who asked, who decided, what was read before the change and what was written; Roll back writes the previous state back. The next scoring pass verifies the item like any fix made by hand.
The first sync
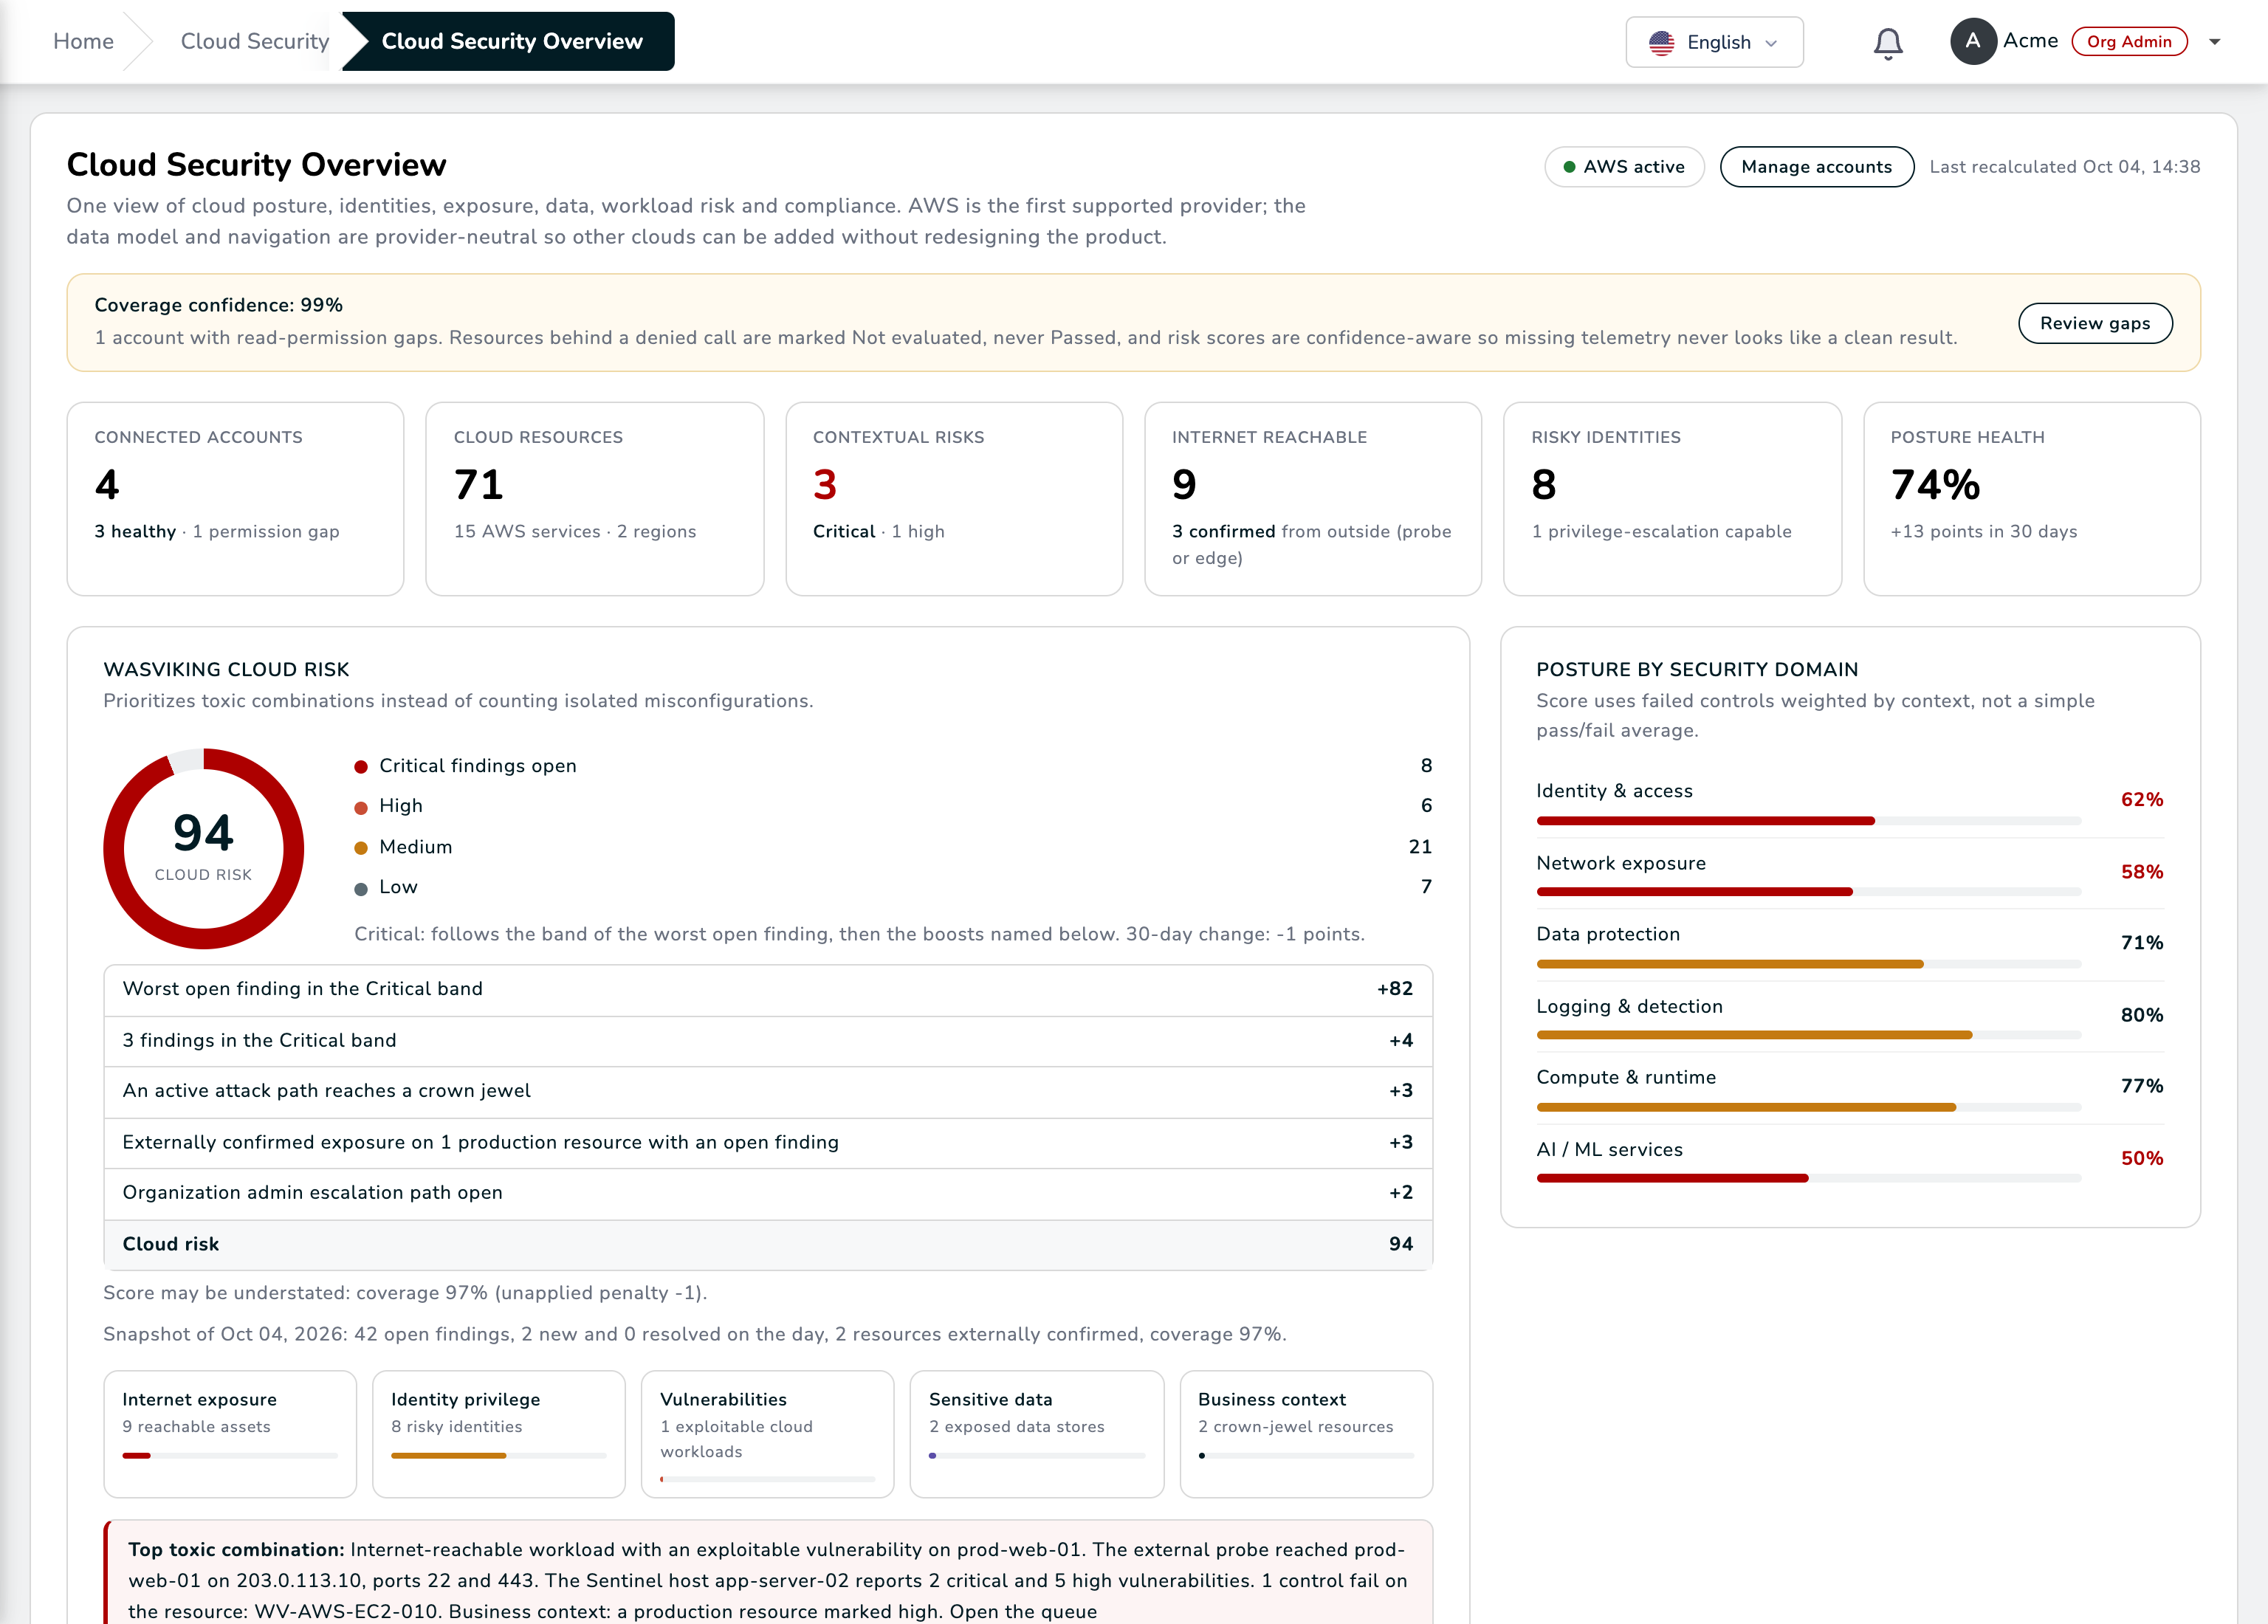
The accounts table shows the sync progressing by collector step (identity, network, compute, storage and data, logging and detection, AI services), with the number of resources seen. The Overview stays in its "first sync running" state until the evaluation completes, then shows the Cloud Risk ring with every point named, the posture by domain and the first findings. A first sync of a mid-sized account takes a few minutes; the validation page told you the estimate.
What to look at next:
- Overview: the coverage confidence banner (if below 100 percent, open the gaps and attach the Fix access snippet), the top toxic combination and the highest priority risks.
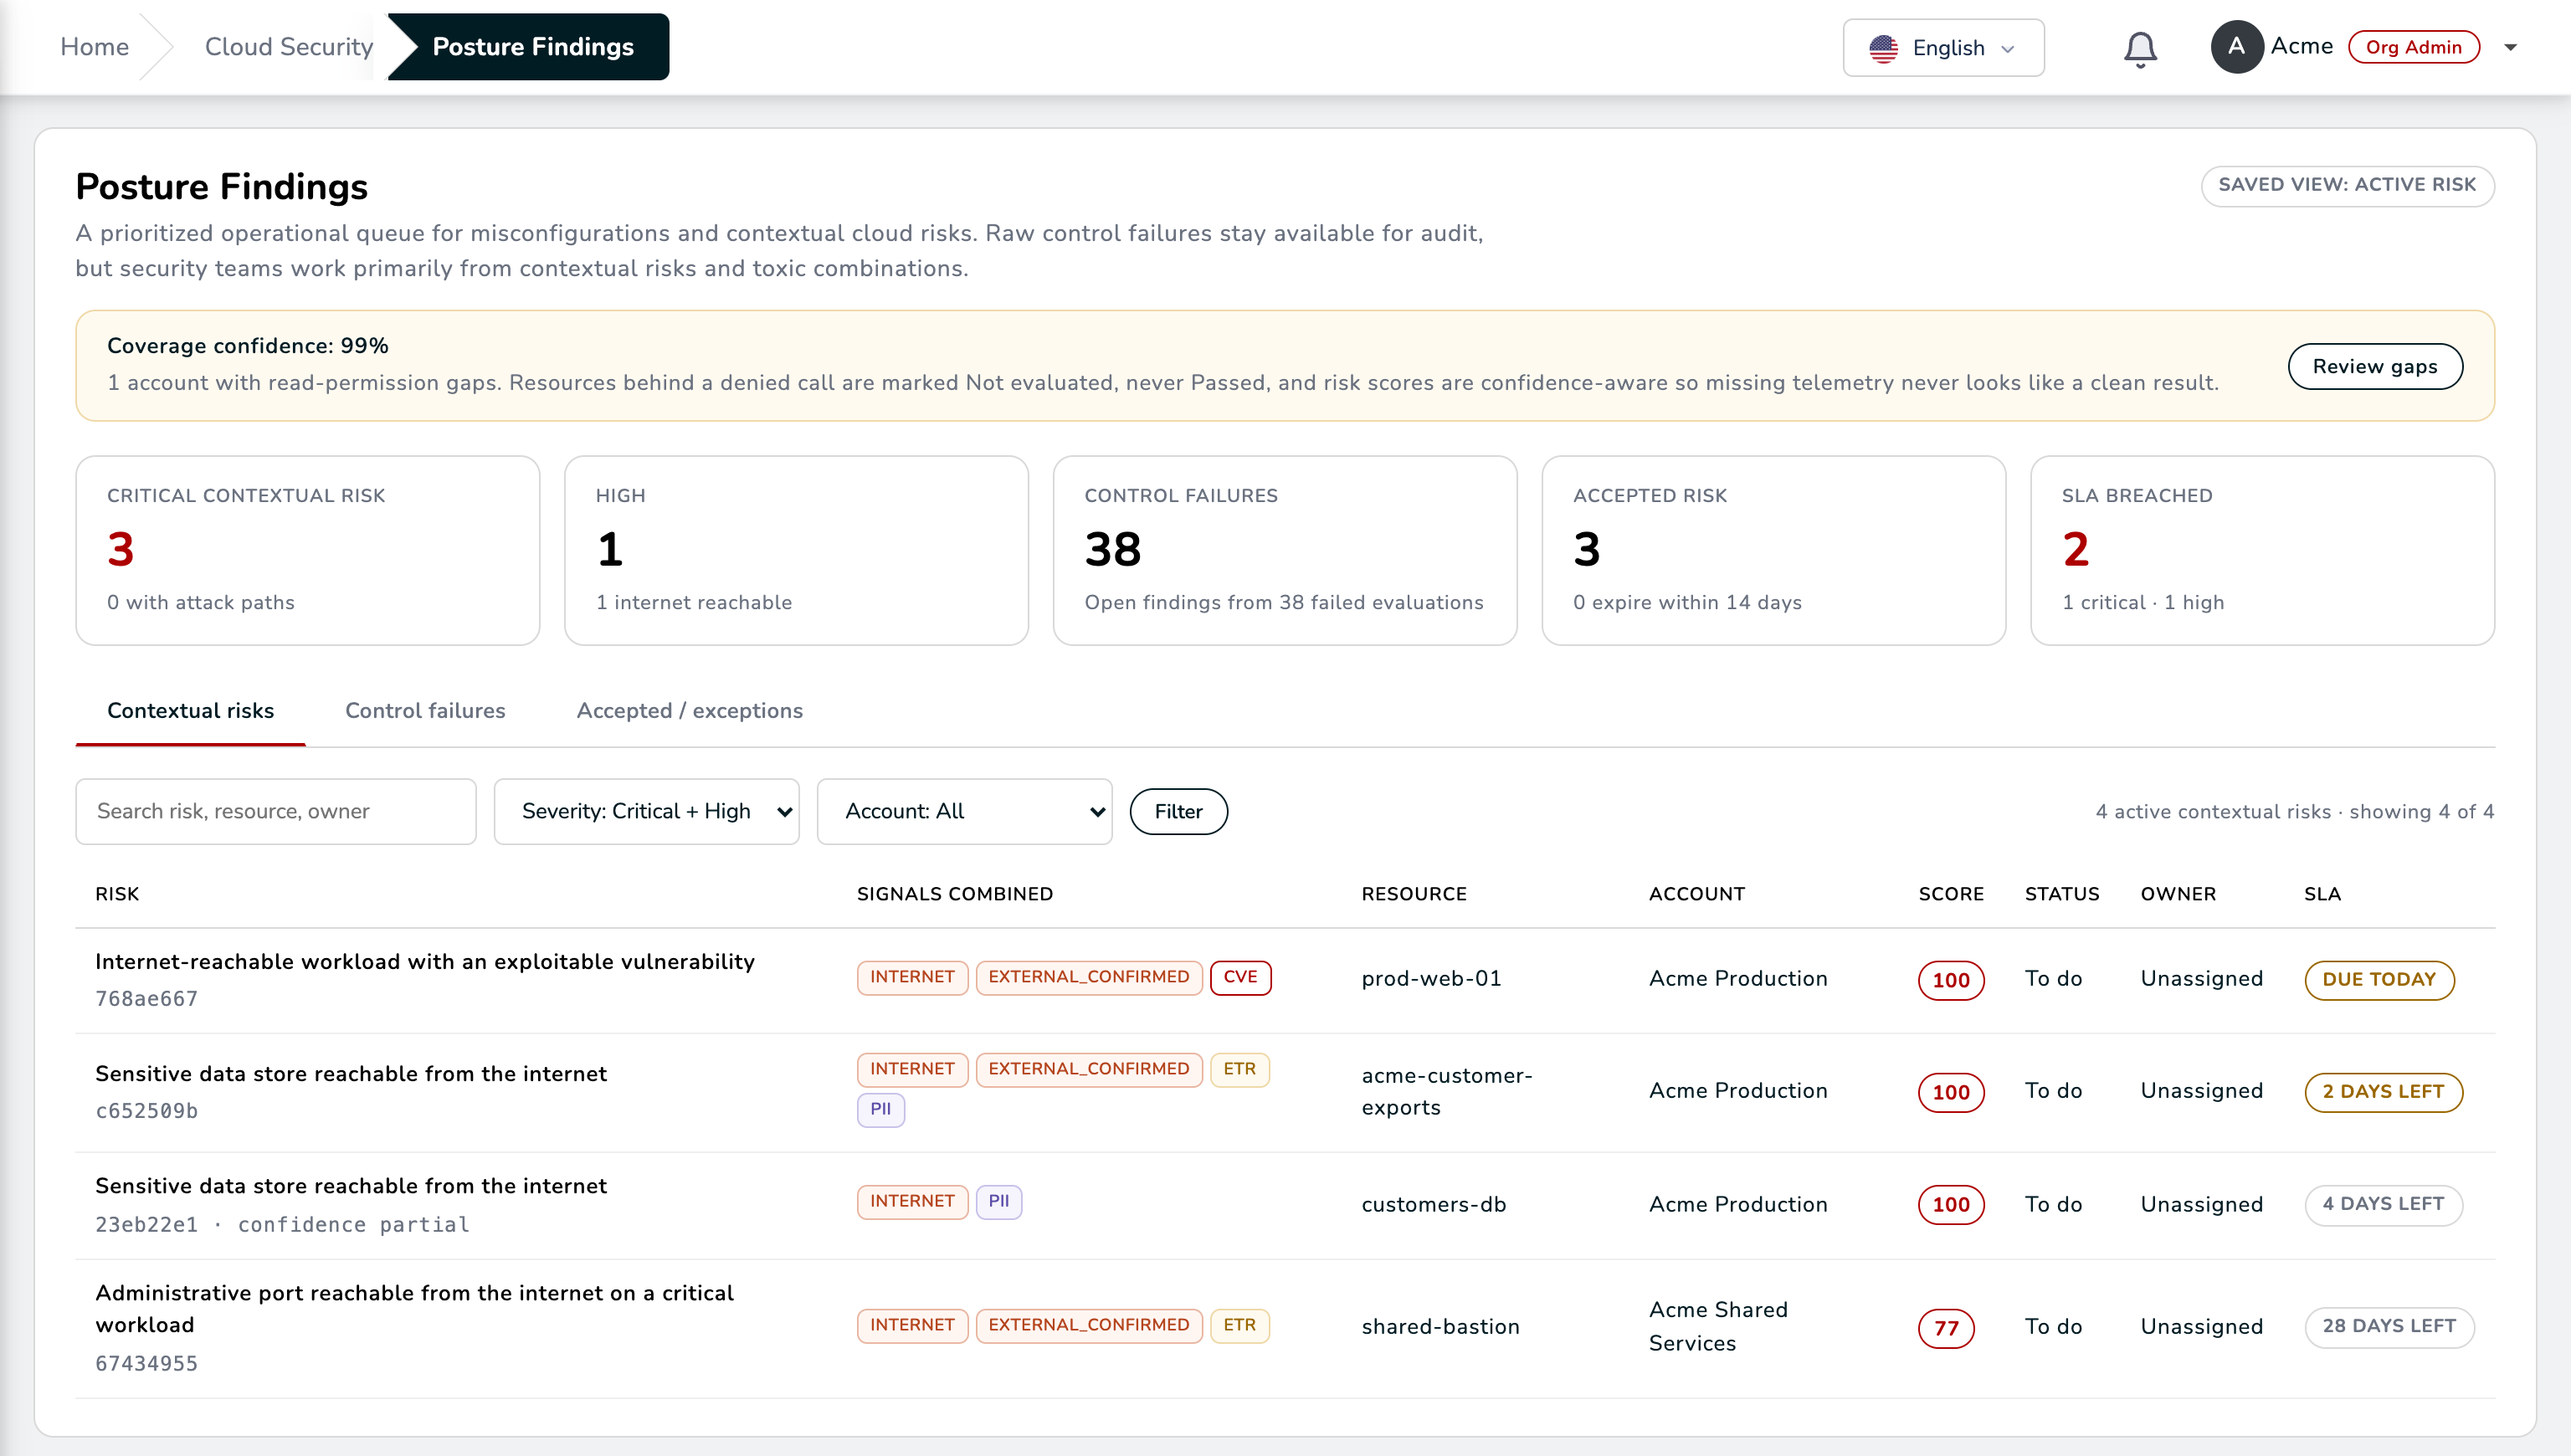
- Posture Findings: start with the Contextual risks tab; each one names the components of the combination and how to break it.
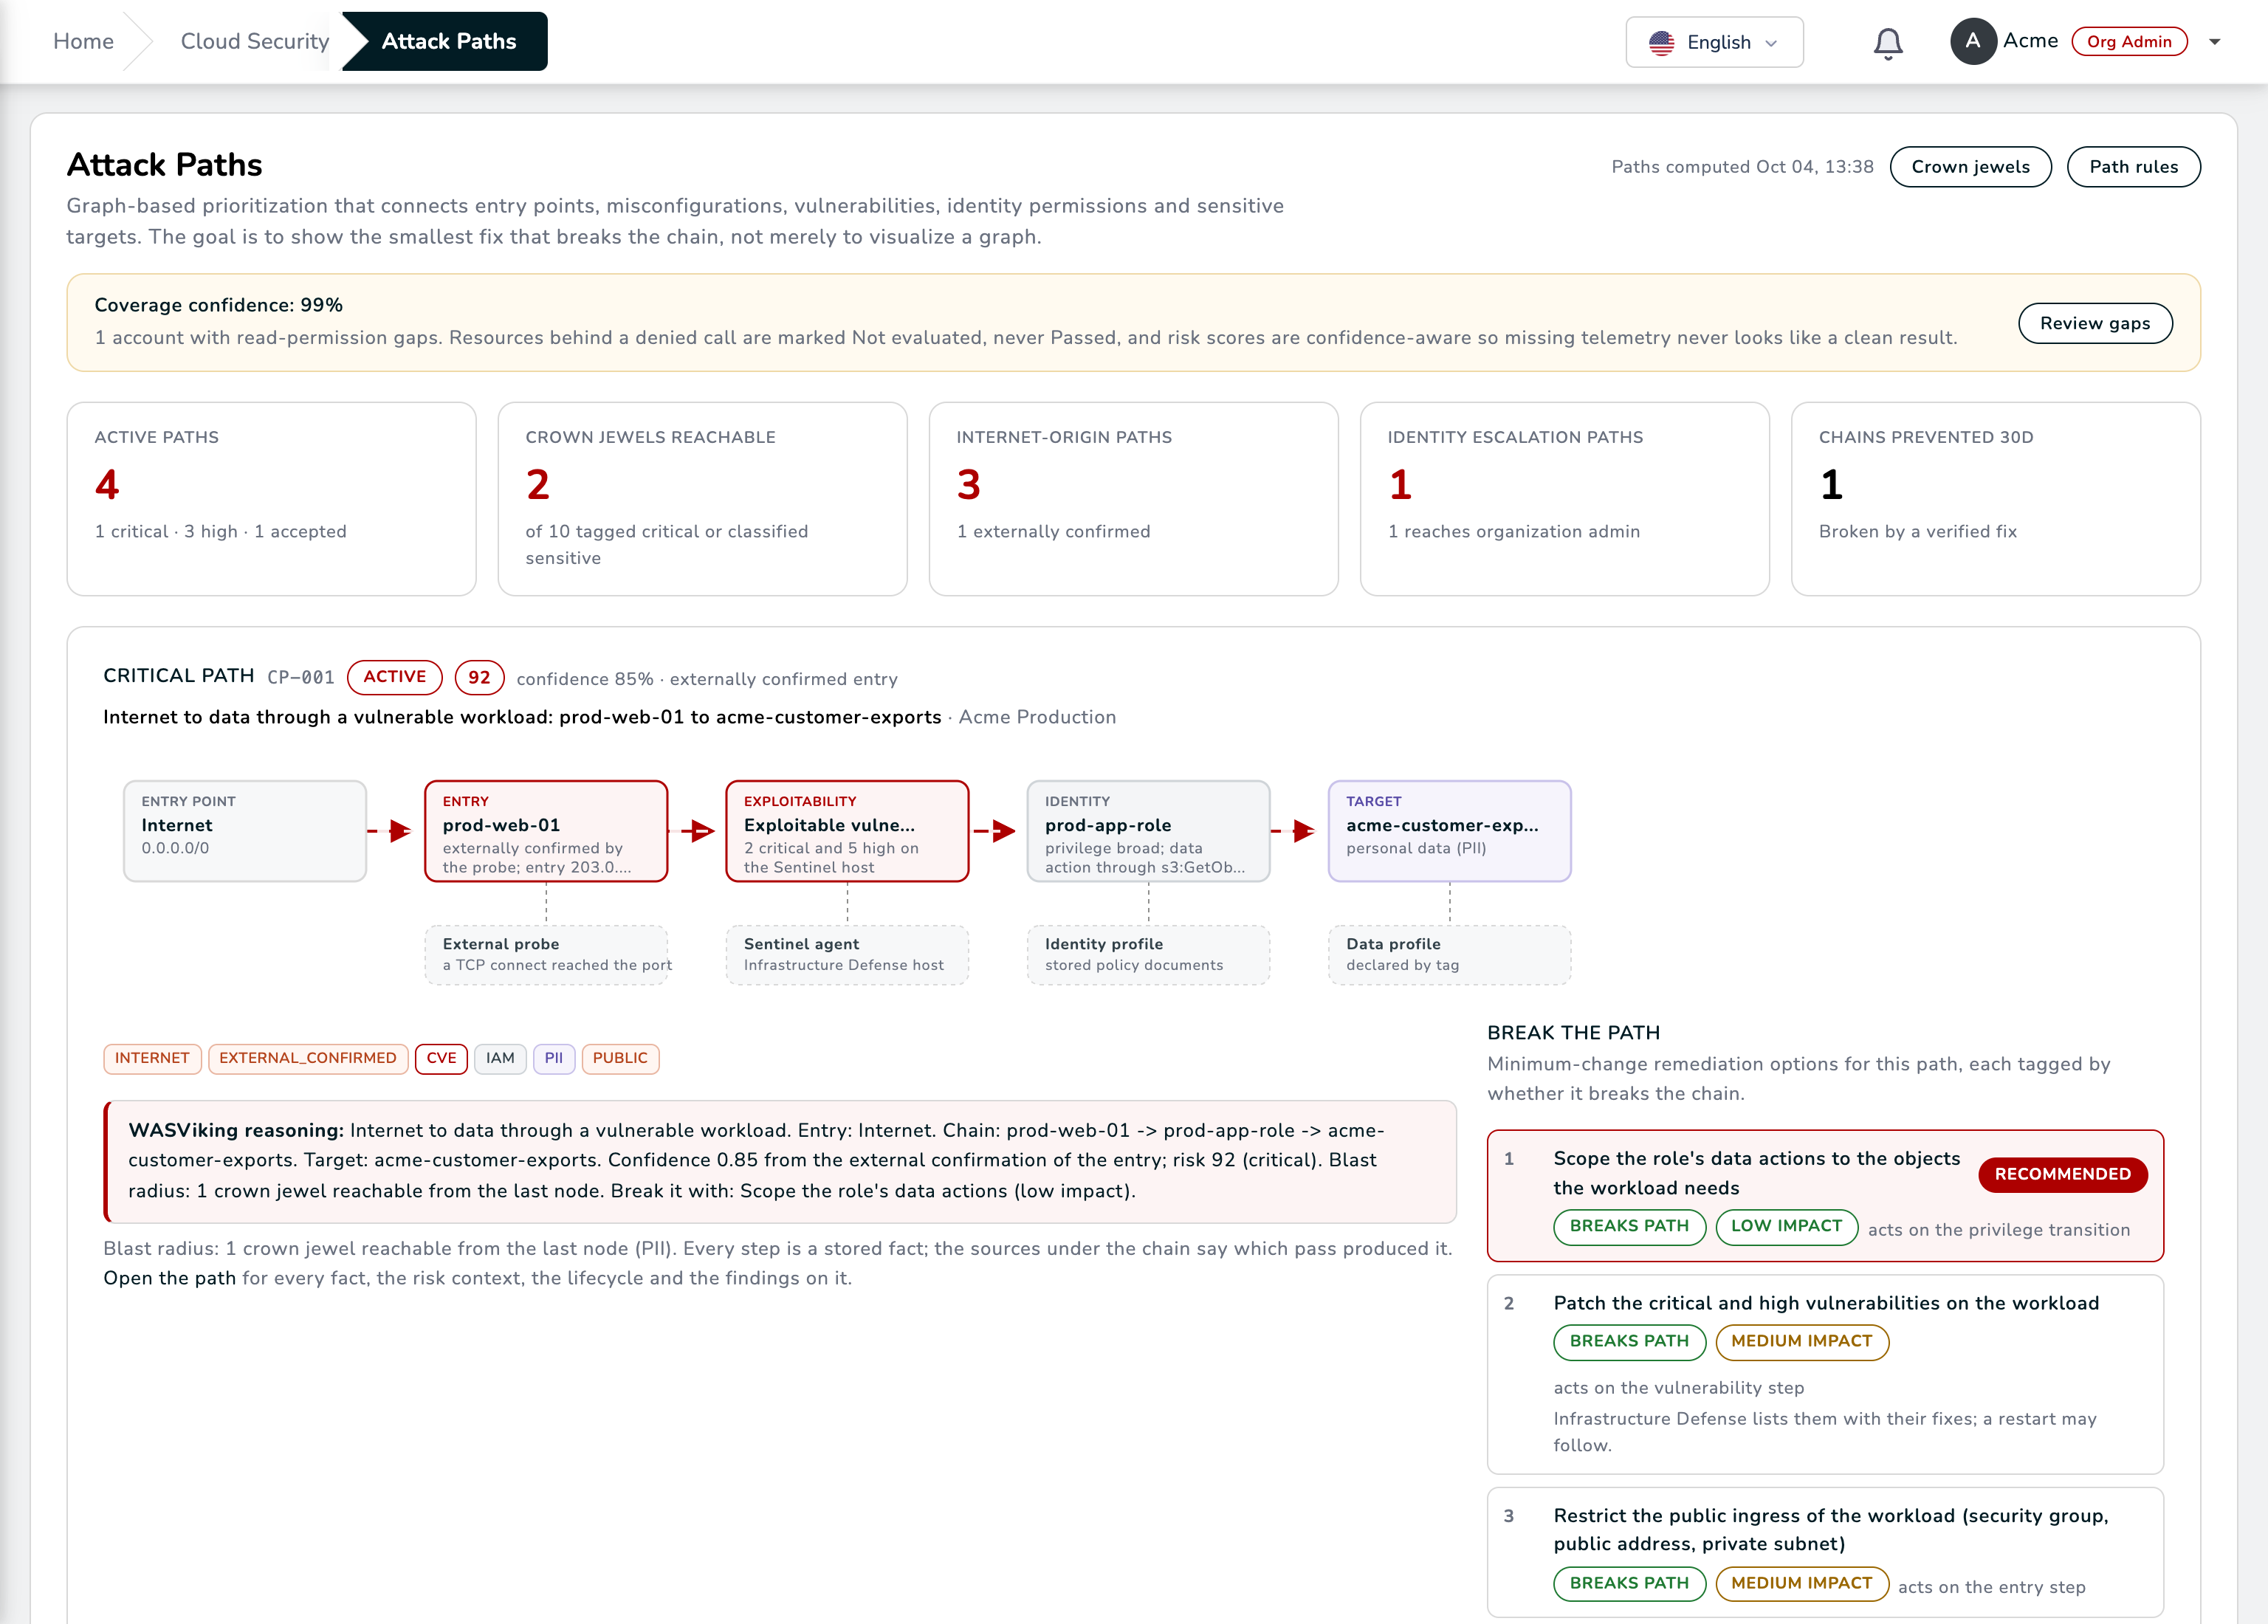
- Attack Paths: the featured chain and its recommended break option; Open remediation plan turns it into a work item.
- Cloud Inventory: open any resource to read its configuration, the graph around it, its host and attack surface context and its exposure path.
Day two
- Settings: tell the module which tag keys name the owner, the environment, the criticality and the data classification of your resources; declare the crown jewel rules; choose the native signals to ingest and the retention of deleted resources.
- Policies & Controls: enable the policy packs that match the account (the enterprise baseline is always on); request, approve and revoke exceptions; every exception is time bound and reopens the finding when it expires.
- Data Security: set a classification by hand on a store the inference got wrong; the manual value survives every later sync.
- Reports & Evidence: download the executive PDF, the posture and inventory CSV exports or the evidence pack, and schedule the weekly or monthly report to the members who need it.
- Notification channels: the Cloud Security events (new critical or high finding, exception requested or expired, attack path created) can be routed to Slack, Teams, e-mail or a webhook like every other alert. Enable them per channel following Notification Channels.
- Ticketing: a finding can be sent to Jira or ServiceNow from its page once the platform integration is connected.
- More accounts: repeat the four steps per account, or, in an AWS Organization, deploy the StackSet once and register the accounts as they appear.
Troubleshooting
| What you see | What it means | What to do |
|---|---|---|
| The role could not be assumed | The role does not exist in that account, its trust policy does not name the WASViking account with this External ID, or a service control policy blocks the assumption. | Check the role ARN, re-deploy the template, or review the organization's policies. |
| The role refused every External ID WASViking knows | The trust policy carries a retired External ID. | Update the trust policy with the External ID shown on the deploy page. |
| The role belongs to a different account | The ARN you pasted, or the identity it assumes, is not in the account you registered. | Register that account separately, or paste the right ARN. |
| Permission gap with a list of actions | The role can be assumed but some reads are denied. | Attach the Fix access snippet to the role and validate again. |
| A region is not enabled | An opt-in region in the list is not enabled for the account. | Nothing to do: the region is listed as inactive and skipped. |
| AWS throttled the calls | The account is busy; the sync stopped at the step it reached. | The next sync continues from there; no action needed. |
| Waiting for events stays for hours | The events stack was not created in the region where changes happen, or the organization paused real-time evaluation. | Create the stack in that region; check Settings. |
| A control reads Not evaluated | An input the control needs could not be read, or the policy pack that carries it is off. | Open the account's validation for the missing actions, or enable the pack. |
Removing an account
Remove on the accounts table stops the reads at once. The inventory and the evidence are kept for the deleted-resource retention window set in Settings so reports stay reproducible, then purged. Delete the stack (or the role) on your side when you are done; nothing on the WASViking side can delete it for you.