
Triage your first SAST finding
Open the first weakness WASViking found in your source code, read the evidence down to the file and line, decide what to do with it and confirm it closes on its own after the fix.
Once Set up Code Security has produced its first run, the weaknesses WASViking® found in your source code are waiting in Findings, next to everything the platform found in traffic. This page walks one of them from the list to closure: where to find it, how to read the evidence, how to record a decision and how the platform confirms the fix without anyone reopening the ticket.
Before you start
- A monitored repository with at least one completed run. The row on Application Security → Code Security shows Completed under Last scan and a count under WASViking SAST Findings.
- Access to Findings. Reading is open to every role; changing the status or the owner of a finding follows the permissions of your role.
Step 1: open the SAST findings of a repository
The shortest path starts on the Code Security page. On the row of the repository, the chips under WASViking SAST Findings name the weakness classes found (for example IDOR, BOLA, BAC, Clickjacking). Click Open findings to land in Findings already filtered by that repository, by the category Broken Access Control (IDOR, BOLA, BFLA, clickjacking) and by the status Open and active.
From Findings itself, set Category to the same value, pick the repository under Repository and leave Status on Open and active. The counter above the table tells you how many findings match and the active filters appear as chips you can remove one by one.
Each row shows the risk score, the severity, the title, the OWASP category and the asset. Sort defaults to Severity first, so the finding to look at first is at the top.
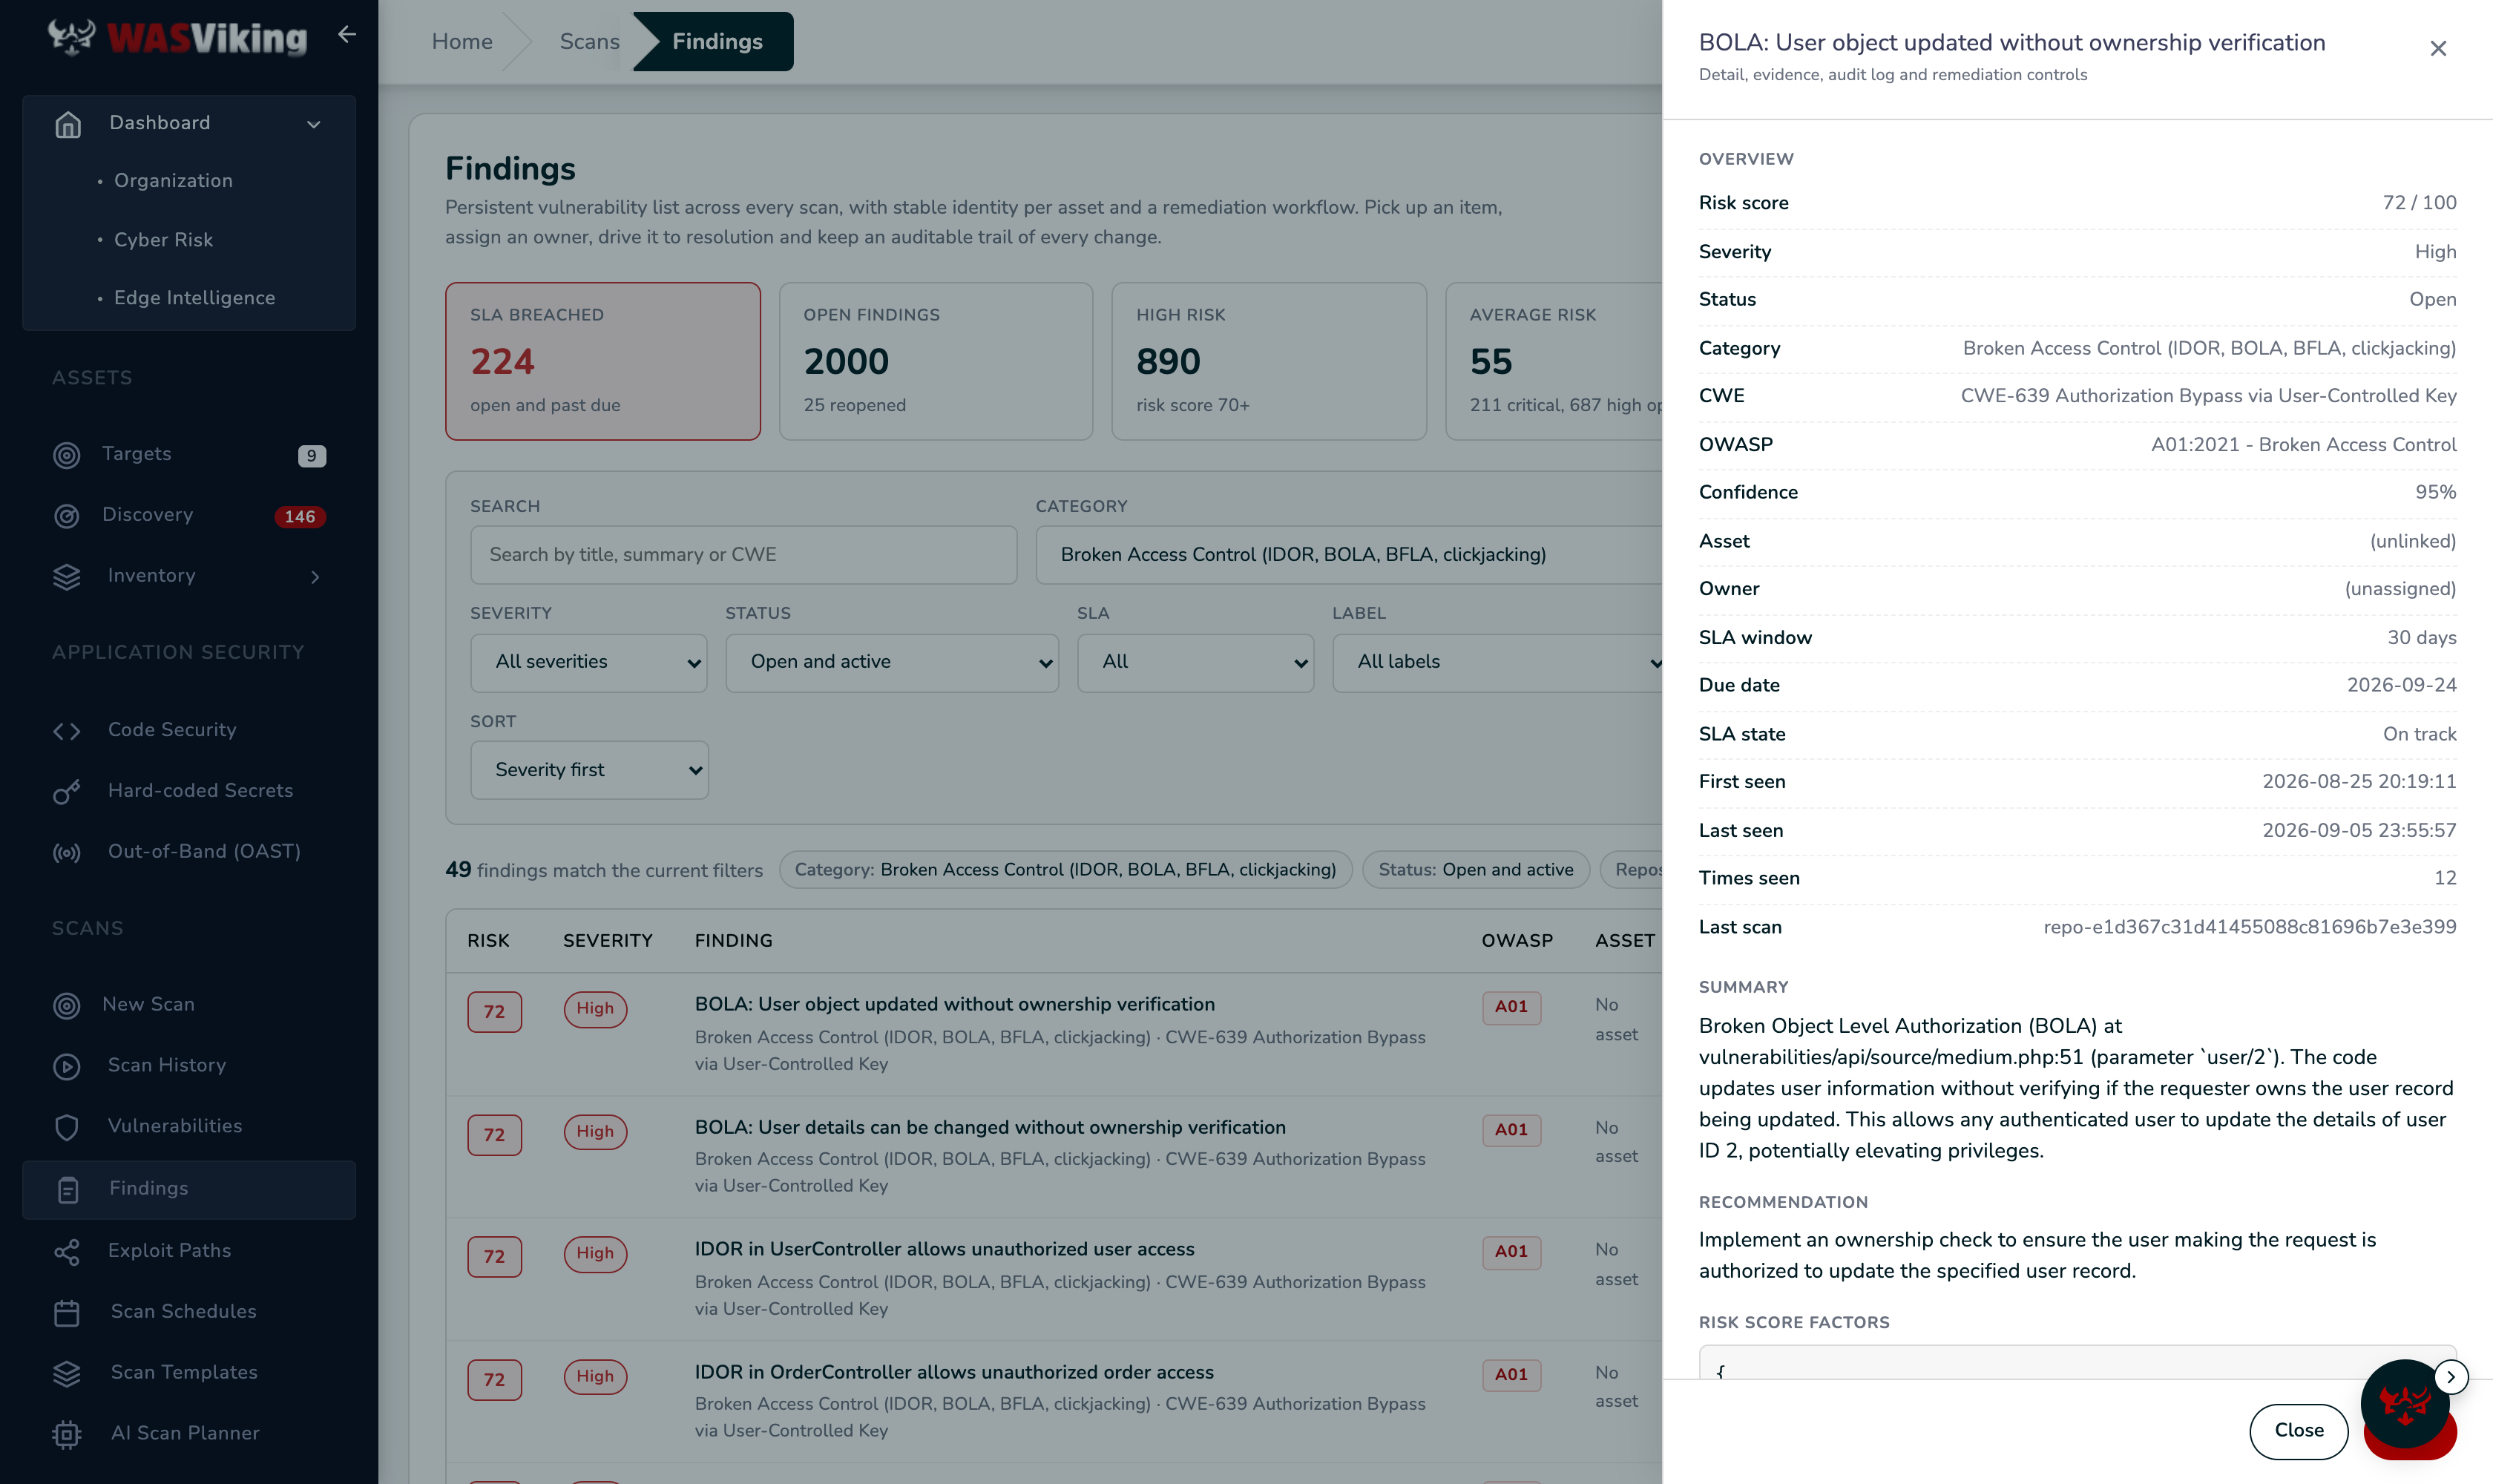 Findings filtered by repository and category. Clicking a row opens the panel with the overview, the summary and the recommendation.
Step 2: read the evidence
Click the row. The panel opens on the right with everything the analysis knows about the weakness.
Overview carries the fields the rest of the platform uses for every finding: risk score, severity, status, category, CWE, OWASP category, confidence, asset, owner, SLA window, due date, SLA state, first seen, last seen, times seen and the last scan that saw it. Summary states the weakness in one paragraph with the file, the line and the parameter. Recommendation is the fix for that exact code, not a generic guideline.
Scroll to the block titled WASViking SAST Findings. This is the source-level evidence:
- the weakness class, then Location (file and line), Route / function, Attacker input (the parameter an attacker controls) and Language;
- Why this is exploitable, in plain language, and the Attack scenario that reproduces it;
- Vulnerable code, the excerpt with the vulnerable line highlighted;
- References to the OWASP and CWE entries behind the class, and the Audit log of the finding, starting with the scan that created it.
Every quoted line was verified against the real file before the finding was created. If the analysis could not ground a weakness in the code, it was discarded, so what you see in this block is in the repository at the commit shown under Last scan.
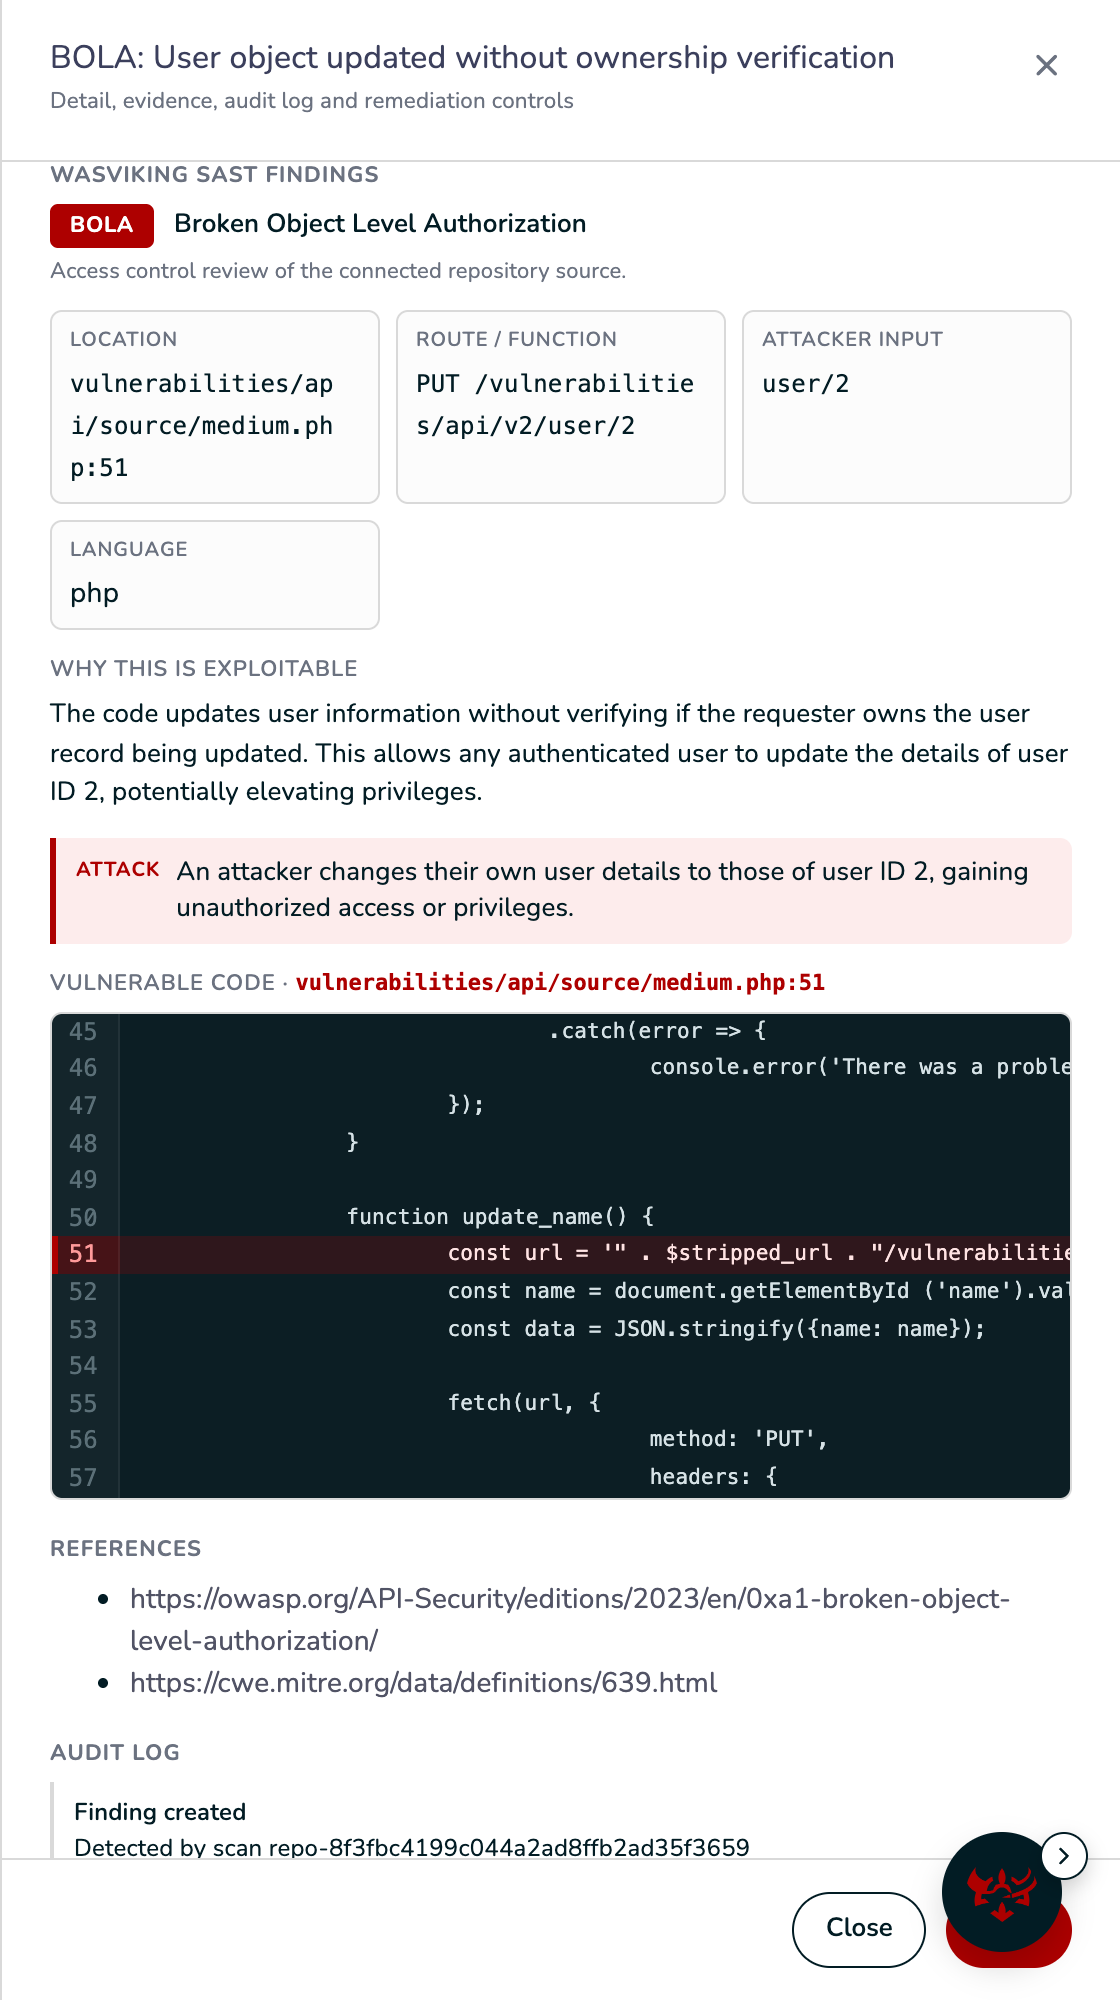 The evidence block: location, route, attacker input, why it is exploitable, the attack scenario and the vulnerable code with the line highlighted.
Reading order that works: the attack scenario tells you whether the weakness is reachable in your deployment; the route and parameter tell you which request to try; the excerpt tells the developer where to look.
Step 3: decide and record the decision
The bottom of the panel holds the remediation controls. Pick New status, add a Comment (audit log) and click Save.
| Decision | What to set | What happens next |
|---|---|---|
| Someone will fix it | In progress, plus an Owner | The finding stays in the open count and the SLA clock keeps running until it is resolved. |
| The risk is understood and accepted for now | Accepted risk, with Accepted for (days) | The finding leaves the open count and returns for review when the acceptance expires. |
| The analysis is wrong for this code | False positive, with a comment explaining why | The finding is closed with that reason on record. |
| The code is already fixed | Resolved, or leave it and let the next scan confirm it (Step 4) | Resolved findings reopen on their own if the weakness comes back. |
Severity override lets you raise or lower the severity when your context justifies it; the original stays on record. Every change lands in the Audit log section of the panel with who did it and when, and new or reopened findings reach Slack, Teams, Jira, ServiceNow or a webhook through the same notification rules as every other finding.
Step 4: fix the code and let the platform confirm it
Push the fix to the default branch. A push triggers a scan right away when the interval since the last scan has elapsed; otherwise click Scan now on the repository row under Application Security → Code Security. The file that carried the open finding is reviewed again on every scan.
The finding resolves on its own once two consecutive reviews of the same file no longer find the weakness. Nothing to click. If the weakness returns in a later commit, the same finding reopens with its history intact, so the team sees a regression, not a new item. The SLA clock and the risk score follow the same rules as a finding from a scan of the running application.
Step 5: hand over the record
Report on the repository row produces a PDF with every open finding of that repository by engine, including the SAST section with the evidence, for a code owner or an auditor. For a fleet view, the WASViking SAST Findings tile on the Code Security page counts open weaknesses across every monitored repository.
Where to go next
- The capability in full: Code Security.
- How risk scores, SLAs and statuses work for every finding: Findings and Risk Score.
- Routing findings to your tools: Slack and Teams, Jira, ServiceNow, Webhooks.