
Connect a Google Cloud project
Connect a Google Cloud project step by step. Register the project, create the read-only identity with the generated Terraform module, the gcloud script or the console steps, paste the service account and the identity provider, validate the permissions, choose whether changes are evaluated in real time from Cloud Audit Logs, and read the first results.
This guide connects a Google Cloud project to WASViking® Cloud Security next to your AWS accounts, in the same screens. By the end the project is read through an identity you own, every resource is in the inventory and evaluated, and the first contextual risks and attack paths are on screen in Google Cloud words. Nothing here creates a key: you create a service account in your project with a custom role that can only list and read configuration, and WASViking is federated into it for one hour at a time through a workload identity pool that accepts one subject only.
Before you start
Cloud Security is an add-on module, available from the Pro plan, enabled per organization by your WASViking contact or partner. The package includes one connected account; an AWS account and a Google Cloud project each count as one. Registering and validating connectors needs the Manage permission on the module.
On the Google Cloud side you need someone who administers the project you are connecting: the Owner role, or Project IAM Admin, Service Account Admin, Role Administrator, Workload Identity Pool Admin and Service Usage Admin together. That person applies the Terraform module, runs the gcloud script in Cloud Shell, or follows the console steps.
Have at hand the project id (the lowercase identifier, not the project number and not the display name) and the e-mail of the team that owns the project.
The identity needs five Google APIs enabled in the project: IAM, IAM Service Account Credentials, Security Token Service, Cloud Resource Manager and Service Usage. The module and the script enable them; the console steps say where. The APIs of the services you use stay as they are: a service whose API is disabled reads not enabled in the validation and its resources are simply not read.
Step 1: register the project
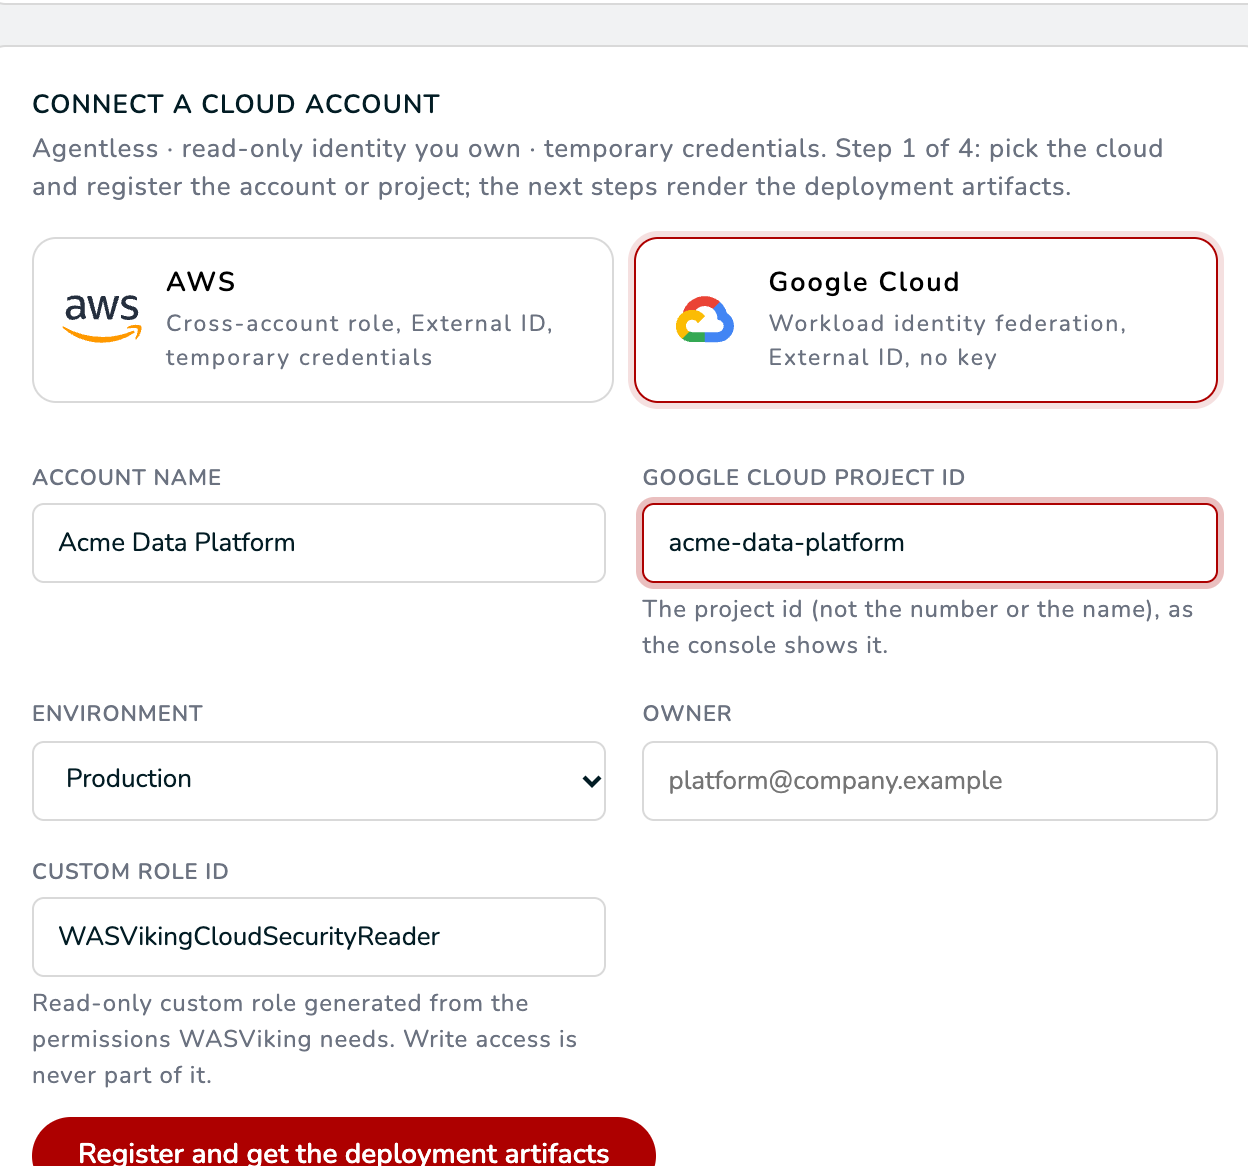
Open Cloud Security → Accounts & Connectors and click Connect account. Choose the Google Cloud card and fill in:
- Account name, as your team calls the project ("Data platform", "Payments production").
- The Google Cloud project id: 6 to 30 characters, lowercase letters, digits and hyphens, starting with a letter, as the console shows it.
- Environment: Production, Staging, Development, Shared, Security, Sandbox or Audit. The environment weighs the risk score of every resource in the project.
- Owner: the e-mail that receives the project's health notices.
- Custom role id:
WASVikingCloudSecurityReader, which you may rename.
The right panel shows what the pool you are about to create will trust: the WASViking AWS account and its federation role, the exact subject the pool accepts, an External ID generated for this connector only, the service account name, the custom role name and Write access: No. Click Register and get the deployment artifacts. The project now appears in the accounts table and the wizard can be resumed from there at any time.
Step 2: create the read-only identity
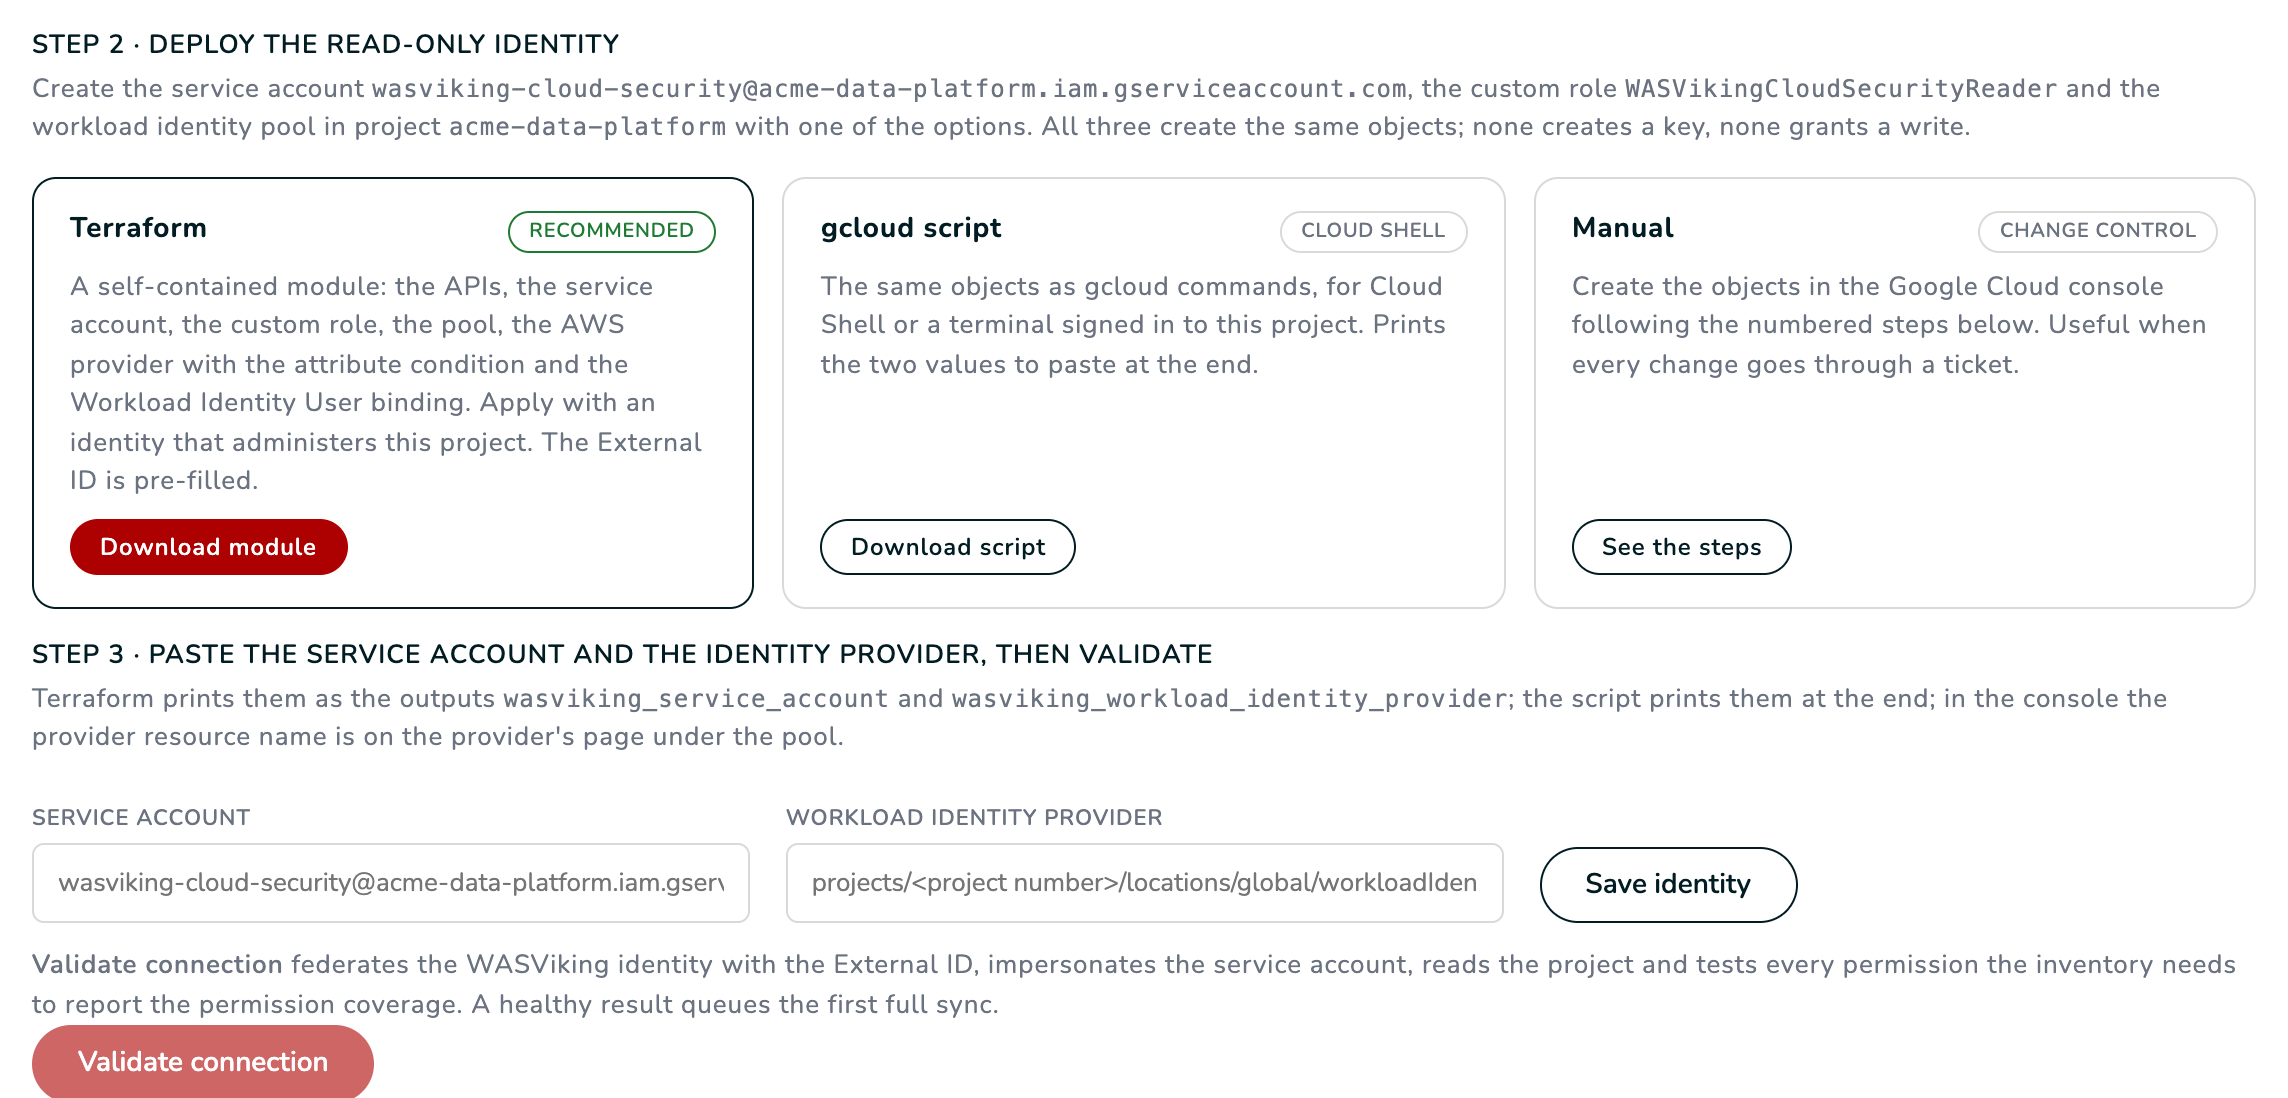
The deploy page offers three ways to create the same objects in your project. All three create the service account, the custom role and the workload identity pool; none creates a key and none grants a write.
- Terraform (recommended): Download module and apply it with an
identity that administers the project: in Cloud Shell, upload the file
to an empty directory, then run
terraform initandterraform applythere. The module enables the five APIs, creates the service accountwasviking-cloud-security@<project id>.iam.gserviceaccount.comwithout a key, creates the custom role with the read permissions the inventory needs and grants it to the service account, creates the poolwasviking-cloud-securitywith an AWS provider namedwasviking-awsthat names the WASViking account, sets the attribute condition that accepts only the subject carrying your External ID, and binds Workload Identity User for that subject on the service account. The External ID is pre-filled. - gcloud script: Download script and run it in Cloud Shell or a terminal signed in to the project. It creates the same objects and prints the two values you paste in Step 3.
- Manual: See the steps and create the objects in the console in order: enable the APIs; create the service account without a key; create the custom role with exactly the permissions listed (every one is a list, get or getIamPolicy read); grant that role to the service account and nothing else; create the pool and its AWS provider with the attribute mapping and the attribute condition shown; grant Workload Identity User on the service account to the subject shown; then paste the two values.
The External ID is shown on this page to members with the Manage permission, with a copy button; it never appears in lists, notifications or exports. If it ever leaks, Rotate External ID issues a new one and keeps the previous one valid for 24 hours so you can update the attribute condition and the binding without an outage. While the window is open the deploy page shows a Rotation pending block with the three gcloud lines that move the trust (update the attribute condition, add the new binding, remove the old one): paste them in Cloud Shell, then validate. With Terraform, download the module again and apply it in the same directory as the first time (its state lives there; a new directory would try to create the objects again).
Step 3: paste the service account and the identity provider, then validate
Terraform prints the two values as the outputs
wasviking_service_account and wasviking_workload_identity_provider;
the script prints them at the end; in the console the provider resource
name is on the provider's page under the pool and reads
projects/<project number>/locations/global/workloadIdentityPools/wasviking-cloud-security/providers/wasviking-aws.
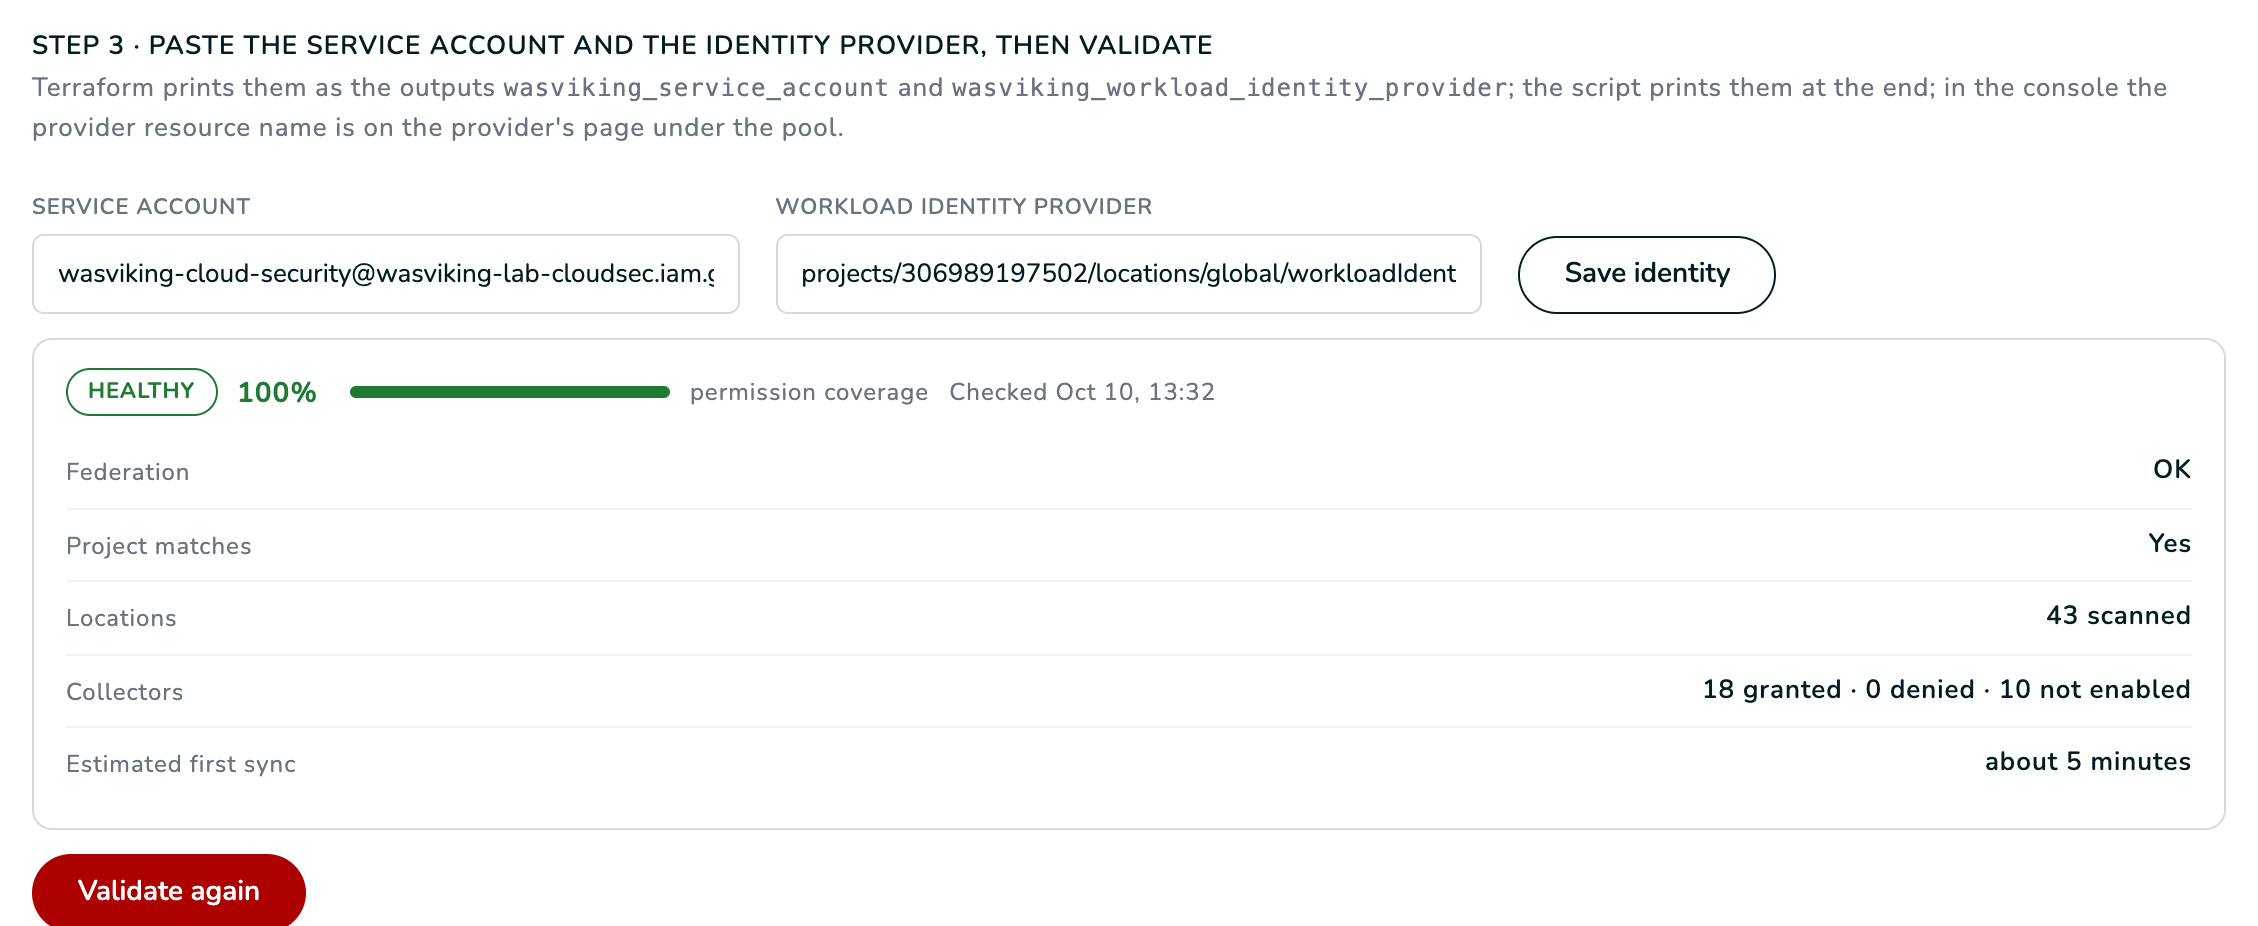
Back on the deploy page, paste the service account e-mail into Service account and the provider resource name into Workload identity provider, click Save identity, then Validate connection. The validation federates WASViking's identity into the service account, checks that the project it answers for is the one you registered (id and number), reads the enabled services, tests every permission of the custom role and discovers the Compute Engine regions. The result shows:
- the identity federated and the project matched,
- the regions that will be read,
- the services whose API is not enabled, if any (their resources are not read; nothing to fix unless you use them),
- Permission coverage: the share of reads the custom role can make,
- the missing permissions, if any, with a Fix access block: one gcloud line that adds them to the custom role, and the lines to paste in the Terraform module (a read that only an optional signal needs is listed there too, with the name of its collector; it does not lower the coverage, but that signal stays unread until you grant it),
- the estimated duration of the first sync.
A validation that fails stays on this step with the reason and what to change (see Troubleshooting). A validation that succeeds marks the project Healthy, or Permission gap when some reads are denied, and queues the first full sync at once. Both states are synced; a gap only means some controls read Not evaluated until you add the permissions.
Step 4: enable real-time evaluation (optional)
Without this step the project is read every 24 hours (configurable in Settings) and every change is recorded from the difference between two syncs. With it, an administrative change in your project reaches WASViking within a minute through Cloud Audit Logs and is judged as risk introduced, removed or none, with the actor and the tool that made it.
Click Download events Terraform or Download events script, or
follow the steps on the page. The Terraform file is self-contained:
apply it in a directory of its own, separate from the Step 2 module
(terraform init, then terraform apply); the script runs with bash
in Cloud Shell. They create, in your project, a log sink
named wasviking-cloud-security-events on the Admin Activity audit
logs, a Pub/Sub topic and a pull subscription of the same name (60
second acknowledgement deadline, one day of retention), grant the
sink's writer identity Pub/Sub Publisher on the topic and grant the
WASViking service account Pub/Sub Subscriber on the subscription.
WASViking pulls the subscription through the connector's own identity;
it carries configuration events only, never data. The step shows a
state rather than a switch: Waiting for events until the first one
arrives, Receiving events with the time of the last one afterwards,
or Paused when the organization turned real-time evaluation off in
Settings. The accounts table reads Periodic, Receiving or Paused for
each connector.


Optional, for the sensitive stores: the same sink can also carry the
Data Access audit logs of Cloud Storage, BigQuery, Cloud SQL and Secret
Manager. Enable Data Read logs for those four services under IAM &
Admin, Audit Logs, then set data_access_logs = true in the events
Terraform file (or run the script with DATA_ACCESS_LOGS=1), or widen
the sink's inclusion filter to the one the page shows under the manual
steps. WASViking keeps those reads as access signals on each store,
never as changes: the page of a bucket, dataset, Cloud SQL instance or
secret shows Reads observed with the reads of the last seven days,
how many principals made them, the five busiest and the last moment.
The counters are kept per store, principal and day for thirty days and
carry no object, row or payload. Data Access logs are billed by Cloud
Logging like any other log; the filter names the four services only.
A connector scoped to an organization or a folder puts the sink at the organization with its children included, so the events of every project under it reach the central subscription and WASViking routes each one to the project it names.
Without Step 5, every finding still carries its guided plan in four forms (console steps, gcloud, Terraform and the organization policy constraint that prevents the state) and you apply it yourself.
Step 5: allow assisted remediation (optional)
Every finding ships with a guided plan you apply yourself. Step 5 lets WASViking apply a short list of fixes for you, each one a reversible configuration change: enforce public access prevention on a bucket, remove the public members of a bucket policy, disable a firewall rule open to the world, drop the public address of a Cloud SQL instance, enable rotation on a Cloud KMS key, disable a user-managed service account key. Nothing runs without a request on a work item and an approval under the governance policy you set.
The step creates a second service account in your project, separate from the read-only one, with a custom role that holds only the permissions of the actions you tick, and a second provider on the same workload identity pool whose attribute condition names the remediation subject only (a Remediation External ID generated for this identity). Tick the actions, click Enable assisted remediation, download the remediation Terraform and apply it in an empty directory next to the Step 2 module (or follow the manual steps), then click Validate remediation identity; the step reads Ready when WASViking federated into the second service account and proved it holds the permissions of the actions you enabled. Nothing is pasted: the names are fixed and shown on the page. Changing the list later asks you to download the module again, apply it from the same directory as the first time (Terraform keeps its state there; a new directory would try to create what already exists) and validate again; Disable assisted remediation forgets the identity on our side, and you delete the service account, its role and the second provider in Google Cloud.
Then open Settings, turn on Assisted remediation governance, choose whether every action needs an approver or only the high impact ones, keep the rule that the requester never approves their own request, and tick the actions and the environments you allow. On a work item the block Assisted actions lists what applies to its resource with what changes and how it rolls back; Request this action creates a record that an approver decides on the same page (Approve and run or Reject with a note), and the approvers' channels receive the request when they subscribed to the event. The record keeps who asked, who decided, what was read before the change and what was written; Roll back writes the previous state back. The next scoring pass verifies the item like any fix made by hand.
The first sync
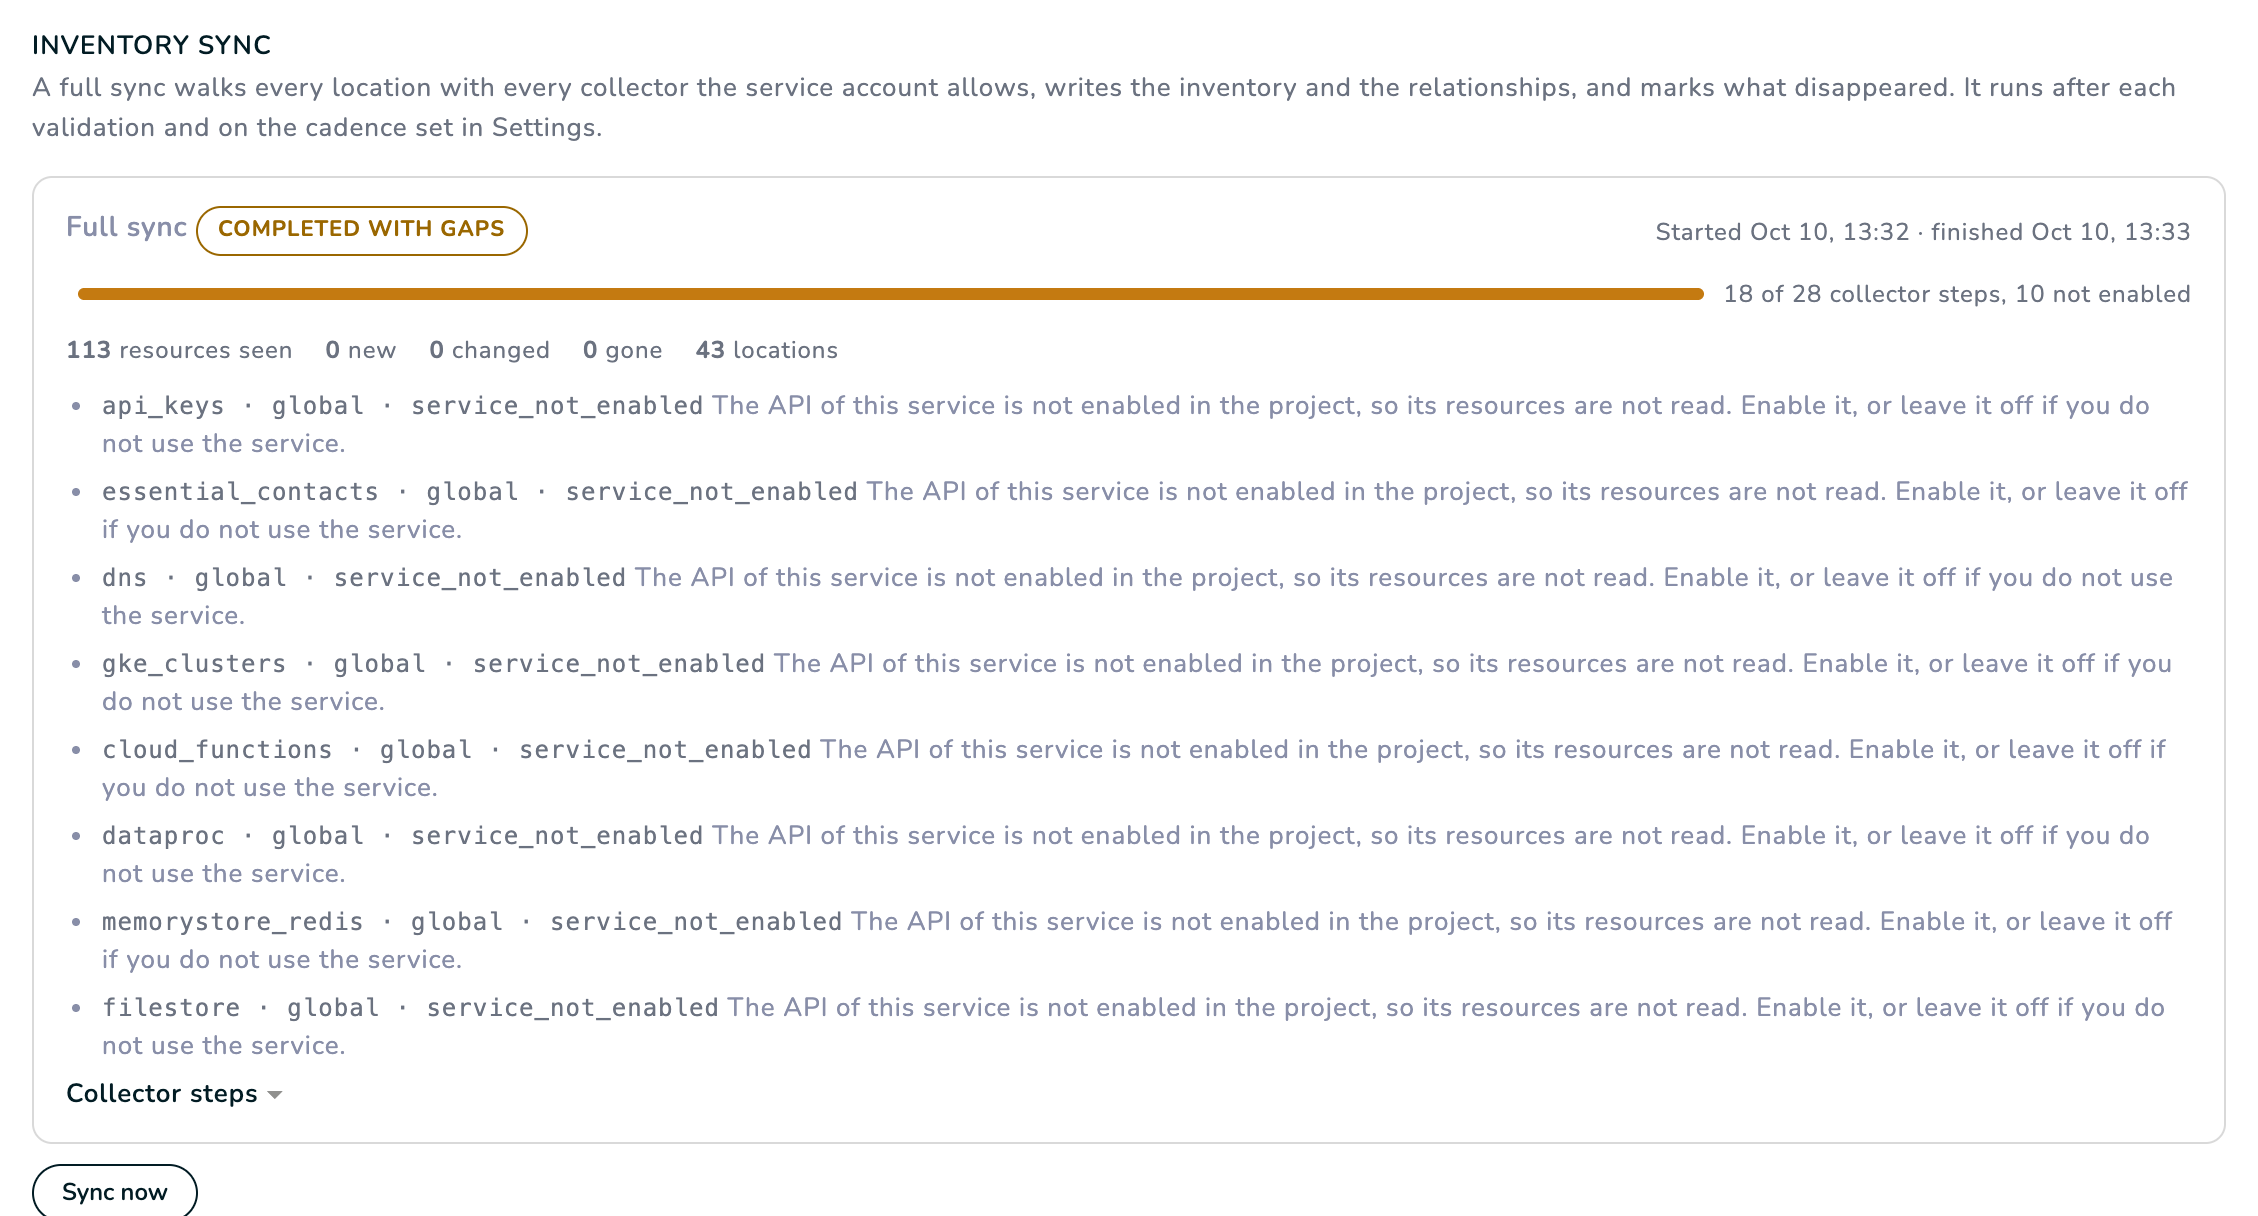
The accounts table shows the sync progressing by collector (the project and its IAM policy, service accounts and keys, custom roles and API keys, networks and firewall rules, load balancing and Cloud DNS, Compute Engine, GKE, Cloud Functions, Cloud Run, Dataproc and Artifact Registry, disks, snapshots and images, Cloud Storage, Cloud SQL, Cloud KMS, Secret Manager, BigQuery, Memorystore, Filestore, Pub/Sub, logging and monitoring, Vertex AI). The Overview stays in its "first sync running" state until the evaluation completes, then shows the Cloud Risk ring with every point named, the posture by domain and the first findings. The controls of a Google Cloud project are referenced to the CIS Google Cloud Platform Foundation Benchmark, PCI DSS 4.0.1 and NIST SP 800-53; the Compliance page shows the CIS Google Cloud card for the project.
What to look at next:
- Overview: the coverage confidence banner (if below 100 percent, open the gaps and apply the Fix access line), the top toxic combination and the highest priority risks.
- Posture Findings: start with the Contextual risks tab; each one names the components of the combination and how to break it. The Control failures tab filtered by the project lists every failing control with its CIS Google Cloud reference.
- Attack Paths: the featured chain and its recommended break option, written in Google Cloud words (public access prevention, allUsers, the roles to replace, the authorized networks to narrow).
- Cloud Inventory: open any resource to read its configuration, the graph around it and its exposure path (the external address, the VPC network and the firewall rules that admit the internet to it).
- Architecture Map: the project drawn with its VPC networks at the project level, their subnetworks, the regions and the services that run in each one.
Reading every project of an organization or a folder
One connector can read every project under a Google Cloud organization
or under one of its folders. In Step 1, fill Organization or folder
scope with the node (organizations/123456789012, the number the
console shows under IAM & Admin, Settings, or folders/987654321, the
number in the folder's page) and register a project of yours as the
central project: the service account and the pool are created there, while the
custom role is created at the organization and bound at its node. The
artifacts of Step 2 carry that difference; apply them with an identity
that holds, at the organization node, Organization Role
Administrator (roles/iam.organizationRoleAdmin, to create the
custom role there) and Organization Administrator
(roles/resourcemanager.organizationAdmin, to bind it). An identity
that only creates projects is refused at the role with iam.roles.get;
grant the two roles and apply again, the module continues where it
stopped.
After the first sync of the central project, every active project under the organization and its folders appears in the accounts table as a connector of its own, with its folder path, marked Discovered project. A discovered project needs nothing deployed: it reads through the central connector's identity and External ID, validates itself as soon as it is discovered and runs its first sync right after, so the whole estate connects itself from one registration. Validate all on the accounts table remains for a project that was refused meanwhile; real-time (Step 4) is enabled per project. A project you remove is not registered again; a project created later appears on the next sync of the central project. A rotation of the central connector's External ID moves every discovered project with it.
With a folder node the custom role is still created at the
organization (Google Cloud creates custom roles at the organization or
at a project, never on a folder) and bound at the folder: the module
looks the organization up from the folder, the script walks the
folder's parents, the console steps name it. Apply with an identity
that holds Organization Role Administrator at the organization and
Folder IAM Admin on the folder. The Fix access line of a
folder-scoped connector names the organization as ORGANIZATION_ID,
since the identity reads nothing above the folder: replace it with the
organization number before running it.
Day two
- Settings: the label
data-classificationon a bucket, a dataset or a Cloud SQL instance declares its classification (pii, pci, phi, secrets, internal), the labelpublic-by-designon an instance or a Cloud Run service declares that it answers the internet on purpose, and the owner, environment and criticality label keys are the ones you set there, as on AWS. - Policies & Controls: the policy packs apply to both providers; the control library lists the Google Cloud controls with their CIS references; exceptions are time bound and need an approver.
- Data Security: set a classification by hand on a store the inference got wrong; the manual value survives every later sync.
- Reports & Evidence: the executive PDF, the posture and inventory exports and the evidence pack include the Google Cloud project next to the AWS accounts.
- Permission baseline: the reads the custom role needs grow when WASViking adds a check. The module and the script carry the baseline version; when a validation finds your role behind it, the connector page shows the gcloud line, the accounts list marks the project and one notice goes to your channels per version. Run the line or apply the module again; WASViking never changes the role itself.
- Workspace directory: two controls read your Google Workspace directory, 2-Step Verification on every user and enforced on every administrator, and the identity page shows the MFA badge of each person. The Admin SDK is not covered by the custom role: in the Google Admin console, Account, Admin roles, create a role with the Users read privilege and assign it to the connector's service account, then enable the Admin SDK API on the project. Until then those two controls read Not evaluated and the badge reads n/a; WASViking keeps counts and four facts per address (two-step, enforced, administrator, suspended), never a name or a password fact. Access Transparency is verified when Access Approval is enrolled or an Access Transparency log entry exists for the project; otherwise it reads Not evaluated rather than failing on what no API tells.
- Native signals: with Security Command Center activated (the Standard tier is free; activate it on the organization, or on the project alone when you do not administer the organization) and its API enabled on the project, the active findings count toward the detection controls. With the Sensitive Data Protection API enabled, every completed inspection job classifies the bucket or dataset it scanned by what it found, which beats the label and the name. Both are read by the custom role; a role created before these reads existed shows them under Fix access.
- More projects: one connector is one project; repeat the four steps per project. The Terraform module takes the project id and the External ID as variables, so a second project is a second apply.
Troubleshooting
| What you see | What it means | What to do |
|---|---|---|
| The identity could not be federated into the service account | The pool, its AWS provider, the attribute condition or the Workload Identity User binding is missing, names another account, or carries another External ID. | Compare the provider and the binding with the subject shown on the deploy page; re-apply the module or the script. |
| The pool refused every External ID WASViking knows | The attribute condition and the binding still carry a retired External ID. | Update both with the External ID shown on the deploy page. |
| The service account, the identity provider or the project answered for a different Google Cloud project | The values you pasted belong to another project, or the project number of the provider does not match the registered project. | Paste the values of the registered project, or register that project separately. |
| WASViking's own federation identity was unavailable | A condition on the WASViking side. | Nothing to change on your side; the check is retried within the hour. |
| Validation failed seconds after you applied the module or the script | IAM bindings in Google Cloud take up to a minute to propagate; the first check can arrive before them. | Wait a minute and click Validate again. |
| Permission gap with a list of permissions | The identity works but some reads are denied. | Run the Fix access gcloud line (or paste the Terraform lines), then validate again. |
| Healthy at 100 percent, yet a Fix access block, or Behind baseline on the accounts list | Your custom role was created before WASViking added a read (the coverage does not count an optional one); a notice reached your channels once for this version. | Run the Fix access gcloud line, or download the module again and apply it, then validate again. |
| A service reads not enabled | The API of that service is disabled in the project. | Enable it if you use the service; otherwise nothing to do, its resources are not read. |
| Waiting for events stays for hours | The sink and the subscription were not created, the subscriber binding is missing, or the organization paused real-time evaluation. | Apply the events artifacts; check Settings. |
| A control reads Not evaluated | A permission the control needs is missing, the API of its service is disabled, or the policy pack that carries it is off. | Open the project's validation for the missing permissions, enable the API, or enable the pack. |
| A Sensitive Data Protection inspection job fails with unable to read from path | The service agent of that service (service-<project number>@dlp-api.iam.gserviceaccount.com) has no read access to the bucket. |
Grant it Storage Object Viewer on that bucket and create the job again; the next sync reads the completed job. |
Removing a project
Remove on the accounts table stops the reads at once. The inventory and the evidence are kept for the deleted-resource retention window set in Settings so reports stay reproducible, then purged. Destroy the Terraform module (or delete the pool, the service account and the custom role in the console) on your side when you are done; nothing on the WASViking side can keep them.